Set up calls
The following section provides everything you need to know about setting up calls inside Conversations and how agents can receive and make calls, as well as the details about video call options available to agents during their conversations with customers.
For additional details on how to setup the general behavior of a contact center, such as for queues, routes, SLA, and more, see Conversations setup.
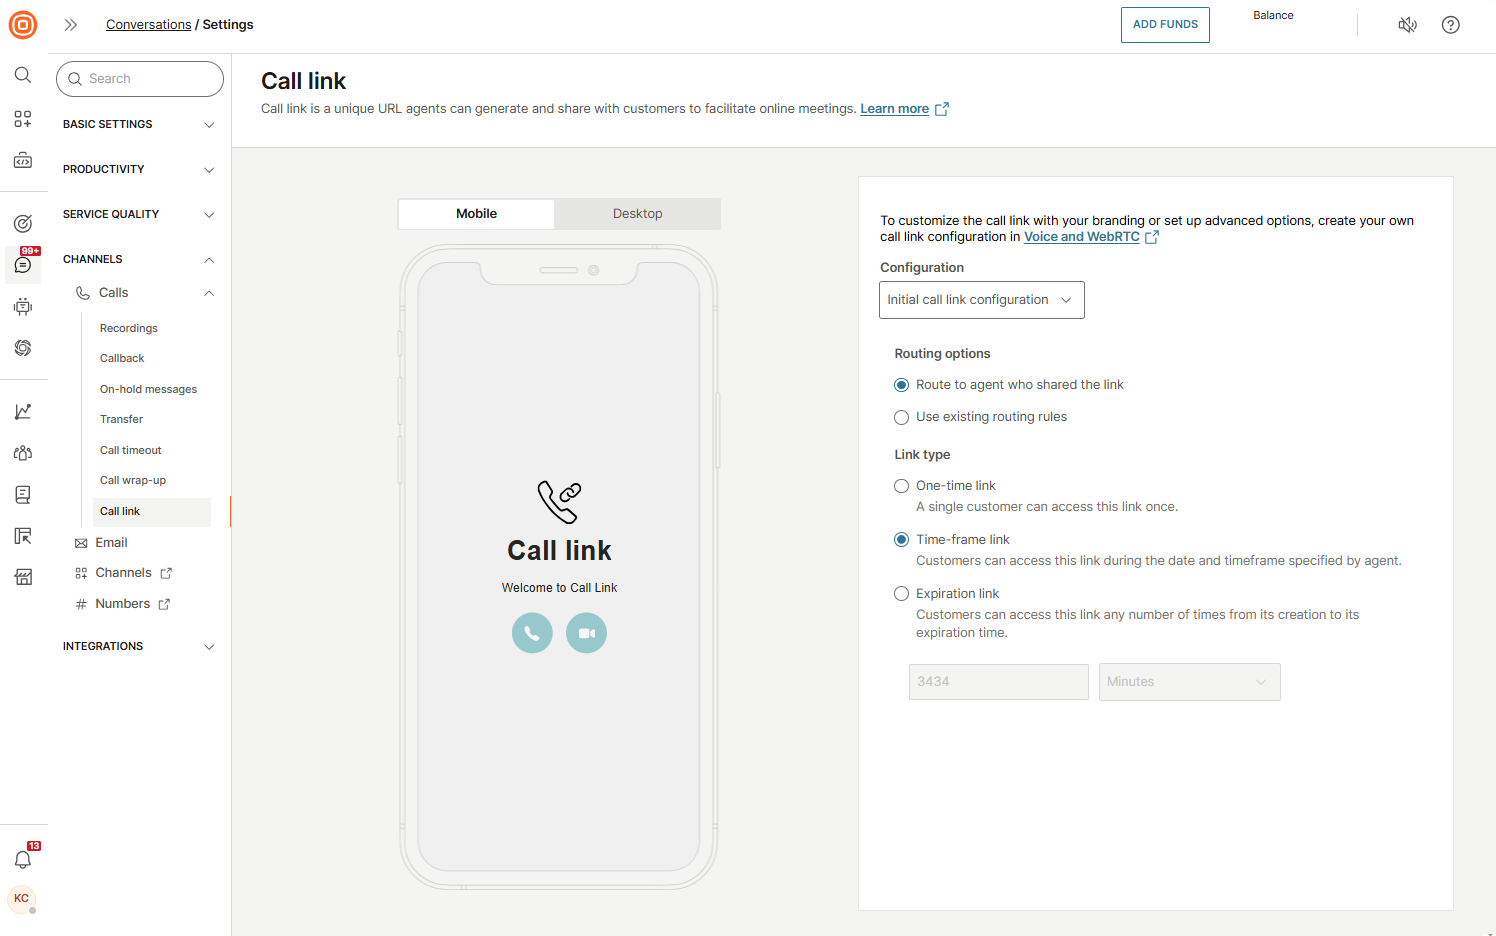
Call link
The Call link feature allows agents to instantly connect with customers through audio or video calls, without requiring any app installation or development. Customers receive a link and can join the conversation directly, choosing the format that best suits them.
If no setup is created, the default call link configuration will be applied.
Set up a call link [#set-up-a-call-link-call-link]
To set up and modify the behavior associated with the call link according to your preferences, it is necessary to:
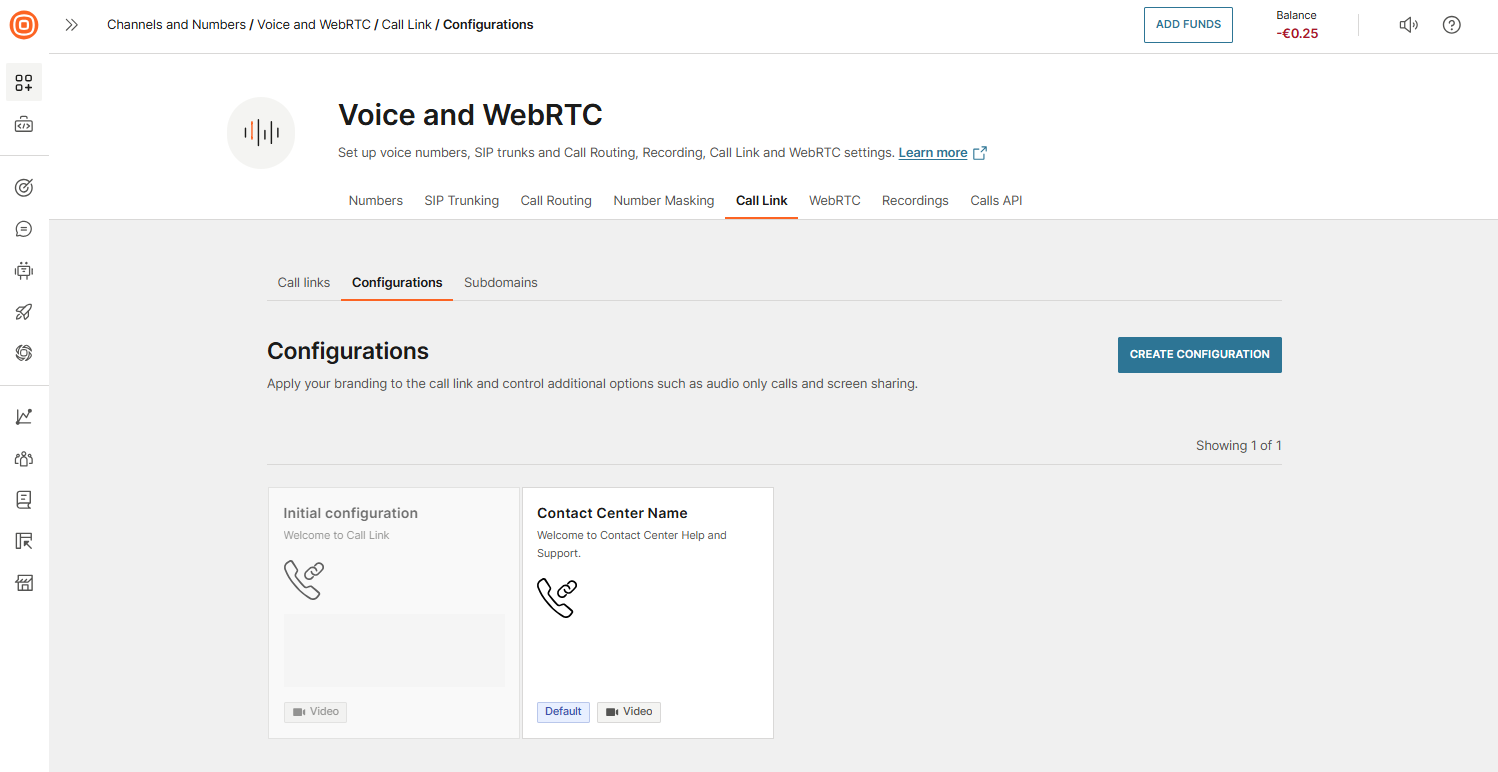
- Go to Channels and Numbers → Channels → Voice and WebRTC → Call Link → Configurations.
- Select the Create configuration button to create a new configuration according to your preferences. More information on how to create the configuration can be found here.
- Go to Conversations → Settings → Channels → Calls → Call link.
- In the Configuration drop-down, select the configuration you want to use.
- Set the desired routing options:
- Route to agent who shared the link
- Use existing routing rules
- Choose what link type you want to use:
- One-time link (usable once by a single customer)
- Time-frame link (valid within the date and timeframe set by the agent)
- Expiration link (usable multiple times until its expiration)
Customer experience with call link [#customer-experience-with-call-link-call-link]
When customers receive and click a generated call link, a web page opens with two options:
- Start audio call
- Start video call
During the call, customers can:
- Drop the call
- Mute themselves
- Share their screen
- Turn the camera on or off
- Switch between front and back cameras (on supported devices such as smartphones and tablets)
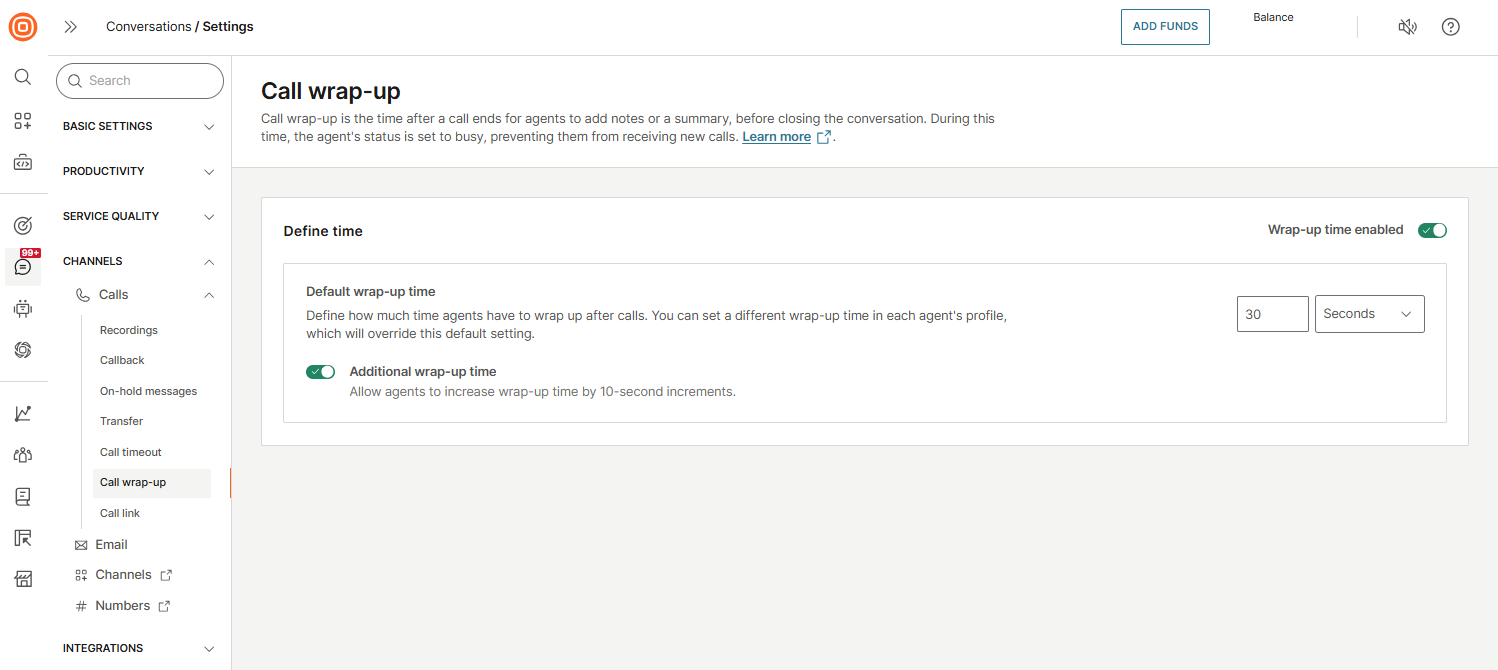
Call wrap-up
To set the default duration for the wrap-up window:
- Go to Conversations → Settings → Channels → Calls → Call wrap-up.
- Enable the toggle to activate wrap-up time.
- In the Default wrap-up time section, specify the time assigned to agents for completing post-call wrap-up activities.
- Additionally, you can allow agents to extend their wrap-up time in 10-second increments by turning on the Additional wrap-up time option. If this option is enabled, agents will see a +10 seconds button, which they can use to add extra time as needed.
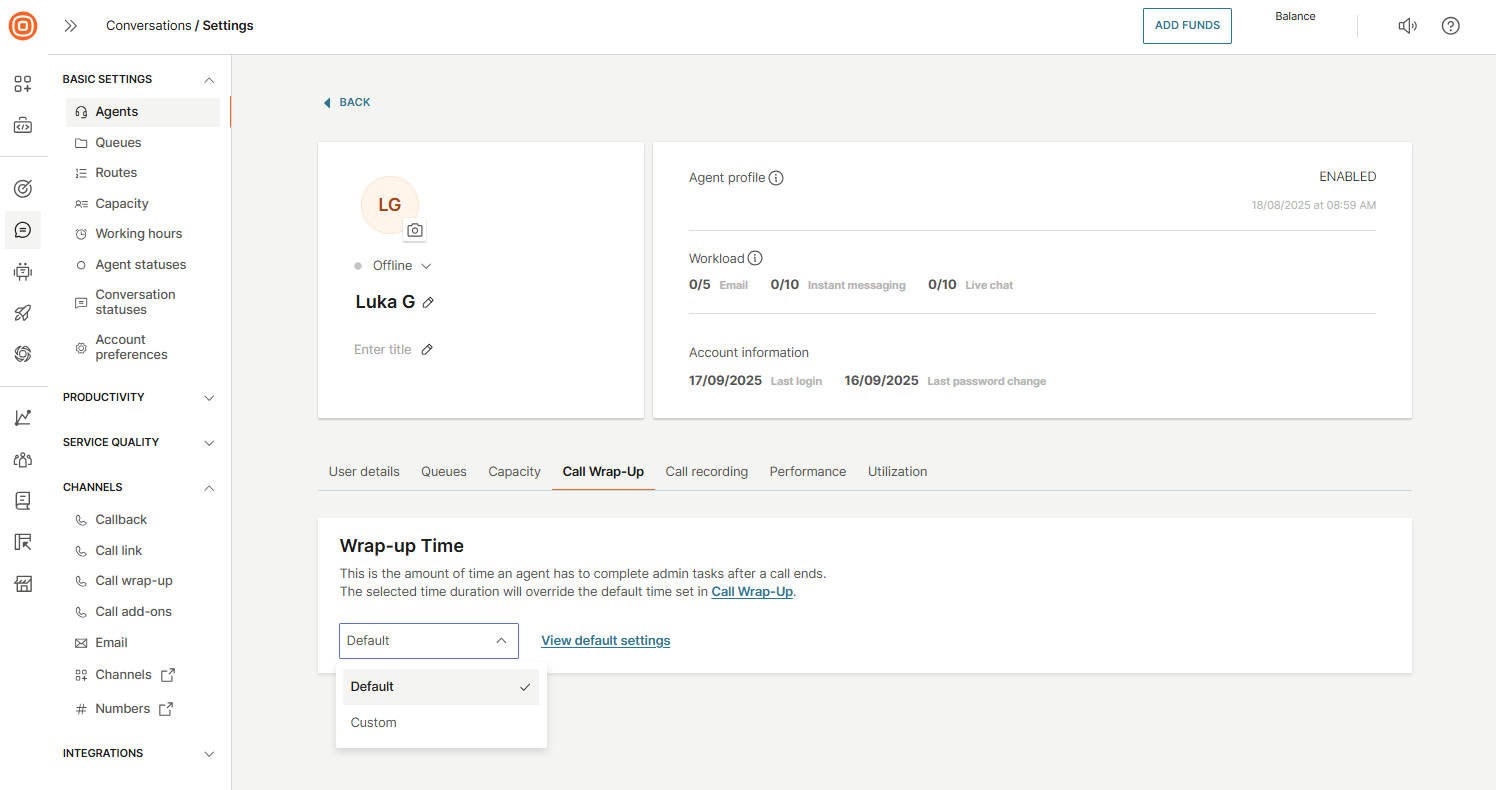
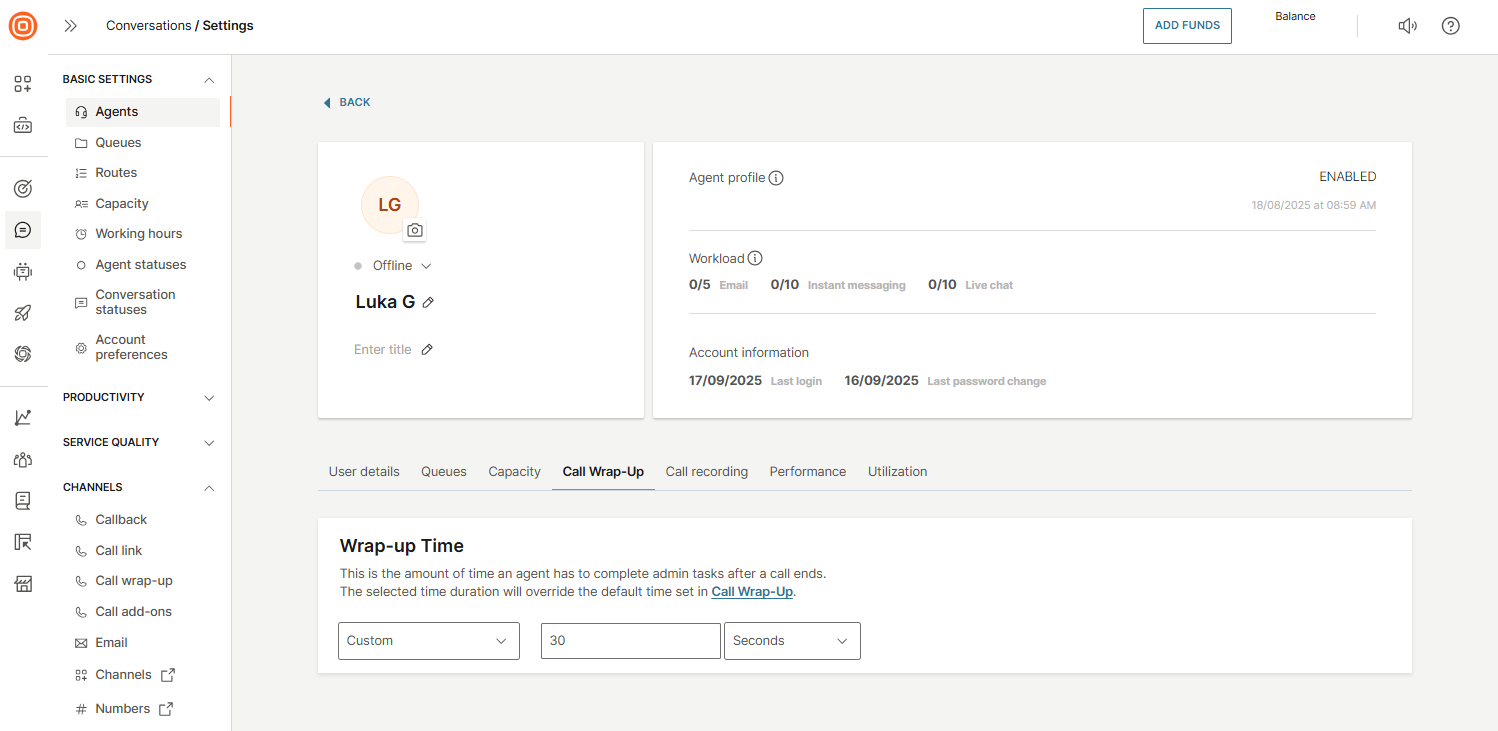
Adjust call wrap-up for individual agents [#adjust-call-wrap-up-for-individual-agents-call-wrap-up]
Wrap-up time can be customized at the agent level, as not all agents handle the same types of calls or possess the same skill sets.
To adjust an individual agent's wrap-up time:
- Go to Conversations → Settings → Basic settings → Agents.
- Choose the agent you want to update the wrap-up time for.
- Go to the Call wrap-up tab.
- Choose whether to use the default wrap-up time or set a custom duration.
- If you select Custom, enter the amount of time agents will have for wrap-up. This custom duration will override the default time set in the Call wrap-up section mentioned above.
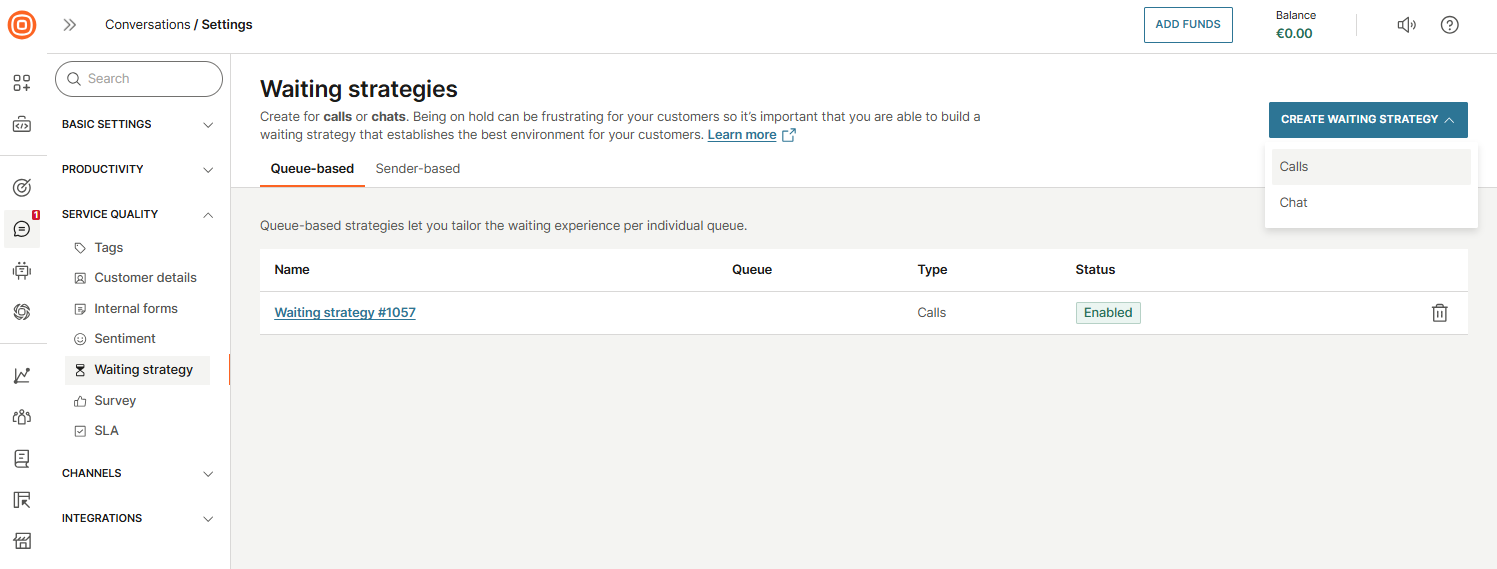
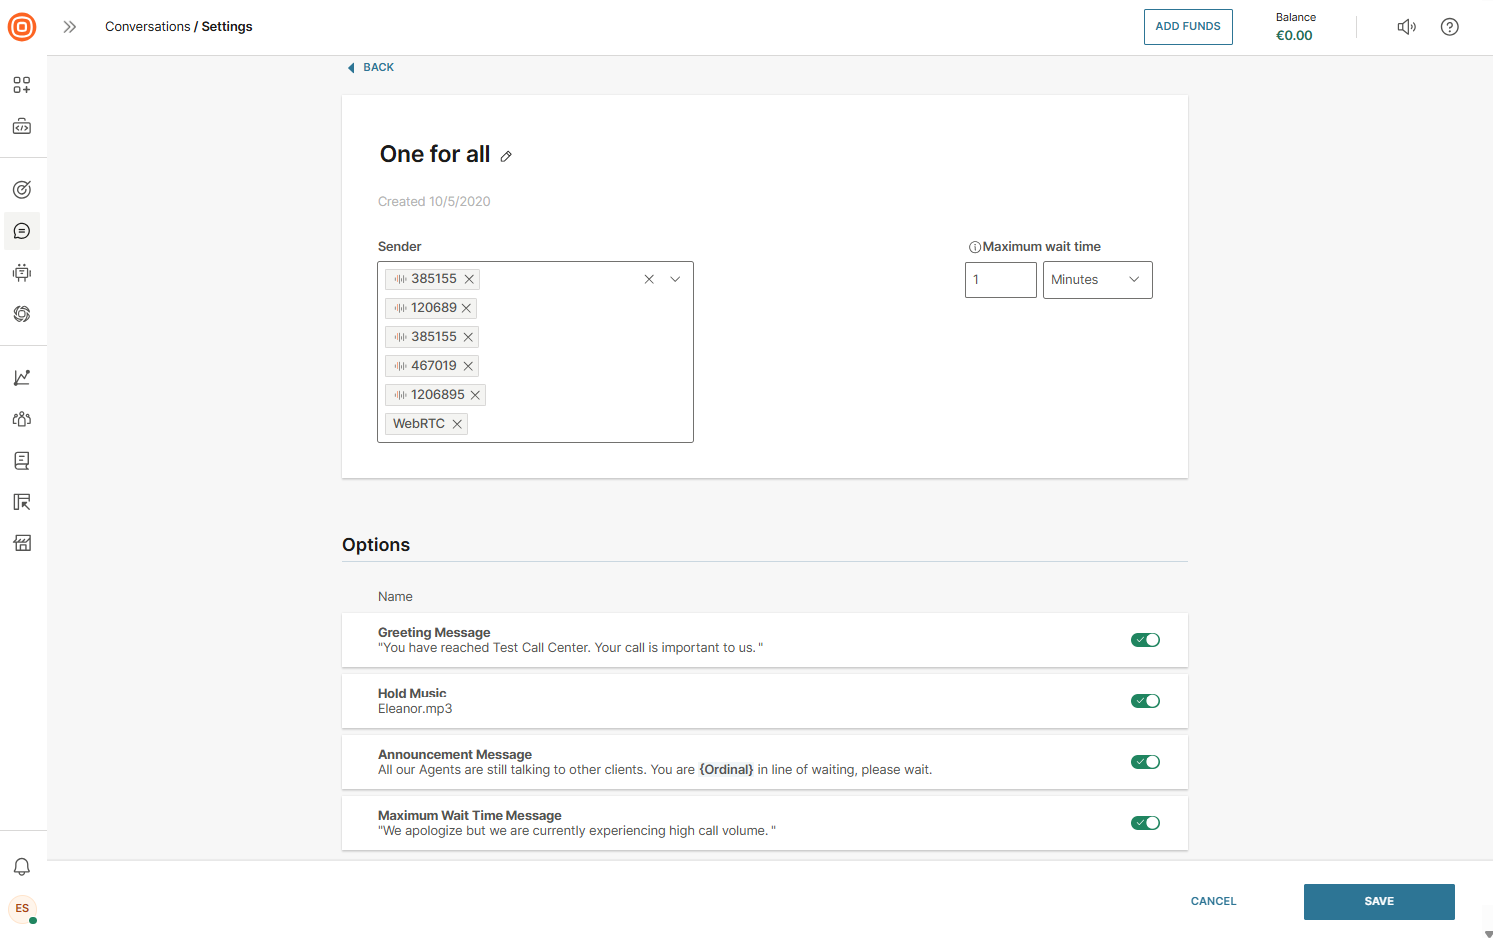
Call waiting strategy
Being on hold can be frustrating for your customers, so it is important that you are able to build a waiting strategy that establishes the best environment for callers while they wait to be connected to your agents.
To create a new waiting strategy for calls:
- Go to Conversations → Settings → Service quality → Waiting strategy.
- Choose whether you want to set up a Queue-based or Sender-based waiting strategy:
- Queue-based strategy - customize the waiting experience for each individual queue.
- Sender-based strategy - apply a consistent waiting experience across all queues linked to the same sender.
- Select the Create waiting strategy button → Calls.
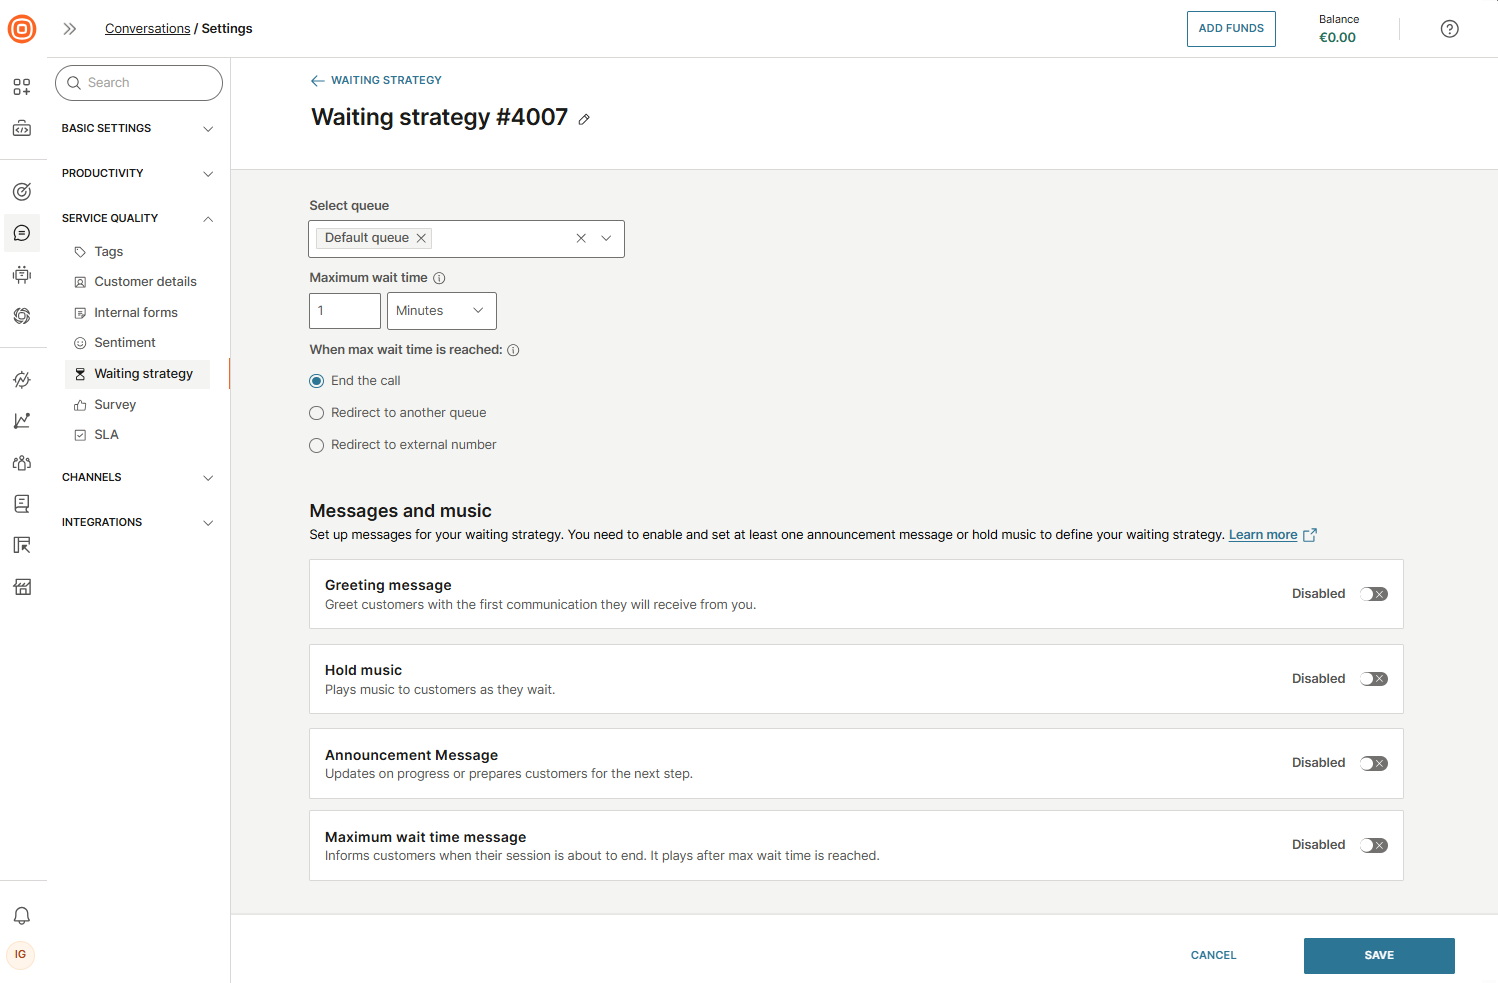
- Name your strategy and select the sender or queue it will apply to.
- Select the sender or queue, depending on whether you are creating a sender-based or queue-based waiting strategy. The strategy will apply to the selected option.
- Set the Maximum wait time - this defines how long the caller will wait before the next action is triggered.
- Set the customer experience for situations when no agents are available. Once the maximum wait time is reached, the waiting strategy ends. Then, choose what happens next:
- End the call - The call is terminated.
- Redirect to another queue - The call is transferred to a different queue.
- Redirect to external number - The call is transferred to an external number.
- Note: If you are creating a sender-based waiting strategy, the Redirect to another queue option will not be available.
- In the Options section, you can configure different message types to be used in your waiting strategy. To enable a message, switch on the toggle next to it and complete the setup.
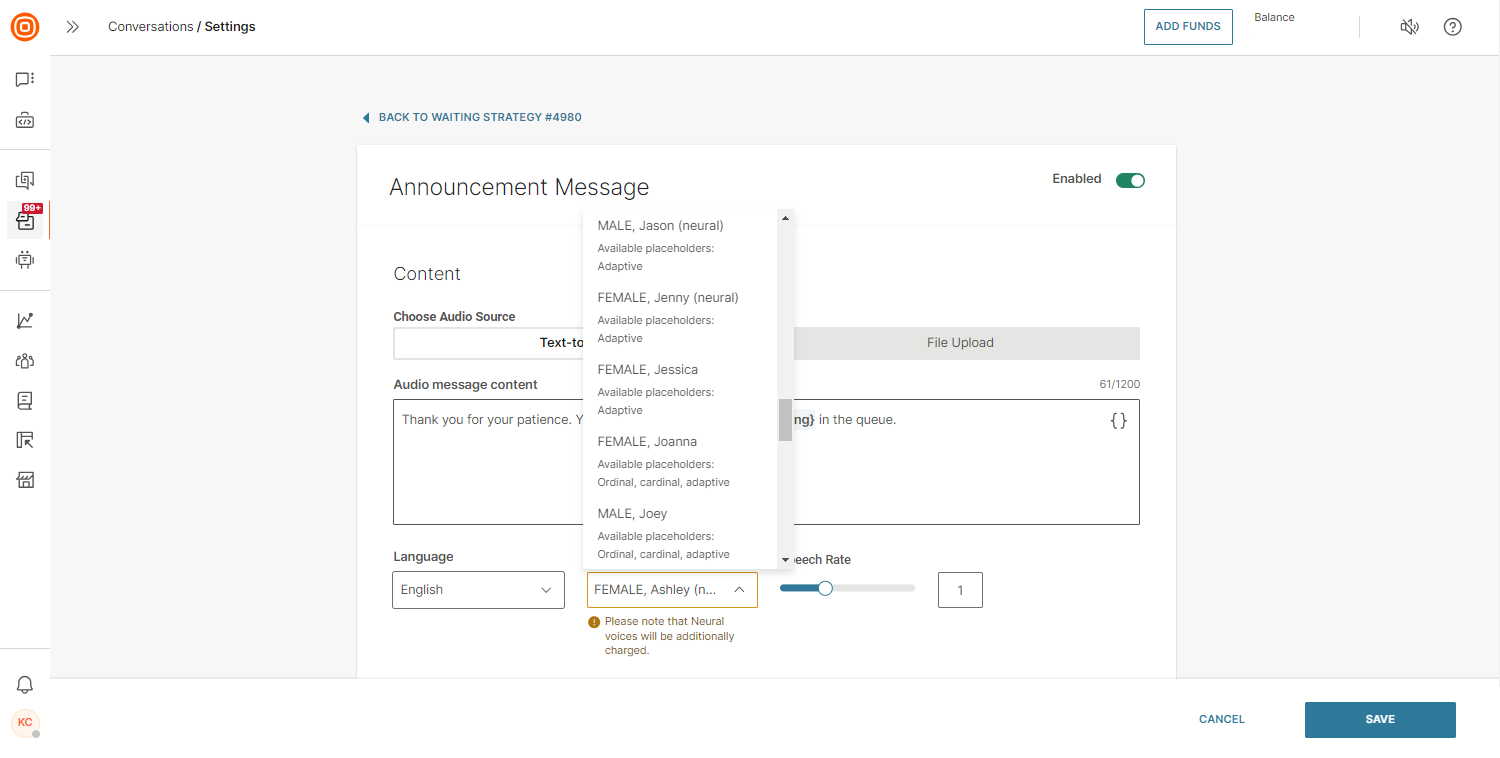
Waiting strategy messages [#waiting-strategy-messages-call-waiting-strategy]
You can configure one or more of the following options based on your business needs:
- Greeting message - The first message your customers hear when they call. You can either use the text-to-speech feature to create it or upload an audio file.
- Hold music - Playing music while customers wait can help create a calmer and more positive experience. Upload your preferred hold music file.
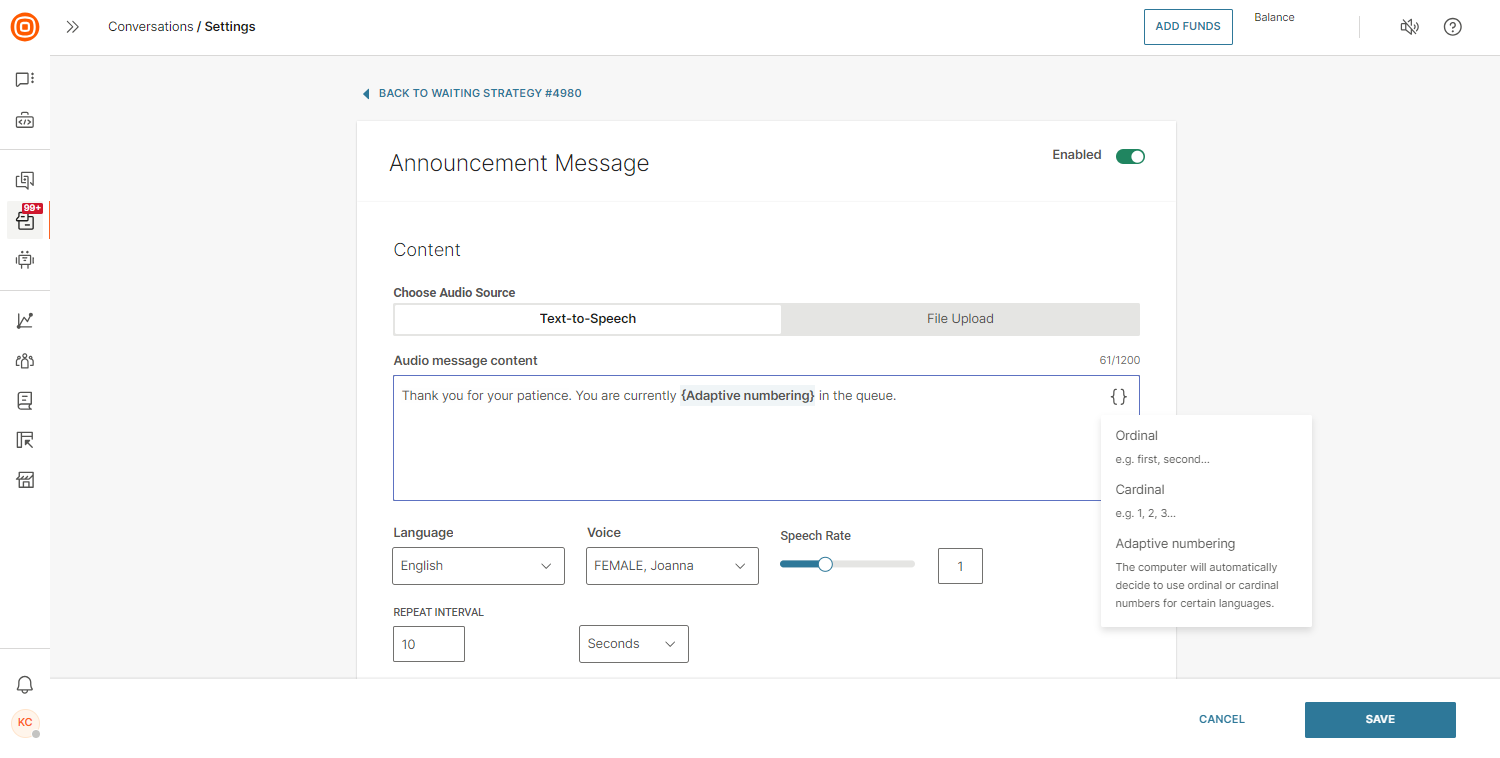
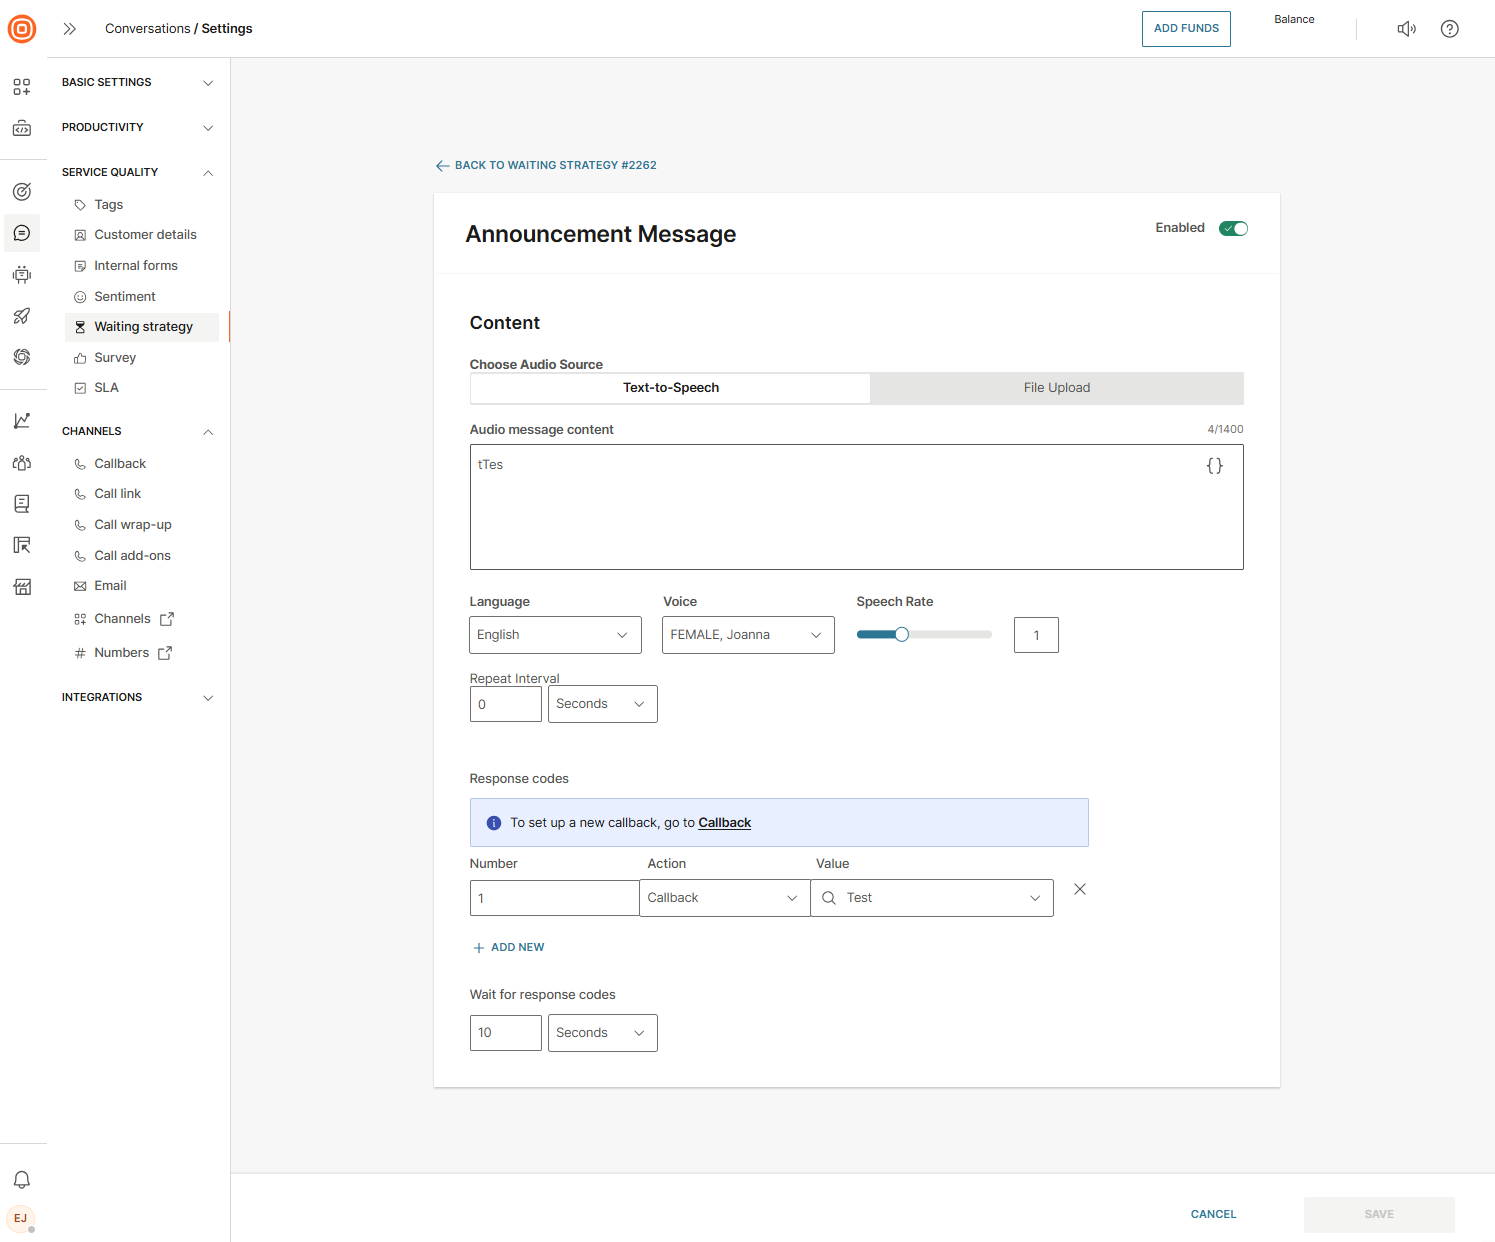
- Announcement message - Keep customers engaged by playing periodic messages during the wait. This helps reduce perceived wait time. You can also configure callback options here.
- Maximum wait time message - When the maximum wait time is reached, and the call is about to end, you can play a final message informing the customer. This message can be created using text-to-speech or by uploading a file.
Create waiting strategy message [#create-waiting-strategy-message-call-waiting-strategy]
You can decide to create your waiting strategy messages as a speech version of the text you provide in a written format. In that case you should use text-to-speech as audio source and write the message script in the provided text field.
To do so, configure these available parameters:
- Language - select one of the available languages
- Voice - select one of the available voices
- Speech rate - adjust the speed at which words will be spoken to be in line with the language and the message you are communicating

Upload message file [#upload-file-call-waiting-strategy]
You can use a file that you have previously recorded or created in your waiting strategy messages. In that case, you should use file upload as the audio source:
- Select Browse (or use drag and drop action to upload your file).
- Locate the file.
- Confirm the action to upload your file.
- You can also delete uploaded files if needed.
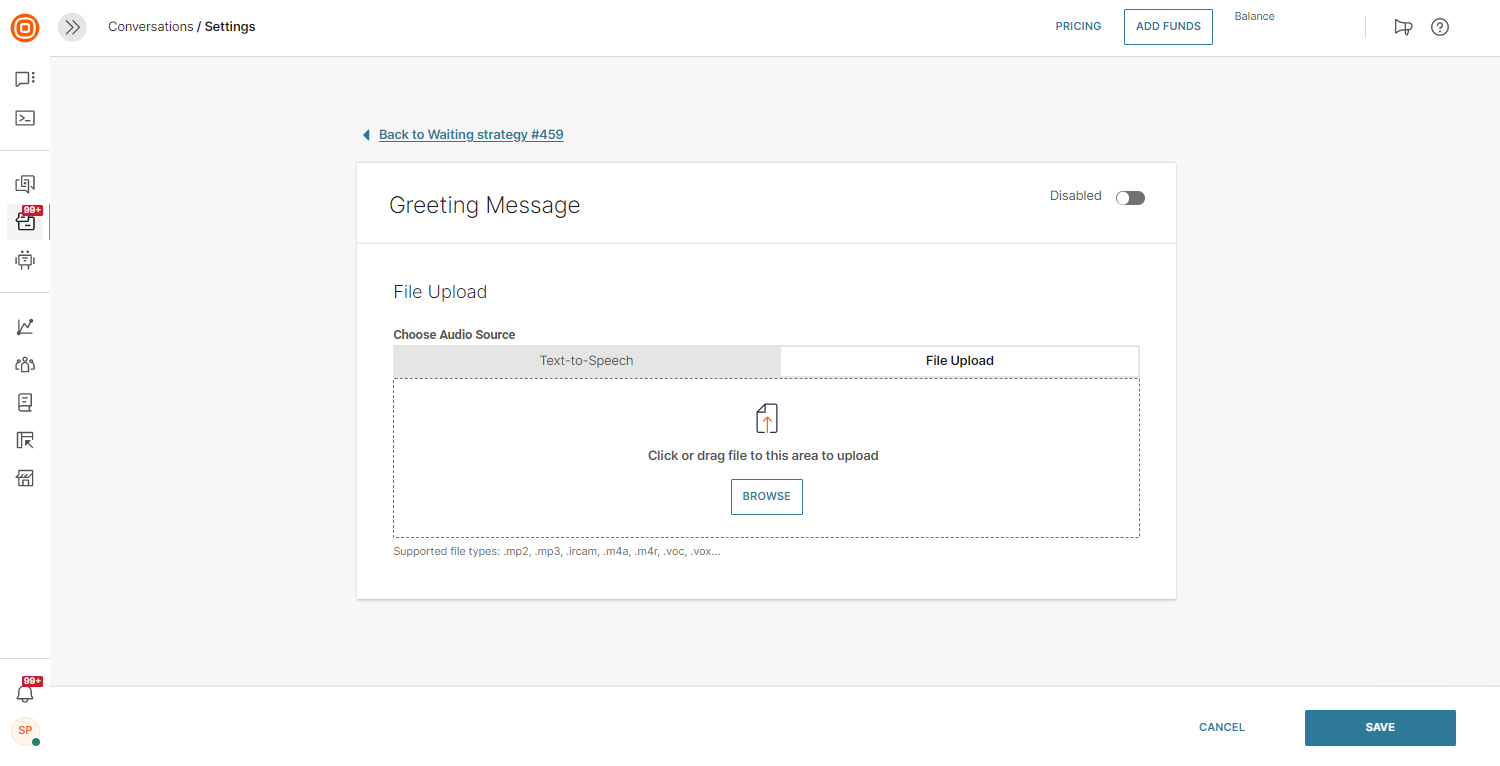
The maximum file size is 4MB.
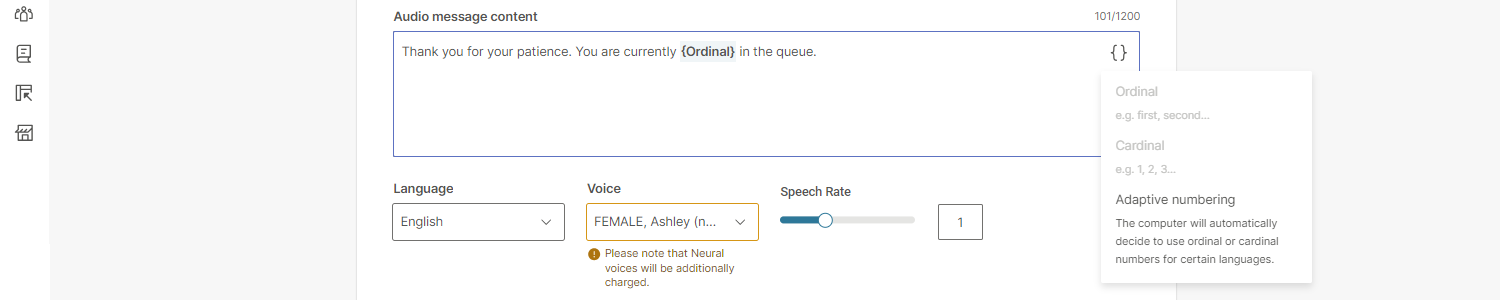
Announce position in queue [#announce-position-in-queue-call-waiting-strategy]
Announcing the position in the queue informs callers about their estimated waiting position, which is determined based on the number of callers in the queue and the queue's size. Offering callers an estimated position in the queue reduces uncertainty, enhances transparency, and elevates the overall customer experience.
From the Waiting strategies tab, you can either add this feature to an existing waiting strategy or:
- Select the Create waiting strategy button to create a new one.
- Choose Calls → Announcement Message.
- By clicking the curly brackets symbol in the Audio message content option, you will see three options to set up a placeholder to inform customers of their position in the queue:
- Ordinal (for example, first, second, third and more)
- Cardinal (for example, 1, 2, 3 and more)
- Adaptive numbering (the computer will automatically decide to use ordinal or cardinal numbers for certain languages)
Waiting message language and voice selection [#waiting-message-language-and-voice-selection-call-waiting-strategy]
It is recommended to select the language and voice first, and then choose the desired placeholder, as not all placeholders are available for all languages or voices:
- Select the wanted placeholder and write out your audio message content accordingly.
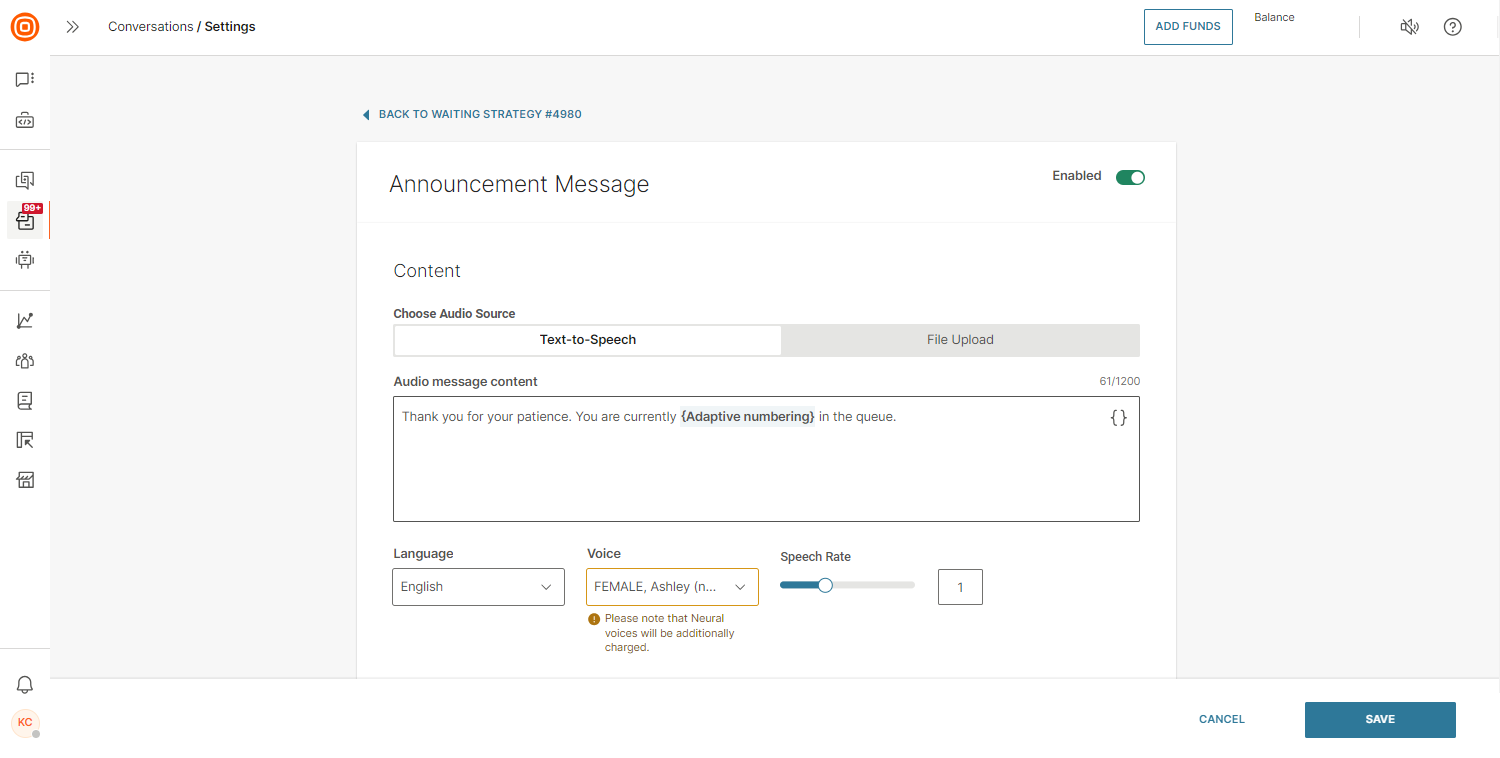
- For every supported language, we offer different voices from a gender perspective as well as from a quality perspective (standard versus neural). You can choose between the standard and neural voices. Neural voice, unlike the standard one, is a remarkably natural-sounding voice for your applications that provides a high level of authenticity with its human-like cadence and intonation. If you do not have neural voices enabled, contact Support or your account manager.
- Under each voice option, you will see the availability of placeholders tailored to assist you in selecting the perfect voice for your audio message.
- If you select a voice with only one available placeholder option, the remaining two will appear grayed out.
- Additionally, you can also choose the Speech rate to adjust the speed at which words will be spoken to be in line with the language and the message you are communicating.
- After you have configured everything, select Save.
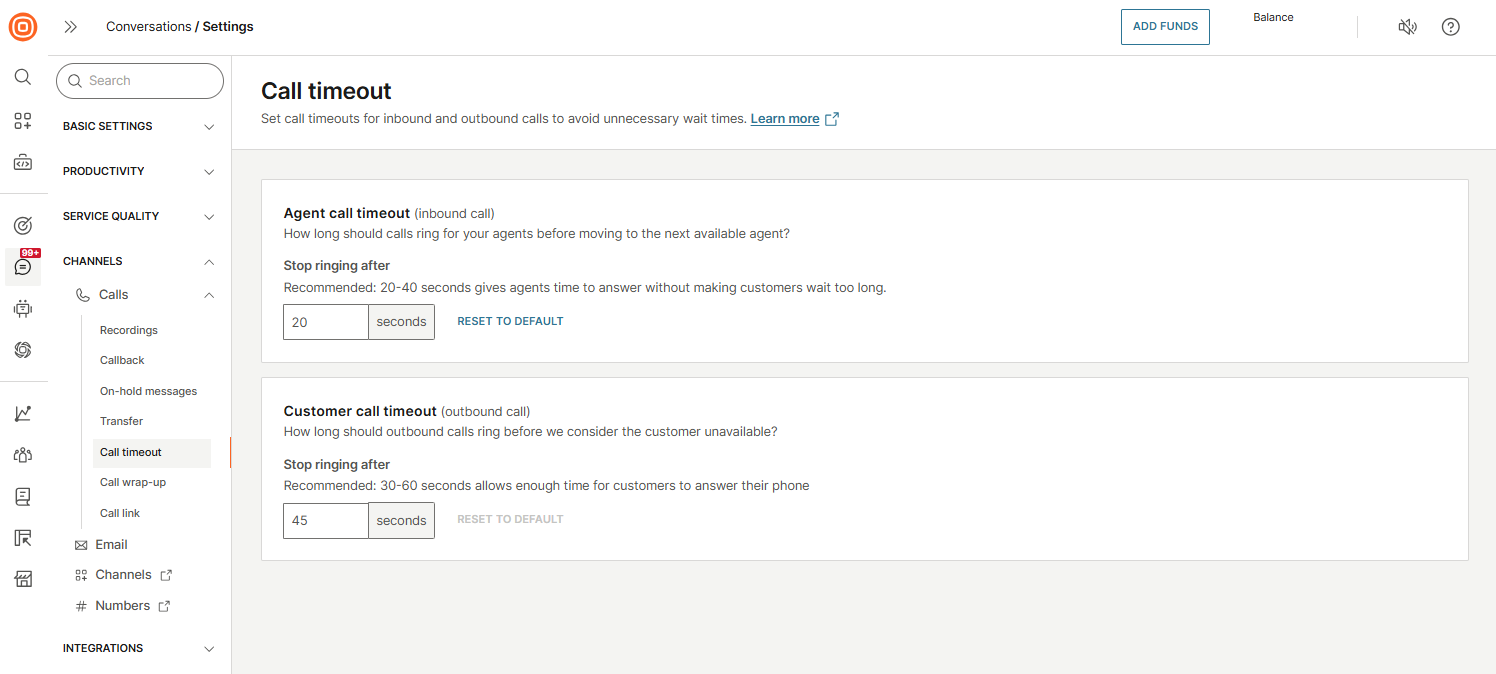
Call timeout
You can define how long an incoming call (including call transfers) should ring for one agent before the system routes it to another available agent. This ensures smoother call handling and prevents calls from going unanswered.
If an agent ignores a call and the configured time-out is reached, the call is reassigned according to the existing routing logic.
Configure call timeout [#configure-call-time-out-call-time-out]
- Go to Conversations → Settings → Channels → Calls → Call timeout.
- In the Agent call timeout (inbound call) and Customer call timeout (outbound call) fields, set the desired ringing duration.
- Allowed range: 3 to 60 seconds.
- (Optional) Reset the setting to the default value of 30 seconds.
Automatic agent assignment for calls
You can set up the automatic agent assignment for calls. Go to Conversations → Settings → General setup → Queues.
For calls, availability is taken into consideration. An agent is considered available to take on new calls when they set their status to Available, and they have fewer conversations assigned in any status other than Closed. Workload and waiting times are calculated for every agent who is in the Available status.
Calls are always auto-assigned by default, regardless of whether the queue's auto-assignment is enabled.
This is the process when a new conversation is assigned to a queue:
- Call assignment process:
- When an incoming call arrives, the system looks for available agents to take the call.
- The eligibility criteria for agents follow the same logic as described for auto-assignment (AA).
- The call rings for the selected agent. If they pick up, both the call and its associated conversation are assigned to them.
- Whatsapp business calling assignment with assigned agent - If a conversation is assigned to an agent, the system will always attempt to connect the call to that agent, as long as they are available. Unlike regular calls, the assigned agent remains tied to the conversation. If the assigned agent rejects the call, it will continue ringing for them and will not be routed to others. Only if the assigned agent is unavailable (for example, offline), the system will search for the next available agent in the queue.
- Capacity override for calls:
- Agents who have reached full capacity based on their text channel workload are still considered available/eligible to receive calls.
- WhatsApp business calling - For WhatsApp business calling, the assigned agent will receive the call even if they are at full capacity. This ensures seamless handling of both calls and messages within assigned conversations, regardless of the agent's current capacity status.
- If the agent does not pick up:
- The system selects the next available agent and rings them. This process continues until the call is answered.
- If no available agent picks up the call, it will start ringing again from the first agent.
- There is a maximum total ringing time for the call if it remains unanswered, which is defined in the waiting strategy for calls.
- As mentioned above, for WhatsApp business calling, if the assigned agent rejects the call, it will continue ringing for them and will not be routed to others. Only if the assigned agent is unavailable (for example, offline), the system will search for the next available agent in the queue.
- Calls outside working hours:
- When the queue is outside working hours, calls do not ring to agents. Instead, an away message is played.
- Callback auto-assignment:
- The callback assignment logic follows a similar process to how AA assigns waiting conversations to agents who become available.
Callback
The Callback feature allows customers to request a callback from the agent to the phone number associated with the conversation. Callbacks aim to improve the customer experience by minimizing the frustration of long wait times or when calling a business outside of working hours.
A callback can be triggered by a long wait time, a lack of available agents, or if the customer simply wants to be called back later.
Here are the three steps to enable callback for your customers:
- Create the callback configuration.
- Apply the callback configuration.
- Set the action code to trigger the callback.
Follow the agent callback section for more information about the agent's experience with callbacks.
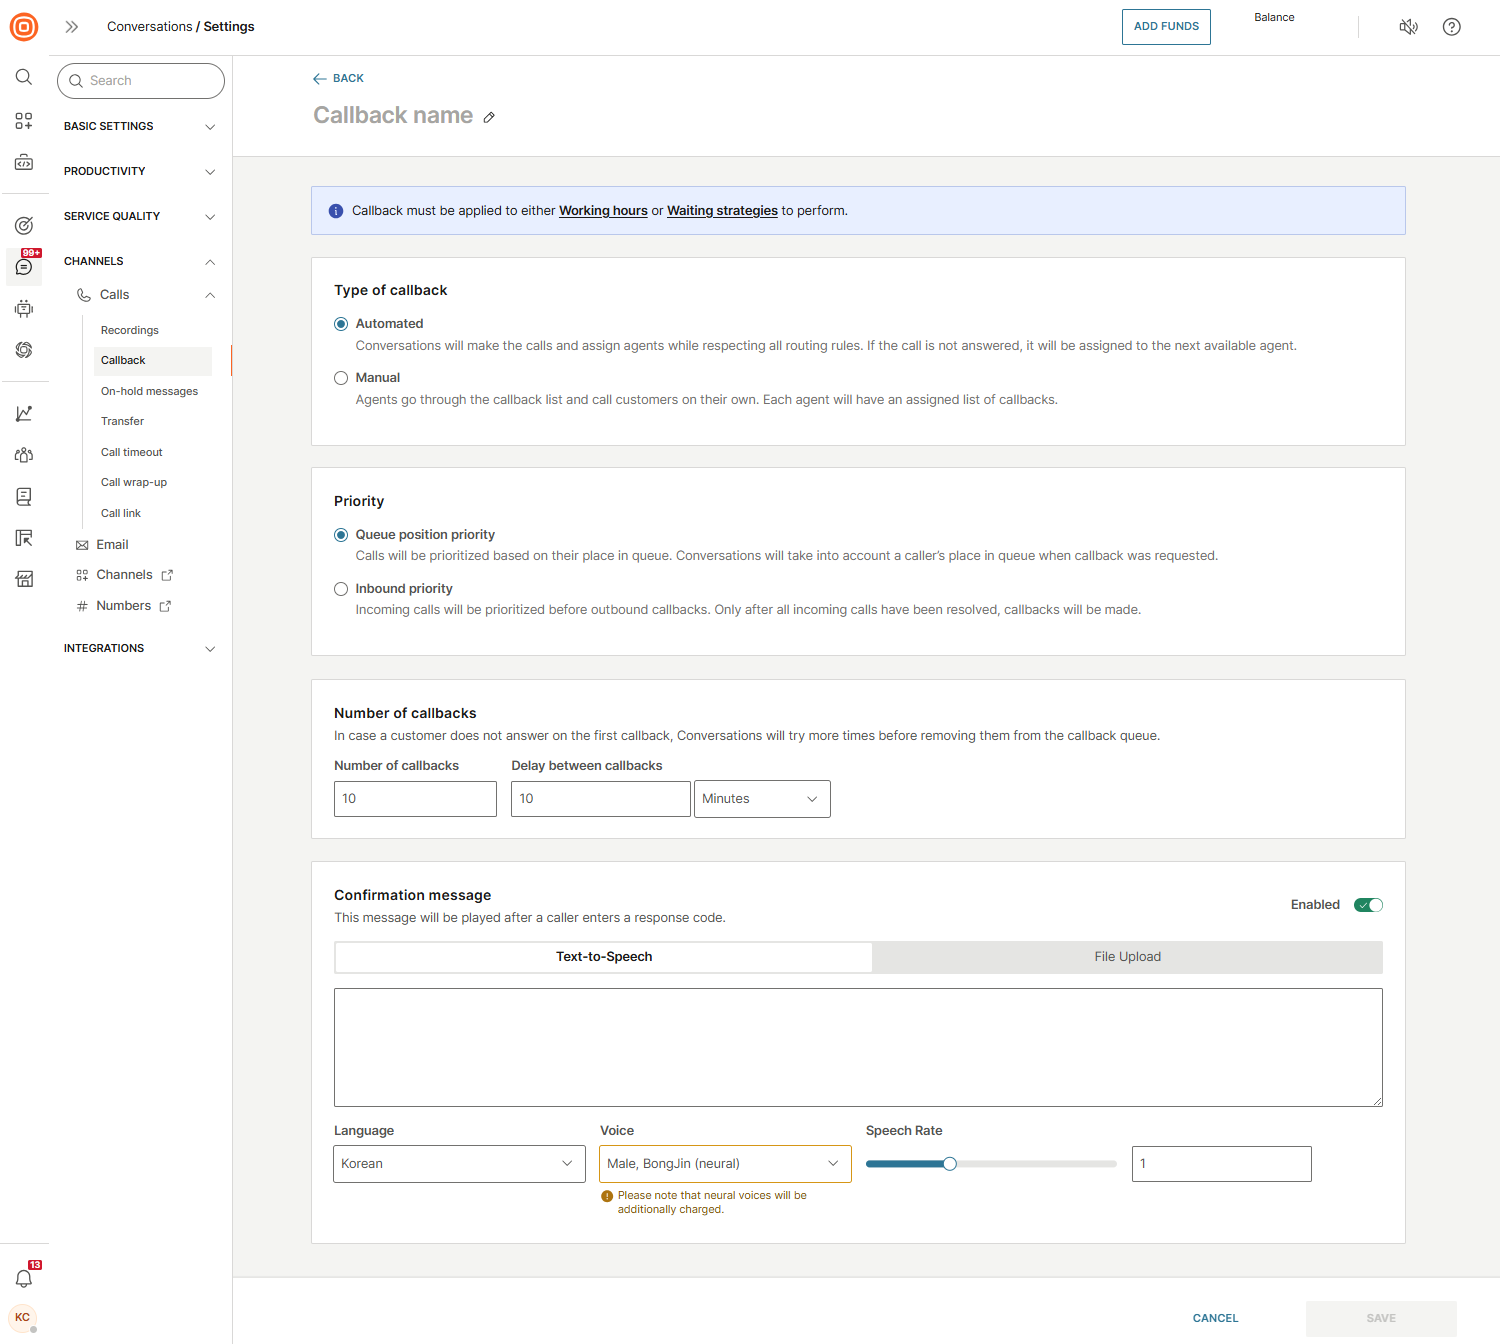
Configure callback [#configure-callback-callback]
To activate a callback, you first must configure the feature to achieve the desired system behaviors:
- Go to Conversations → Settings → Channels → Calls → Callback.
- Select Create callback.

- Enter the callback name.
- Choose the callback type:
- Automated: The system automatically assigns callbacks to agents using existing routing and prioritization rules.
- The callback rings on the agent's desktop or mobile app.
- If the customer does not answer, the system attempts to re-establish the callback according to the configured callback settings.
- Note: Automatic callbacks are not supported for WhatsApp calls. These always downgrade to manual callbacks.
- Manual: Agents manage callbacks themselves by going to All Work → Callbacks and manually selecting a request.
- Automated: The system automatically assigns callbacks to agents using existing routing and prioritization rules.
- Set the priority:
- Queue position priority: Keeps the customer's original queue position when assigning callbacks.
- Inbound priority: Gives priority to live incoming calls; callbacks are handled afterward.
- Configure the number of callbacks:
- Number of callbacks: Enter how many retry attempts should be made if the customer does not answer. (Example: Enter
4for a total of 5 attempts.) - Delay between callbacks: Define the time interval between retries.
- Number of callbacks: Enter how many retry attempts should be made if the customer does not answer. (Example: Enter
- Add a confirmation message: Played to customers when a callback is created. Options include:
- Text-to-speech (set language, voice, and speech rate).
- Upload audio file (drag and drop or browse to add).
- Select Create. Once configured, the system will handle callbacks according to your defined rules.
Apply callback configuration and set action code [#apply-callback-configuration-and-set-action-code-callback]
For callback requests to work, you must connect the callback configuration to:
- An Announcement message under Waiting strategies (for queued calls).
- An Away message under Working hours (for after-hours calls).
To link the callback configuration:
- Create a custom text-to-speech message or upload a custom audio file.
- Set the response code that will trigger the callback.
- Link the response code to the callback configuration created earlier.
- Define the time to wait for a response from the customer.
Enable callback in waiting strategies [#enable-callback-in-waiting-strategies-callback]
To enable callback for calls in queues, set up the announcement message for the Waiting strategy:
- Go to Conversations → Settings → Service quality → Waiting strategy.
- Open an existing strategy.
- Select the Announcement message tab.
Tip: You can also use the quick link on the Callback configuration page to go directly to Waiting strategies → Announcement message.
Set up callback response codes [#set-up-response-codes-callback]
To set up Response codes:
- Scroll down to the Response codes section.
- Configure the following:
- Number - The DTMF code used to trigger the callback.
- Action - Choose Callback from the drop-down list.
- Value - Select the callback configuration to apply.
- Use the Wait for response codes field to define how long the system should wait for the customer's input.
Callback requests list [#callback-requests-list-callback]
To view all callback requests, go to Conversations → All Work → Callback (under Global Views). Here you can filter and preview callback requests by:
- Callback type - Manual or Automatic
- Callback status - In queue, Active, No reply, Done
- Conversation status - Open, Waiting, Solved
- Callback pending since - Predefined time periods
- Callback starting date - Date range with start and end inputs
This gives admins and agents full visibility into ongoing and completed callbacks.
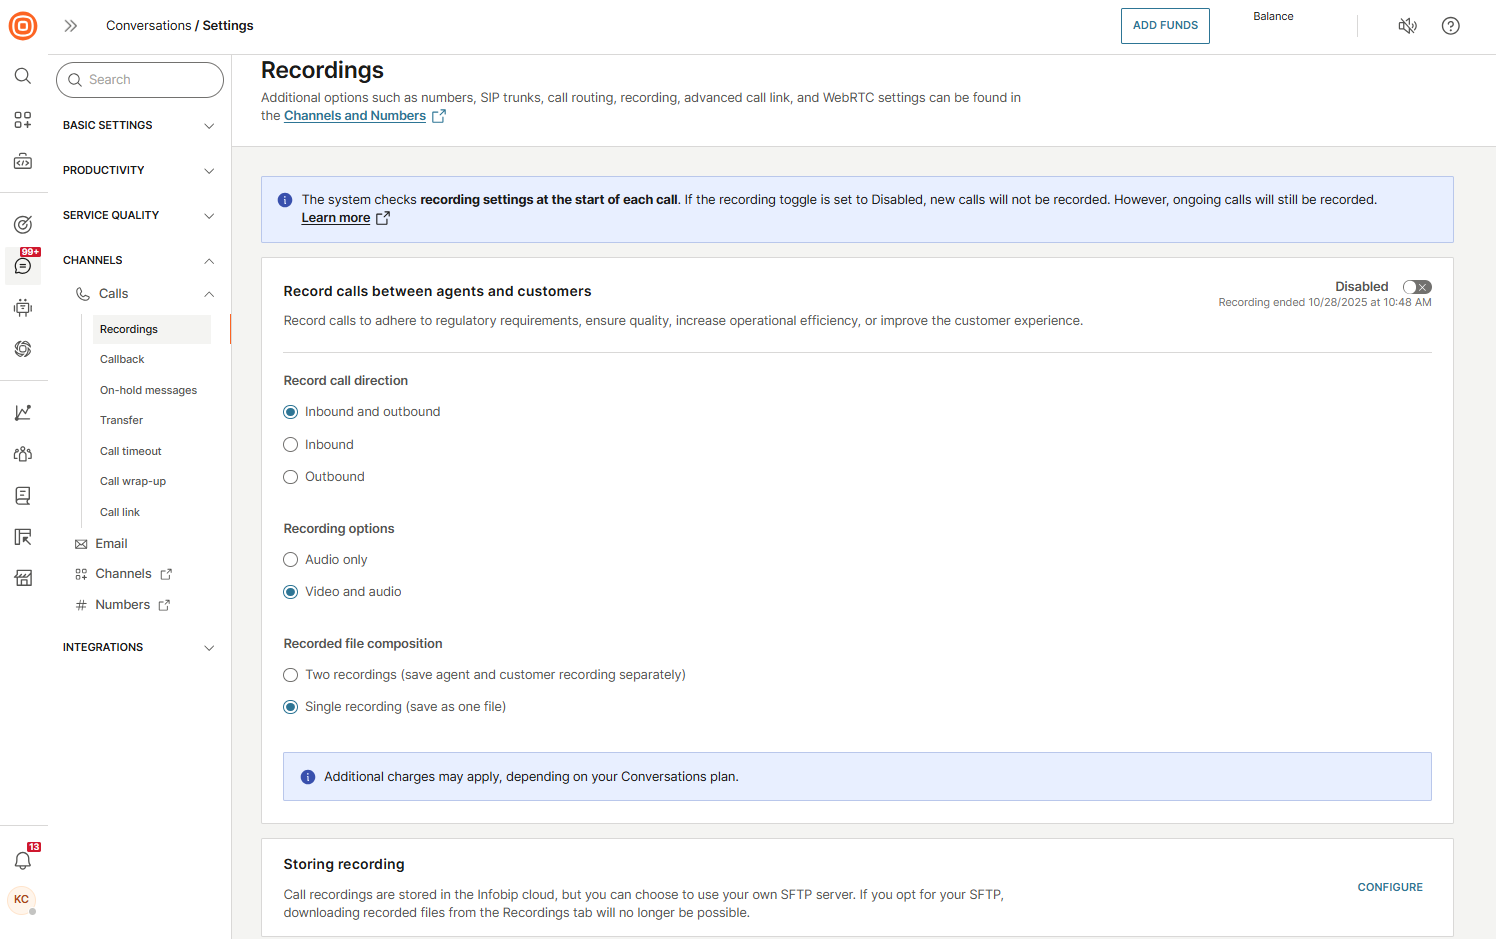
Recordings
Whether it is to adhere to regulatory/compliance requirements, ensure quality, increase operational efficiency, improve the customer experience, or any other reason specific to your business needs, you may need to record conversations between agents and customers.
With Conversations, you can record the following types of calls:
- Audio calls
- Video calls
- Call link (audio/video) calls
How call recordings work [#how-call-recordings-work-recordings]
Every call in Conversations has multiple participants (customer, agent, chatbot, and more). Each participant is considered a separate leg of the call, and each leg is recorded as an individual audio file.
- Example 1: A conversation between one customer and one agent creates two audio files (one for each participant).
- Example 2: A customer first talks to Agent 1, then the call is transferred to Agent 2. This creates four audio files, two for the first segment and two for the second.
Configure call recording [#configure-call-recording-recordings]
Conversations provides flexible recording settings:
- You can apply a single recording configuration for the entire organization.
- Or you can create granular configurations per agent.
To configure and enable recording:
- Go to Conversations → Settings → Channels → Calls → Recordings.
- Ensure the toggle at the top right of the page is set to Disabled before making any changes.
- Adjust configurations for call direction, video recordings, and recorded file composition as needed.
- Re-enable recording when finished.
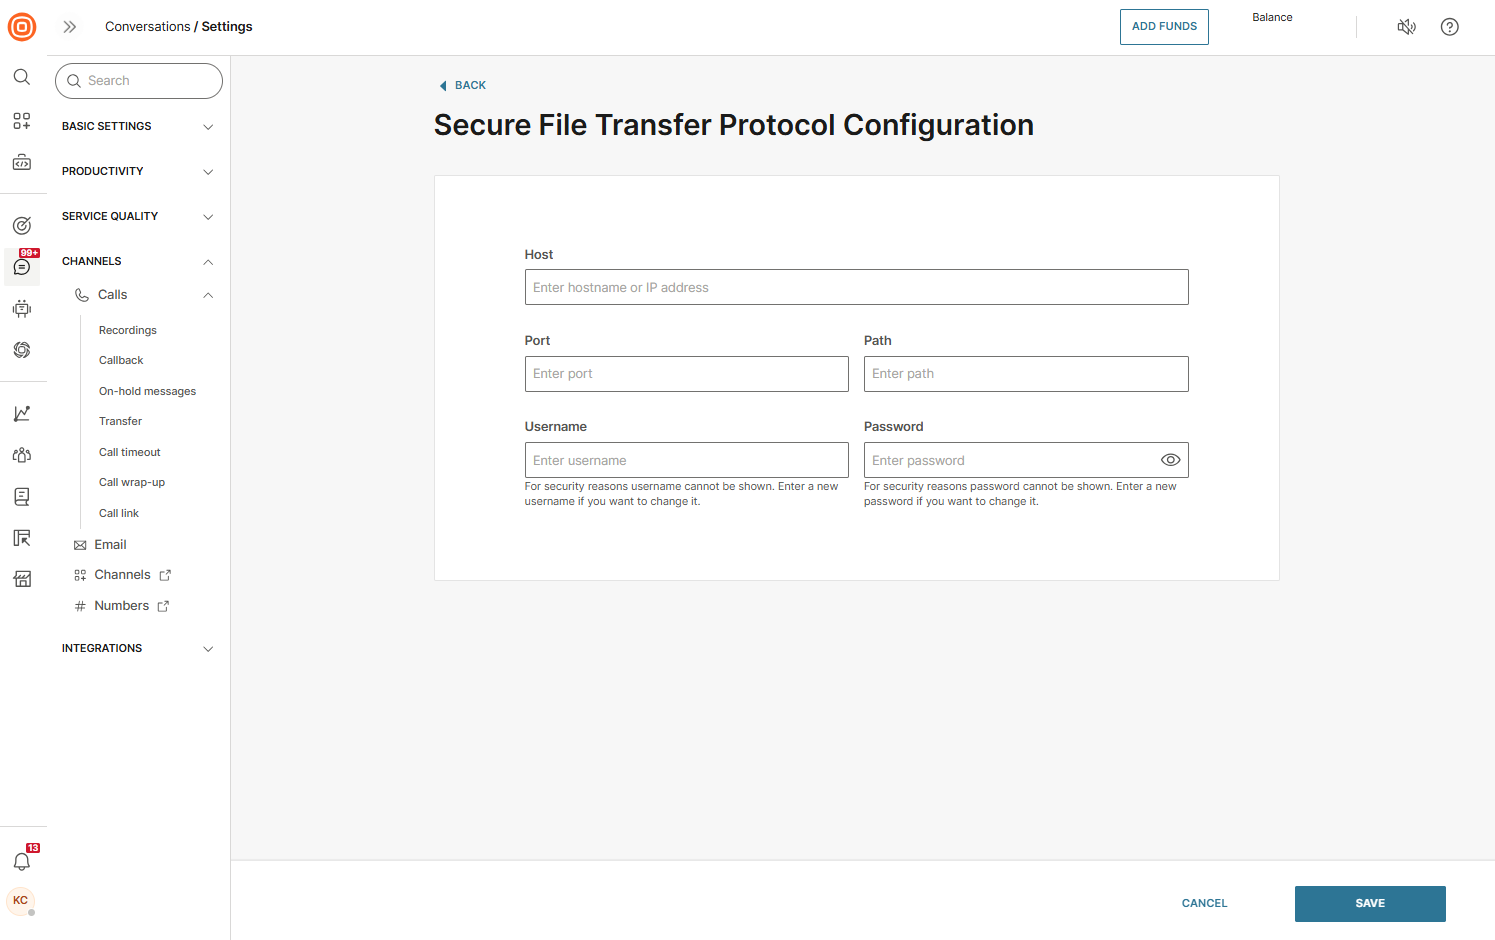
Secure File Transfer Protocol (SFTP) [#secure-file-transfer-protocol-sftp-recordings]
In some regions, regulations prohibit storing call recordings outside of the country. To comply with such requirements, you can use Secure File Transfer Protocol (SFTP) to automatically move recording files from Conversations to a secure, local storage server.
Before configuring SFTP in Conversations, make sure you already have a functioning and available SFTP server. Consult with your IT team if needed.
Configure SFTP [#configure-sftp-recordings]
- Go to Conversations → Settings → Channels → Calls → Recordings.
- On the Recordings page, go to the Storing recording section and select Configure.
- Enter your server details:
- Host IP address or DNS name
- Port
- Storage path
- Username and password
- Enable transfers by switching on the Upload recordings to the SFTP toggle.
Recording storage [#recording-storage-recordings]
You can choose between the Secure File Transfer Protocol (SFTP) and Cloud solution to store your recordings.
As mentioned previously, you can choose what kind of recording files will be stored on servers - separated by call legs or as one unified file. When you download the recording file from the cloud storage or search for the file in your SFTP folder, you can have it composed as a single file which enables you to listen to the whole file and understand the context of a specific call.
Default cloud storage
By default, all recordings are encrypted and stored on Amazon Web Services (AWS). The region used depends on the Infobip data center for your account.
Region | Infobip data center | Recording storage location |
|---|---|---|
| Europe | Frankfurt | AWS: eu-central-1 |
| North America | New York | AWS: us-east-1 |
| Brazil | Sao Paolo | AWS: sa-east-1 |
| India | Mumbai | AWS: ap-south-1 |
| Indonesia | Singapore | Locally at Infobip DC |
| Saudi Arabia Saudi | Saudi Arabia | Locally at Infobip DC |
| Türkiye | Türkiye | Locally at Infobip DC |
Recordings are segmented per customer account to ensure data isolation. Storage limits follow a fair usage policy:
- Example: With 5 GB allocated per agent, an account with 10 agents gets 50 GB/month.
- Extra storage can be purchased if needed.
Call recording file name logic [#call-recording-file-name-logic-recordings]
Recording files are stored in a meaningful format for easy identification. Additionally, the file name contains the conversation ID as well as the date of a specific call. The recording name appears in the following format:
<conversationID>_<agentname>_<end-user>_<UTCStartTime><UTCStartTime>is displayed as YYYYMMDDHHMMSS (using the 24-hour clock format)
The file name format is the same for both Cloud and SFTP storage options.
Call recording metadata files [#call-recording-metadata-files-recordings]
- SFTP storage: Metadata is stored in a separate file alongside the recording file. The metadata file includes:
- Customer name/number
- Agent name
- Conversation ID
- Timestamps (start and end)
- Call ID
- Cloud storage: Metadata is included in the .csv file along with the recording.
Configure call recording for agents [#configure-call-recording-for-agents-recordings]
By default, all calls are recorded when the top-level recording toggle is enabled. If compliance requires exceptions, you can override settings per agent:
- Go to Conversations → Settings → Basic settings → Agents.
- Select the agent you want to configure.
- Set the Record calls toggle to Disabled if you do not want to record calls for this agent.
- Under Recording configuration, select whether to record:
- Inbound calls
- Outbound calls
- Both inbound and outbound calls
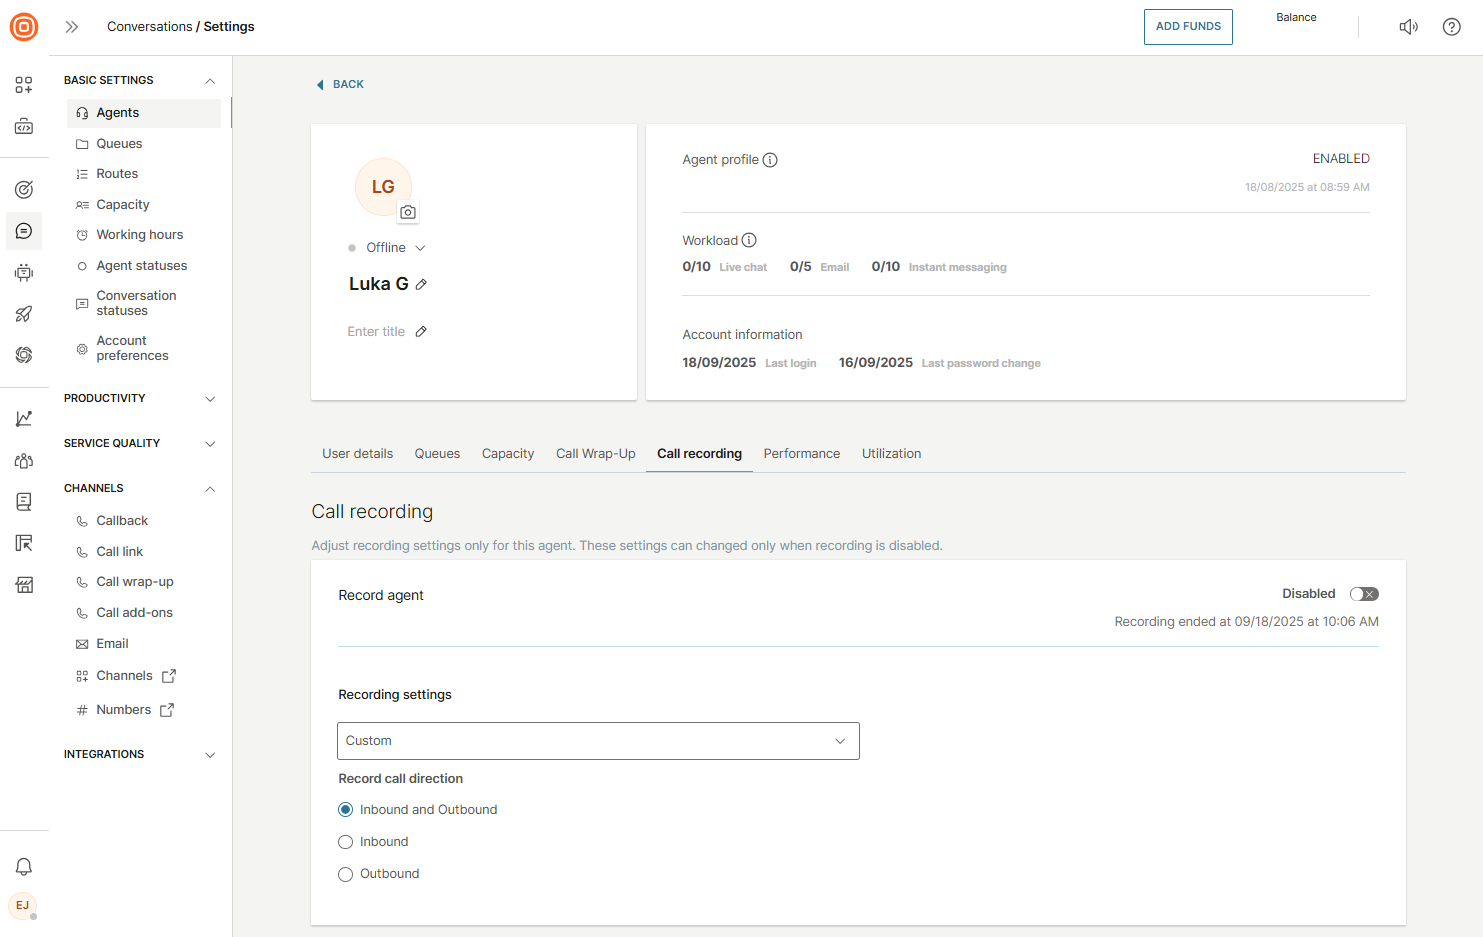
Changes only apply to new calls. Ongoing calls continue recording with the previous configuration.
How to work with call recordings [#how-to-work-with-call-recordings-recordings]
Once your recording setup is complete, calls will be recorded based on your configurations. Conversations provides easy access to playback, download, and deletion of recorded files.
Depending on the configuration you have chosen, each participant's leg can be recorded as a separate or unified file.
In Conversations, you can choose to listen to the full stereo recording (all legs) or each participant file independently (depending on the configuration). Recordings are conveniently located inside each conversation.
In the All Work tab:
- Go to any call conversation with a recording file. There you will see a quick link to the stereo playback option.
- Click the play button to launch the audio player and the playback will begin automatically.
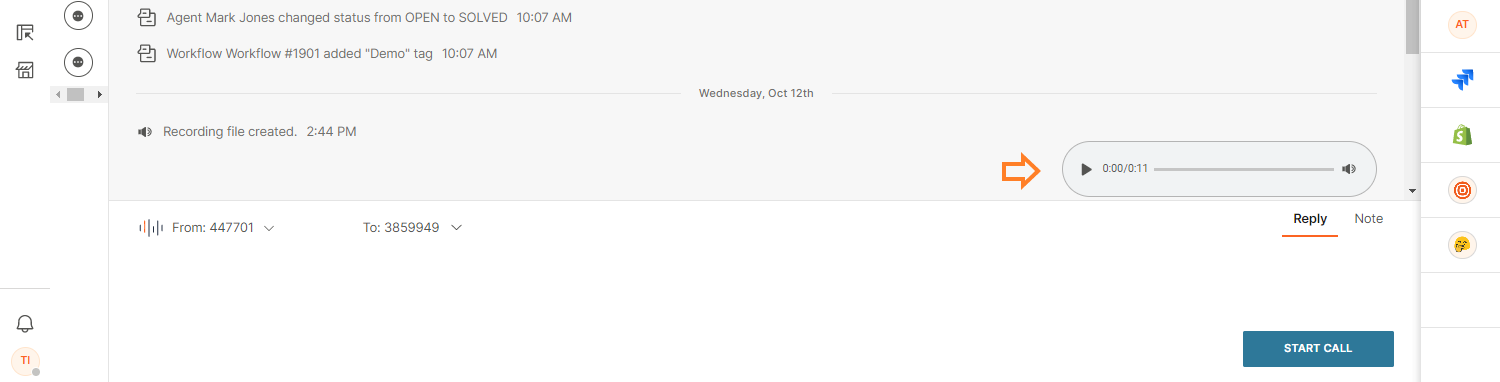
- You can pause and resume playback for both audio and video recording.
- Also, you can fast forward or backward the recording file on both audio and video calls by sliding the progress bar or set a custom start point to listen to a specific recording part.

- By hovering over the speaker symbol, you can adjust the volume or mute the sound.

- If needed, you can play the video recording in full-screen mode by clicking the respective button.
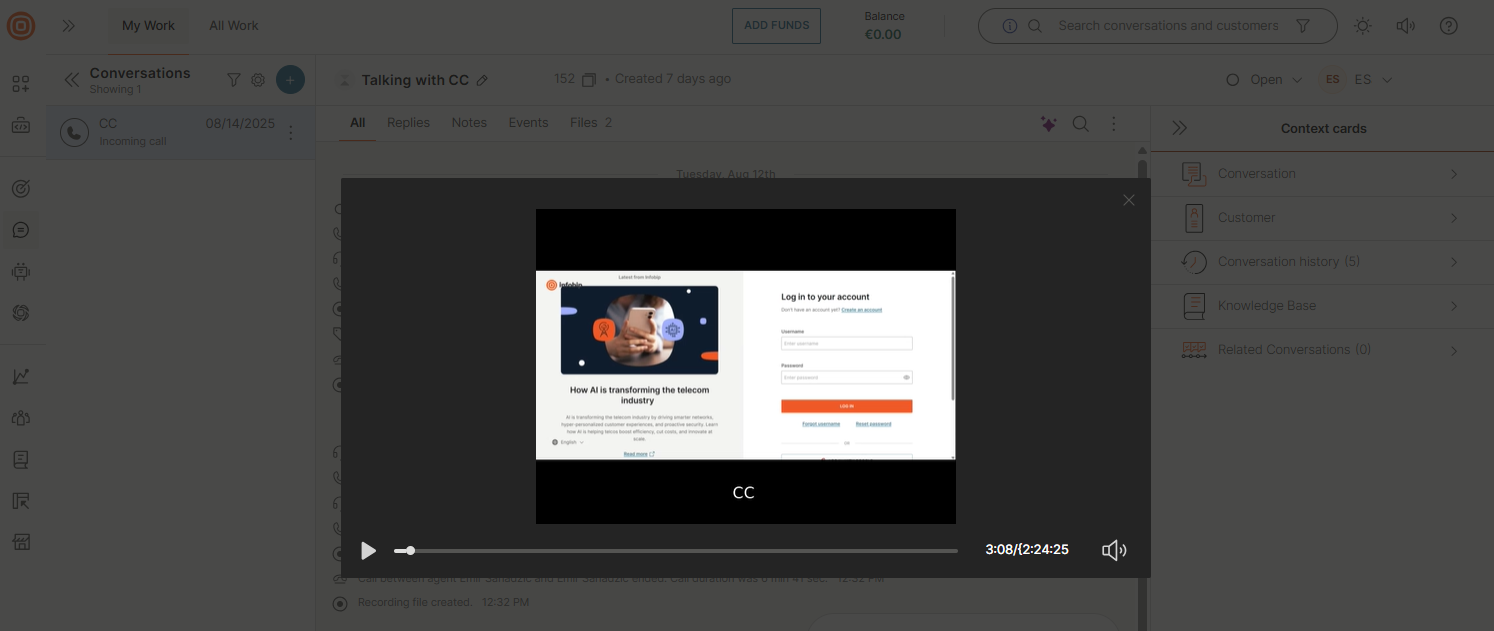
- Finally, you can close the player at any time during playback.
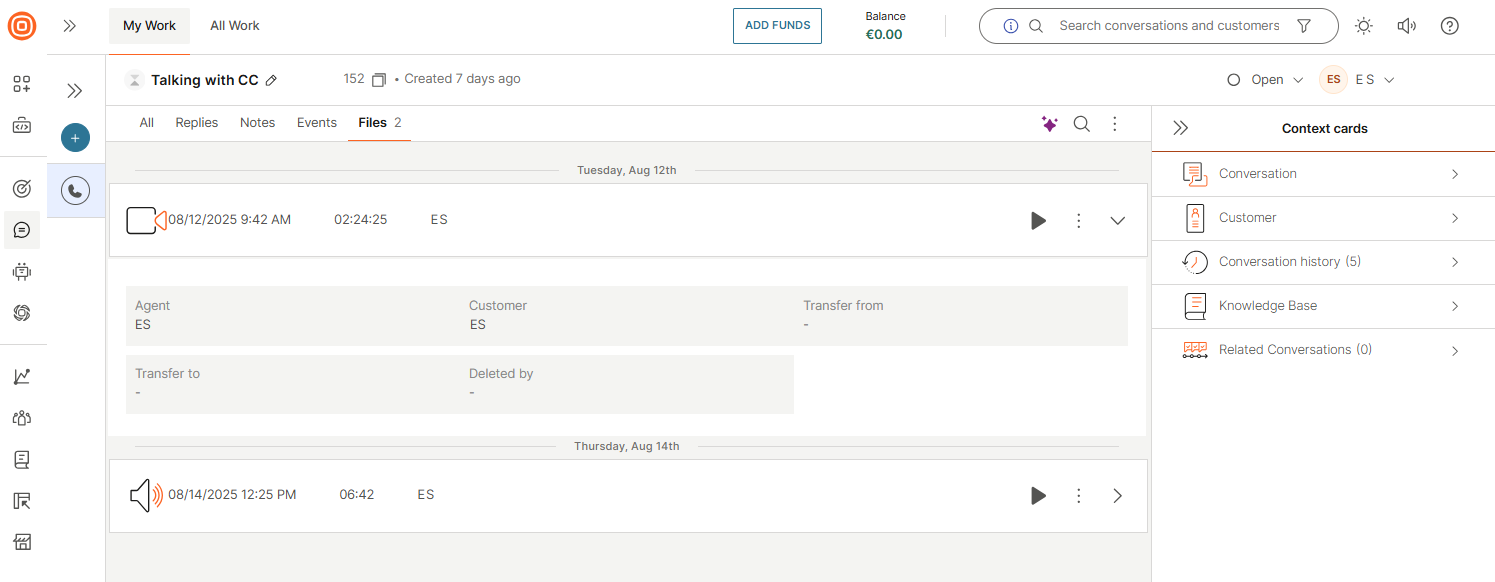
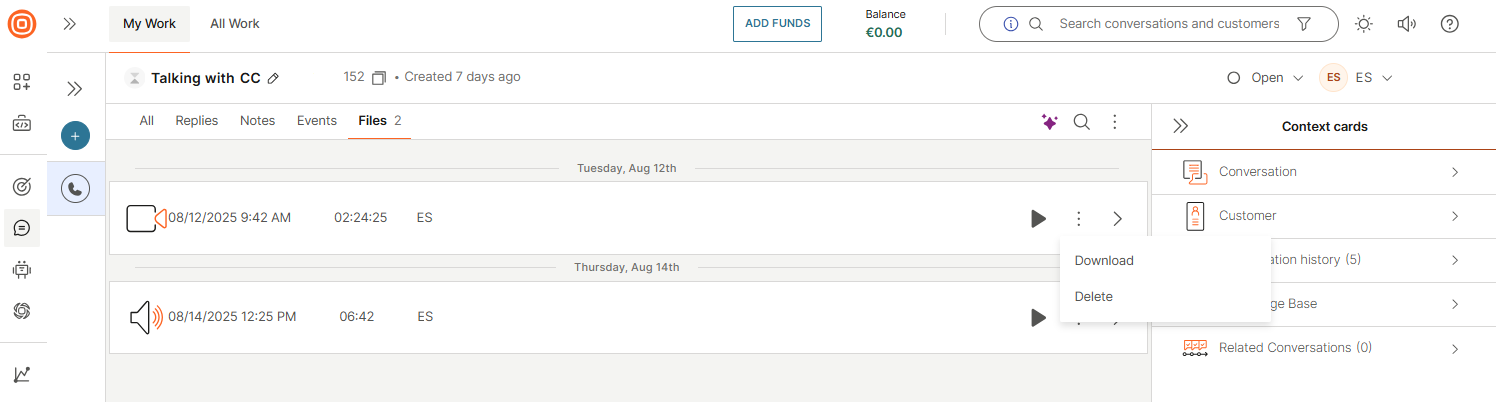
Access call recordings [#access-call-recordings-recordings]
To access the recordings, whether as separated legs or unified files:
- Go to the Files tab. You will notice a list of individual recording files in the table.
- Select the Play icon to launch playback for the single file you selected.
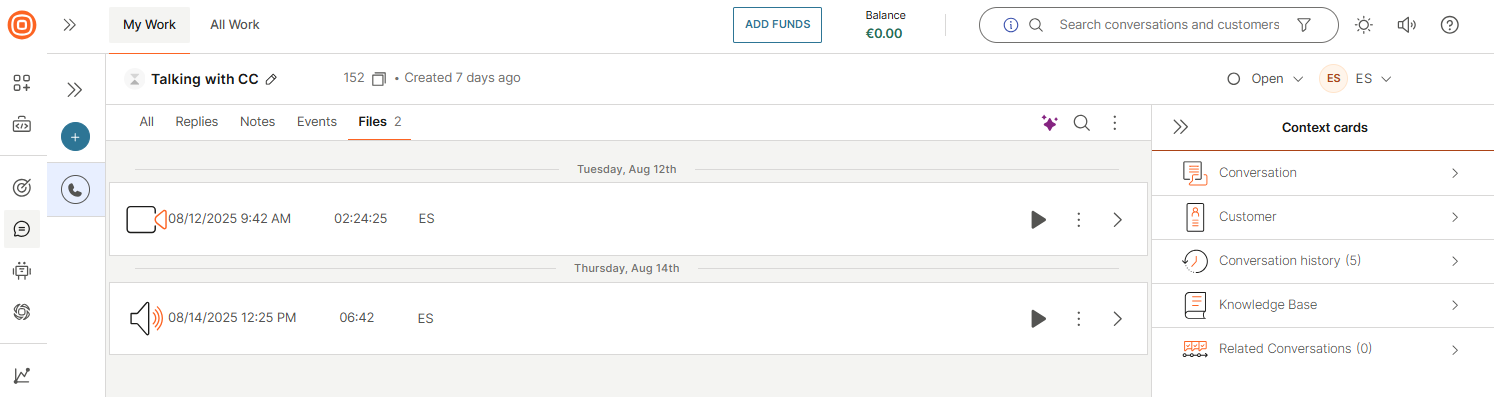
- You can view additional metadata and details about the recording by clicking the > symbol to the right of the three dots, as shown in the image below.
Download call recordings [#download-call-recording-files-recordings]
You can download call recordings from Conversations, and you can do so with each file. There is currently no bulk-download option for recordings.
To access the download option for call recordings:
- Select the three dots.
- Click the Download button. This will download the recording file and a CSV file with associated metadata related to the recorded conversation.
Downloading recording files does not remove the files from the Conversations platform. The only way to remove recordings is to delete the files.
Delete call recordings [#delete-call-recordings-recordings]
You can delete call recordings individually within Conversations. A key advantage of having separate recording files is the ability to selectively remove them.
For example, if a citizen of the European Union exercises their right to be forgotten, you can delete only the recording associated with that individual. At the same time, you may retain the agent-side recording, provided it contains no personally identifiable information (PII) for purposes such as quality assurance or customer experience improvement.
To delete a file:
- Select the three dots.
- Click the Delete button.
Selecting the delete option is a decisive action. Deleting recording files removes them permanently from the Conversations platform, and these files cannot be restored.
Although deleted recording files are permanently removed from the platform, Conversations retains a record indicating that the recording once existed. While the content is no longer accessible, the system maintains an audit trail, including who deleted the file and the deletion timestamp for a defined retention period. After this period expires, the audit record is also permanently deleted.
Call recording data retention and deletion [#call-recording-data-retention-and-deletion-recordings]
Infobip deletes the collected data to ensure not to keep it longer than necessary, depending on your business needs and any applicable legal regulations.
Unless otherwise agreed with you, the default retention rules are implemented to take care of the collected recording data. However, if your business needs require retention periods that differ from the default period, you can customize the retention period based on your needs.
Learn more about data retention.
On-hold messages
You can configure the on hold music and the announcement message that customers hear while waiting for an agent to return to the call.
- Only one configuration can be applied per queue.
- If a configuration is disabled, the system reverts to the default configuration.
Configure on-hold messages [#configure-on-hold-messages-on-hold-messages]
- Go to Conversations → Settings → Channels → Calls → On hold messages.
- To edit the Default message (applies to all new queues):
- Select the three-dot menu.
- Select Edit.
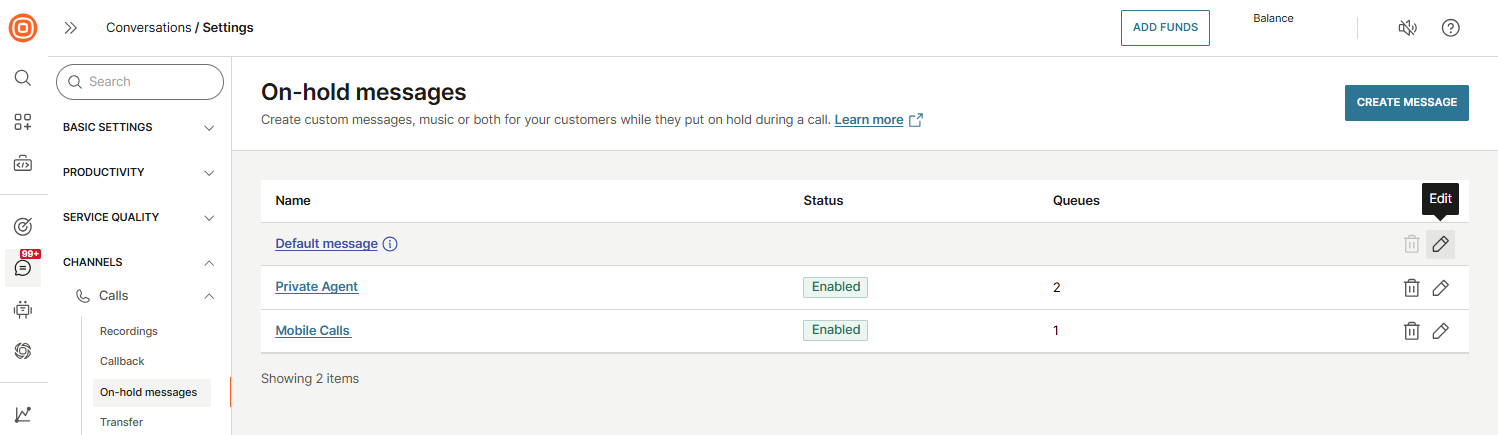
- To create a new configuration:
- Select the Create message button.
- From the drop-down menu, choose the queues that the on-hold message will be applied to.
- Choose music from the library or upload your own audio file.
- (Optional) Preview the music before saving.
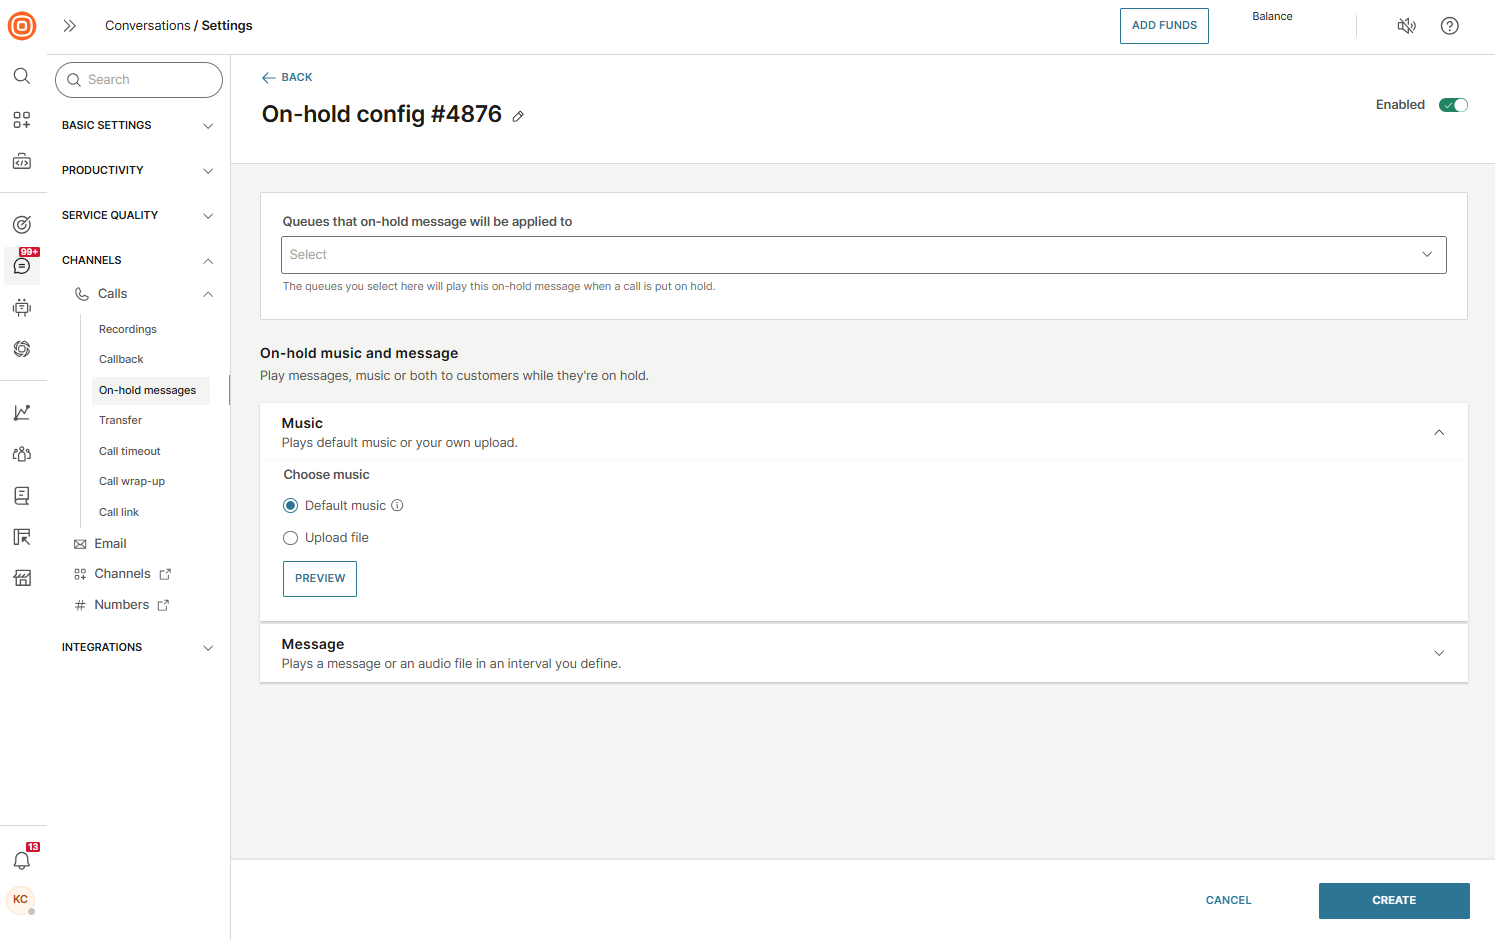
- Add an announcement message:
- Enable the announcement toggle.
- Choose between:
- Text-to-speech: Enter your message, select language, voice, and speech rate. Define how often it should repeat (default = every 10 seconds).
- Audio file: Upload a pre-recorded file.

- Click Create to save the configuration for the queue.
- Repeat these steps for other queues if you want different setups.
Call transfer
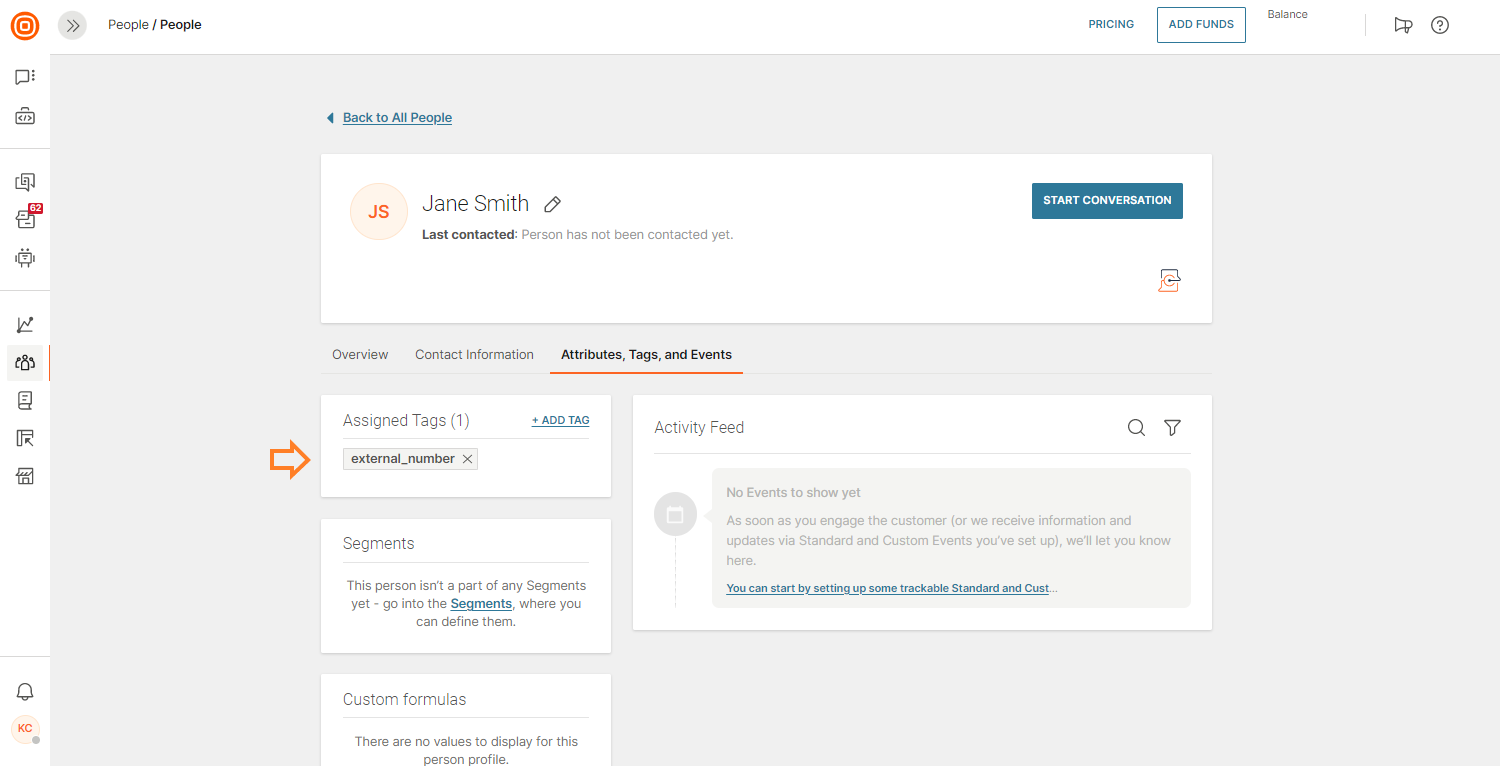
Agents can transfer customers to any valid E.164 formatted phone number. These numbers can be stored in People under Contacts or entered manually by the agent (if allowed).
To make external transfers available, organizations must tag contacts in People with external_number. This tag enables external dialing and helps build richer profiles by unifying customer details across Infobip products and back-end systems.
Configure transfer music and message [#configure-transfer-music-and-message-call-transfer]
You can configure custom transfer music and messages to provide a smoother and more personalized customer experience. By default, preselected music and messages are played during transfers.
- For queue transfers, the configured waiting strategy is played once the customer reaches the Conversations platform.
Configure transfer music [#configure-transfer-music-call-transfer]
- Go to Conversations → Settings → Channels → Calls → Transfer.
- Select the pen icon to configure transfer music.
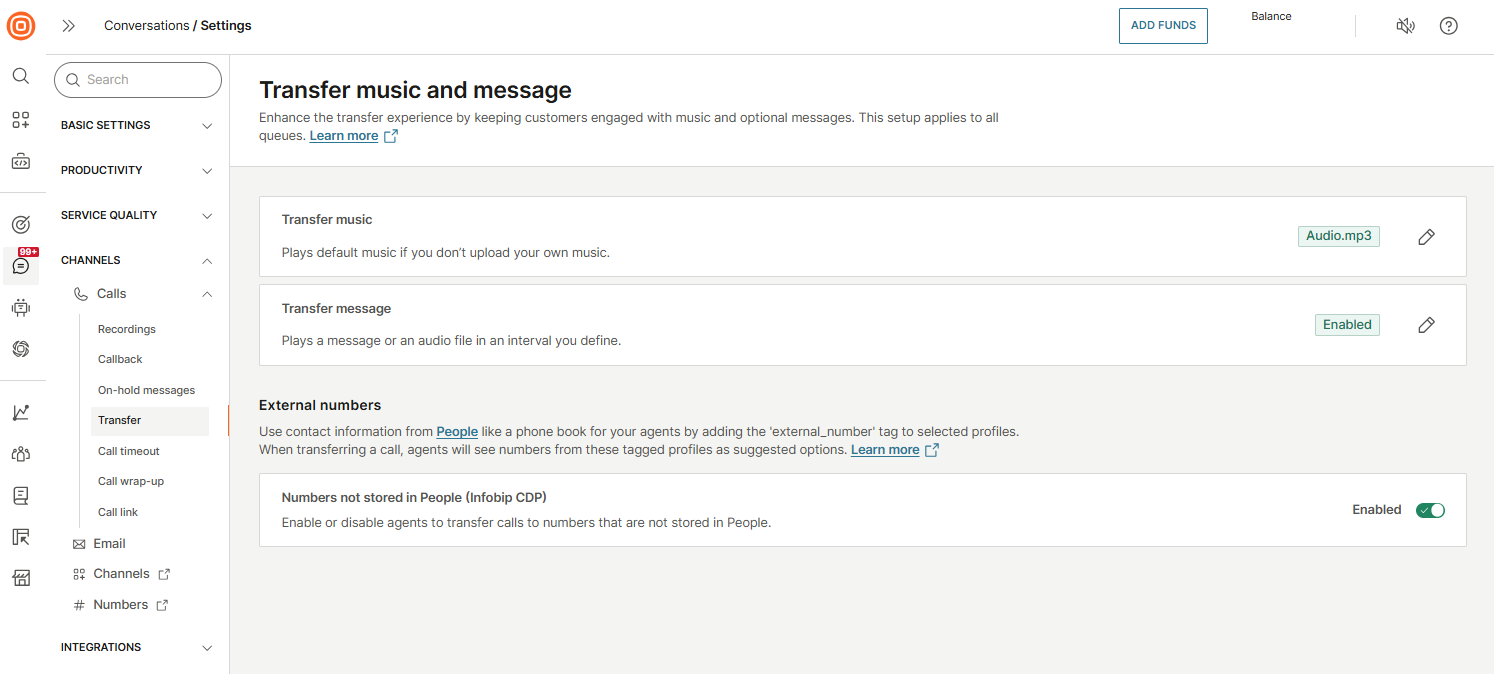
- Choose one of the following options:
- Default music - Use the system's predefined music.
- Upload file - Use your own custom audio file.
- If uploading a file:
- Select Upload file, then use the Browse button or drag and drop your file.
- Supported formats:
.mp2,.mp3,.wav,.ogg.
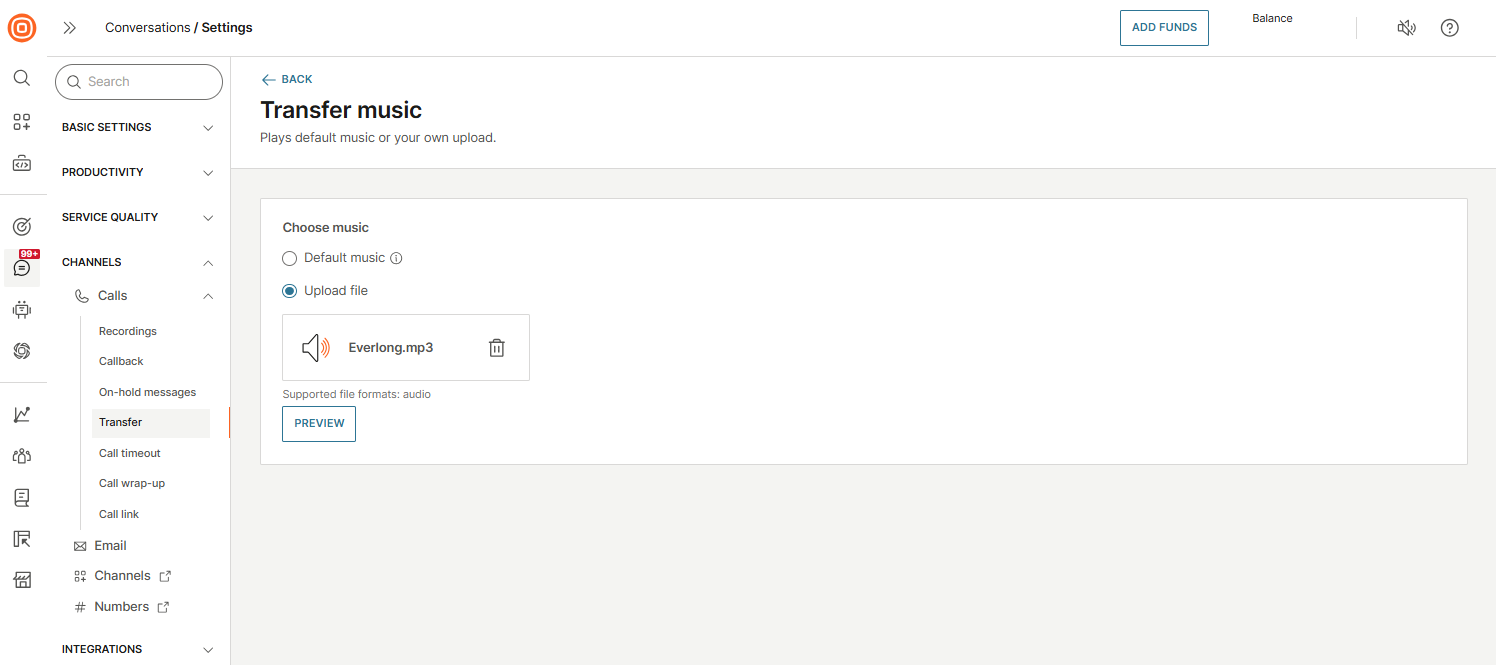
- Select Save to apply changes.
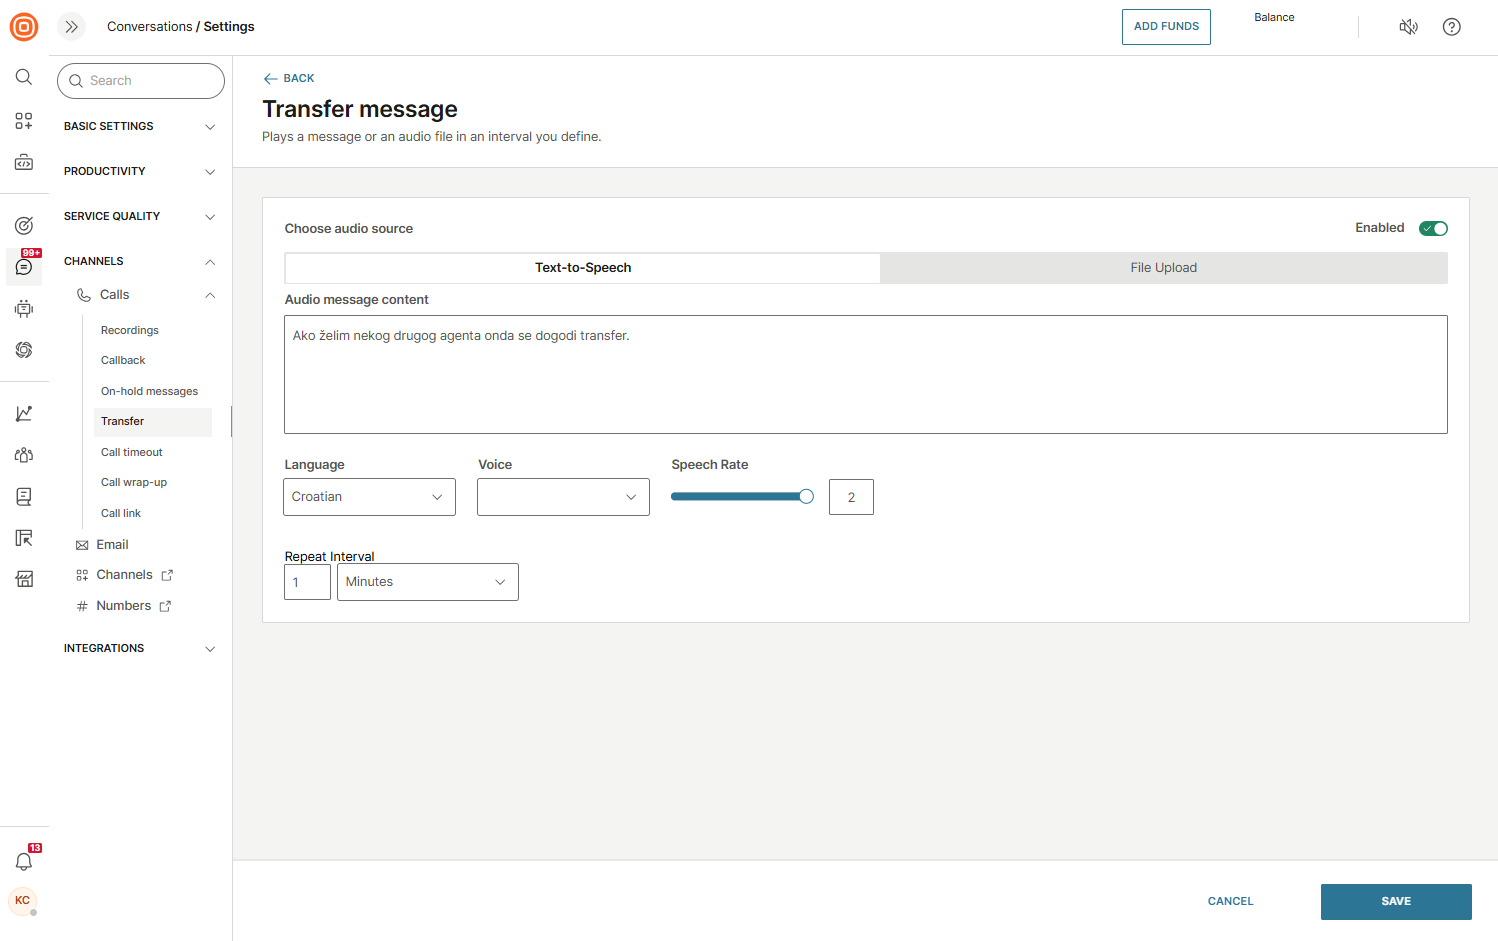
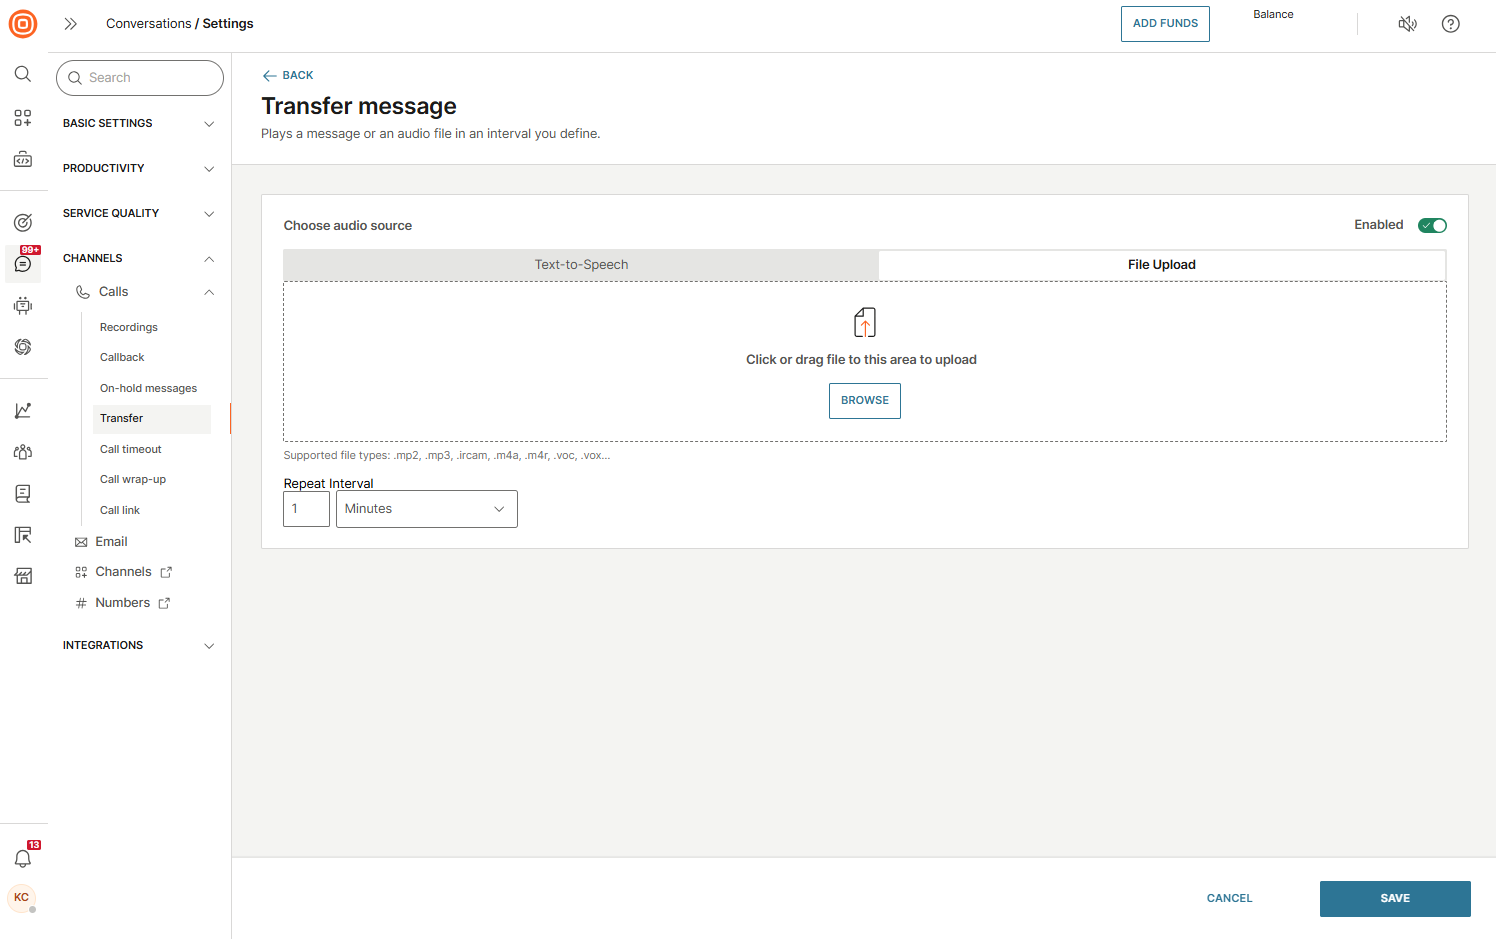
Configure transfer message [#configure-transfer-message-call-transfer]
- Go to Conversations → Settings → Channels → Calls → Transfer.
- Select the pen icon to configure the transfer message.
- Choose one of the following options:
- Text-to-Speech (TTS)
- Enter the message script in the text field.
- Configure the following options:
- Language
- Voice
- Speech rate
- Repeat interval (defines how often the message repeats)
- File upload
- Browse or drag and drop your audio file.
- Set the Repeat interval.
- Text-to-Speech (TTS)
- Enable the transfer message, then select Save to confirm changes.
Configure call transfer [#configure-call-transfer-call-transfer]
- Go to Conversations → Settings → Channels → Calls → Transfer.
- In the External numbers section, enable or disable the option to allow agents to enter phone numbers manually that are not stored in People:
- Enabled: Agents can enter new phone numbers manually. These numbers are automatically added to People with the
external_numbertag and will appear in the drop-down next time. - Disabled: Agents can only transfer calls to numbers stored in People.
- Enabled: Agents can enter new phone numbers manually. These numbers are automatically added to People with the
Call transfer flow [#call-transfer-flow-call-transfer]
Once you set up the Call transfer functionality, agents can either transfer calls only to external numbers stored in People or, if enabled, also enter phone numbers manually.
The transfer flow depends on the configuration:
- While on an active call, agents see the Transfer option.
- In the From field, agents select the number shown to the external party:
- For PSTN calls, the system automatically uses the customer's DID number (no drop-down menu).
- For WebRTC calls, agents can choose one of the DID numbers already assigned to the account.
- In the To field, agents select or enter the destination number:
- If manual entry is allowed, agents can type in the number.
- If a person in People has a phone number, it will appear as an option.
- Contacts tagged with external_number in People appear in the external phone book.
- As agents type, all matching People contacts are suggested.
- To complete the transfer, the agent clicks Transfer. The agent is disconnected, and the customer continues with the external party.
When the option Numbers not stored in People is enabled, agents can manually enter external numbers in the web interface. These numbers are automatically saved in People with the external_number tag, so they will appear in the external number phone book the next time.
Early Media in call transfers [#early-media-in-call-transfers-call-transfer]
Conversations supports Early Media for voice calls. This feature can be enabled on customer accounts by contacting the Infobip account team.
The behavior of call transfers to external numbers depends on whether Early Media is enabled or disabled.
Early Media enabled [#early-media-enabled-call-transfer]
- Customers will hear hold music until Early Media is established.
- Once the speech path is connected, the customer will hear the appropriate network audio (for example, ringing, busy, out of service).
Early Media disabled [#early-media-disabled-call-transfer]
- Customers will hear hold music only until the destination party answers or the call times out.
- No network audio is provided (for example, no ringing, busy tone, or out-of-service message).
- Customers will not have any indication of call progress.
Recommendation: Infobip recommends enabling Early Media for a better customer experience.
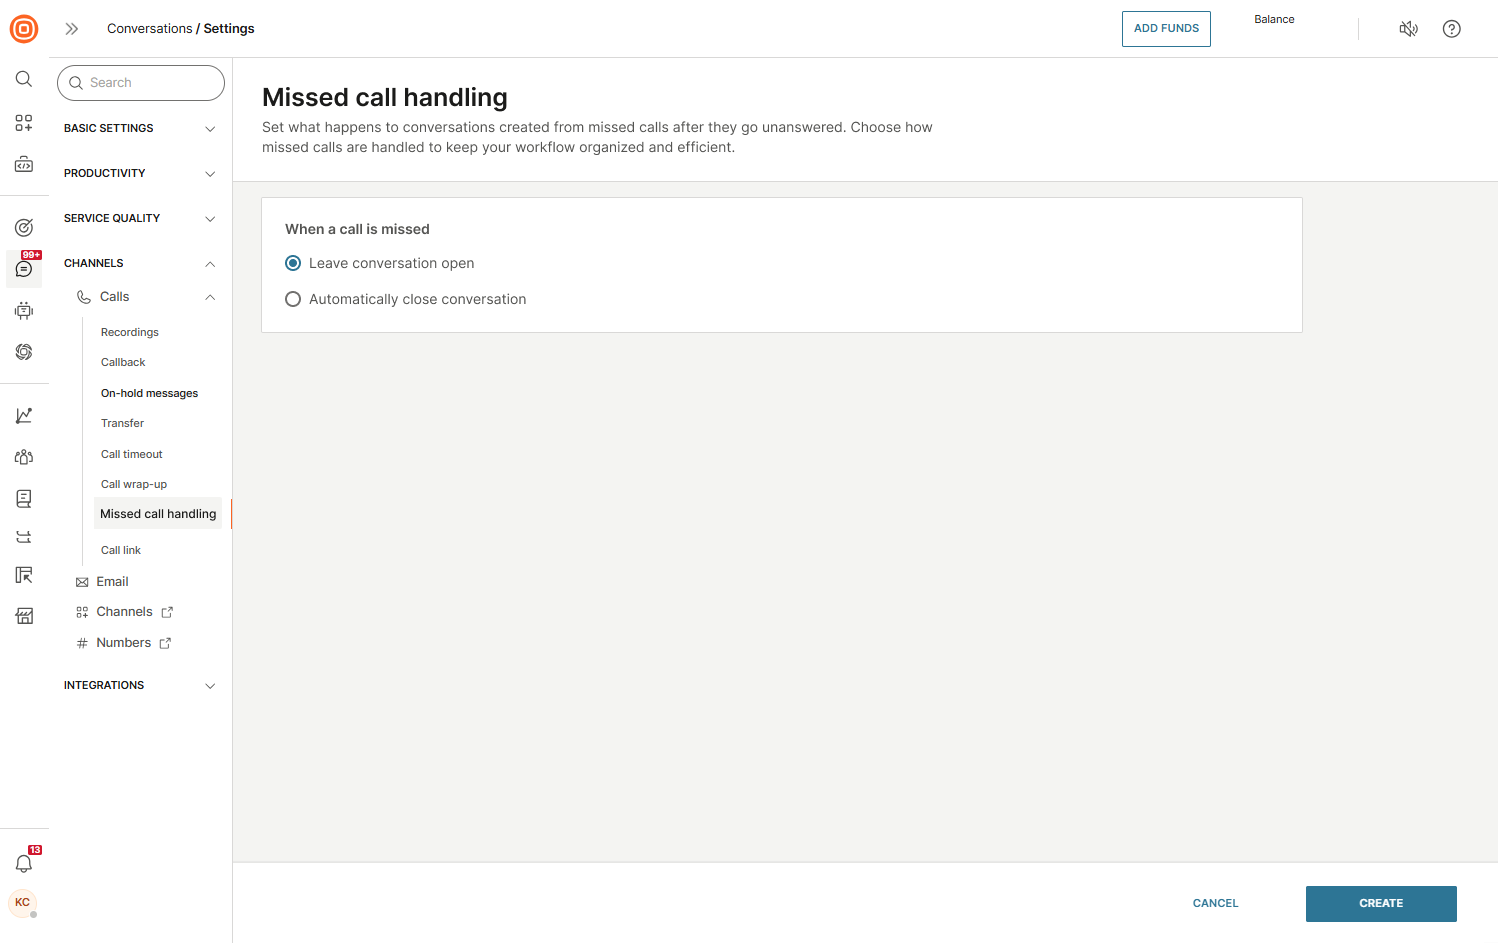
Missed call handling
In the Missed call handling setting, you can define what happens to conversations when a missed call occurs.
To configure this:
- Go to Conversations → Settings → Calls → Missed call handling.
- Choose how missed calls conversations should be handled:
- Leave conversation open: Conversations remain in All Work. Unassigned conversations stay unassigned, while previously assigned WhatsApp Business Calling and Viber Business Calling conversations with unanswered calls remain assigned to the same agent.
Note: This option may result in a large number of unhandled open conversations and can affect conversation metrics if not managed properly. - Automatically close conversation: Conversations are closed without agent action when a missed call occurs.
- Leave conversation open: Conversations remain in All Work. Unassigned conversations stay unassigned, while previously assigned WhatsApp Business Calling and Viber Business Calling conversations with unanswered calls remain assigned to the same agent.
- Select Save. Configuration changes take effect immediately.