Agent guide for calls
Everything you need to know about the agent's capabilities and options, including those for receiving calls, making calls to customers, conducting video calls, and more, is covered in this section.
For additional details about the agent behavior, such as how to log in, change status, create a note, and more, see Agent guide.
Receive a call
Calls can be placed to phone numbers or they might originate from an application. It can be either audio or video. When a call is received, a new conversation is created, or the call is included in an existing conversation.
You can receive only one call at a time. To receive the call, you must be in the Active status as well as in the queue that the call (conversation) is routed to. Agent is considered unavailable while in wrap-up time. Read more on wrap-up under the Call wrap-up window section.
When a call is routed to you, you will hear a ringing sound and an incoming call pop-up window with the customer's name, phone number and queue information will be shown in the agent panel. This will happen if the search based on the phone number in People is successful. Otherwise, only the phone number will be presented to you.
The pop-up window will also enable you to answer or decline the call.
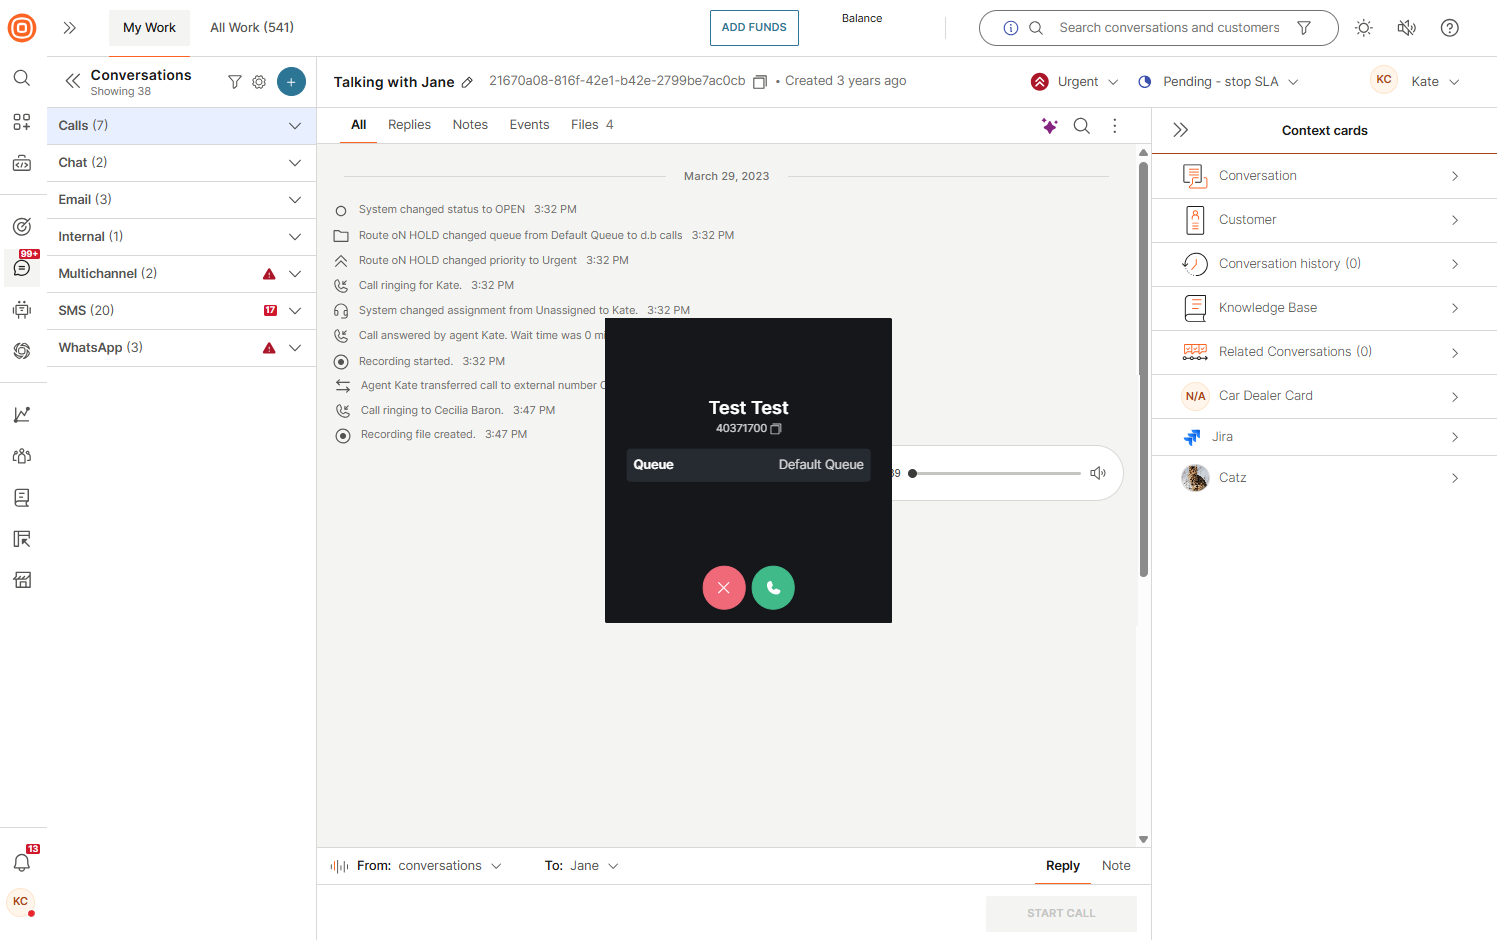
Incoming call information [#incoming-call-information-receive-a-call]
The incoming call modal is the very first information the agents may find out about the customers. We have enriched it to showcase more information about the customers and the incoming call.
Before answering the call, agents can now see this info on the call modal:
- Customer's full name and phone number
- The name of the queue the call is coming to (for example, Customer support)
- Options to answer or decline the call
Moreover, you have the option to copy the phone number with a single click and paste it into your notes, send it to a colleague, or a third-party CRM if used for any storage information purposes.
Make a call
Sometimes agents need to call the customer first. Conversations offer the option of making a call to your customer's phone number.
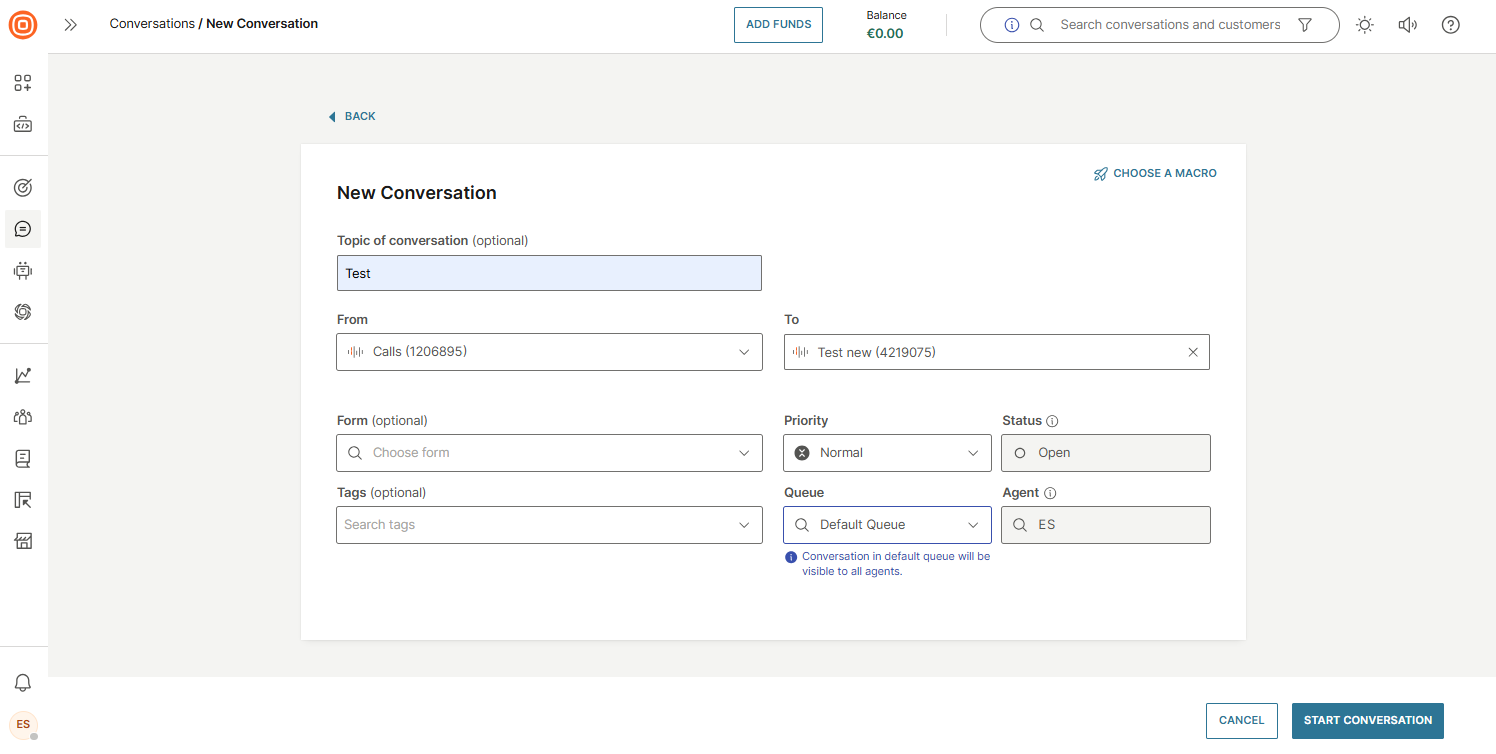
To do that, select the plus button (+) inside the My Work panel and select the Start conversation option to start a new conversation.
Specify the following:
- In the From field select one of the available Voice numbers. For the number to be shown in the list it needs to be configured for Conversations. Read more on how to configure numbers.
- In the To field you need to specify the contact you will call. You can do that by searching and selecting some of the contacts from People or by typing in a new number and adding it.
- Optionally, you can select the wanted form and tags, as well edit the priority, status. The queue and agent cannot be changed.
- Select the Start Conversation button to create a new conversation thread.
Click here to find out more about the phone number validation.
The system will validate if there is an ongoing conversation and if there is, will offer the following scenarios:
- Pre-existing conversations assigned to the logged-in agent or unassigned
- The agent is prompted to view the conversation and continue the communication with the customer if it is relevant to the ongoing topic. A follow-up call can be initiated if needed.
- Pre-existing conversations assigned to another agent
- The agent is notified that a new call cannot be initiated, nor a conversation started with this customer as another agent is already communicating with them. In this case, both parties need to agree on whether the conversation can be transferred; another agent can make that call or the ongoing conversation be closed.
- No existing conversations
- A new conversation will be created
Make an outbound call
When creating a new outbound call, you can add additional fields to the conversation, such as:
- Form (optional)
- Priority
- Tags (optional)
- Queue
This enhances the level of control over call routing and organization. Additionally, it ensures that sensitive call details are accessible only to authorized personnel.
When making outbound calls towards a phone number:
- Agents will hear certain pre-connection audio (Early Media) such as busy signals, failure-to-connect errors, or other informational messages from mobile operators.
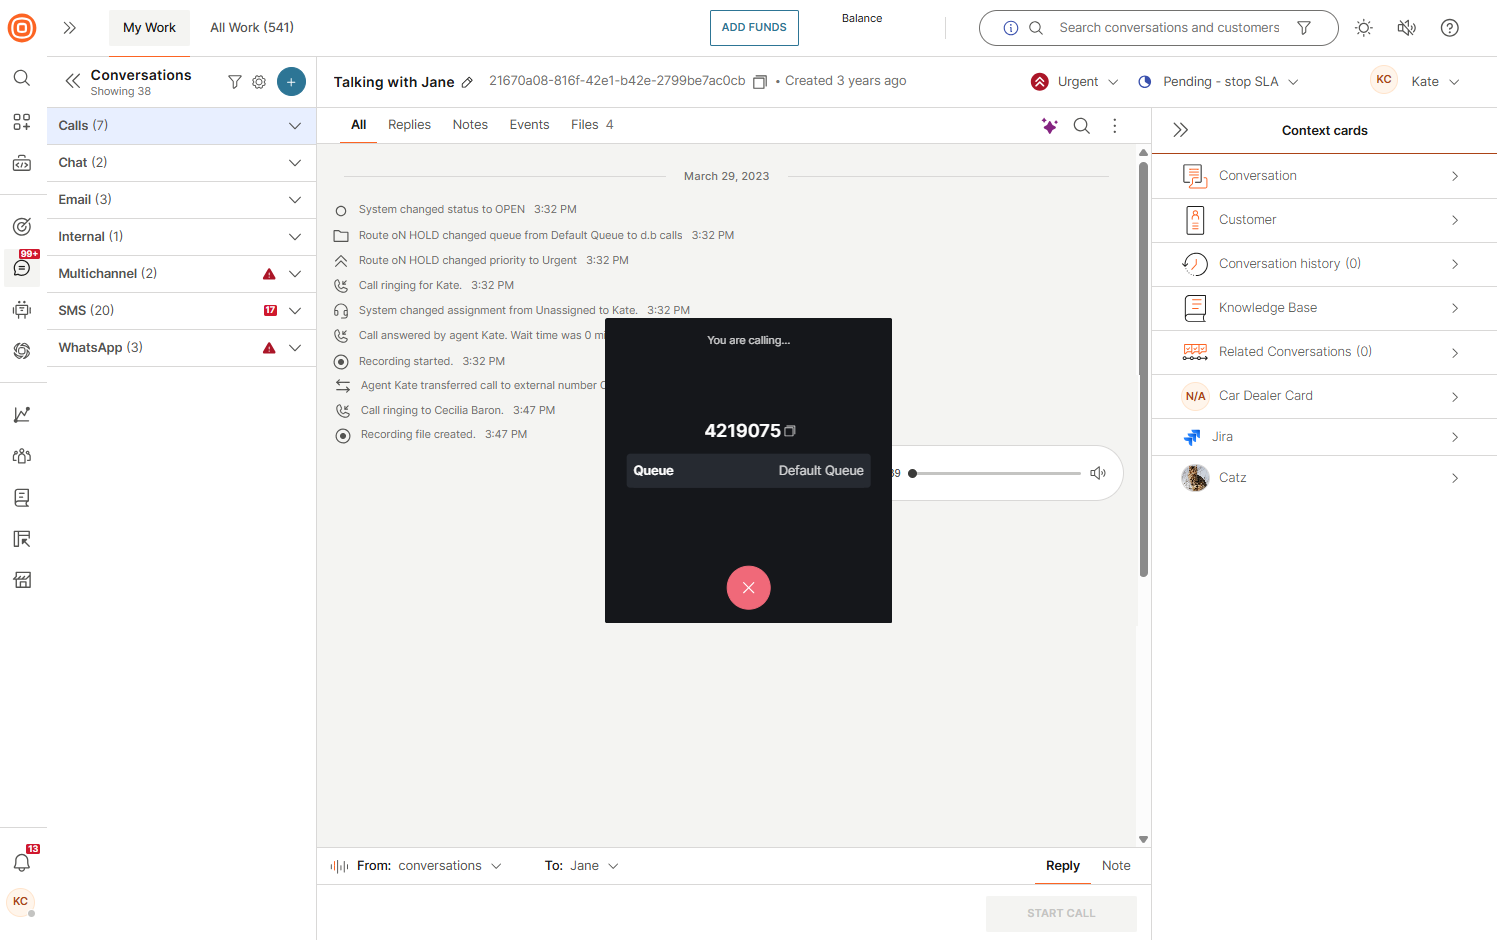
- When creating outbound calls, you can only add a queue you are part of, and you cannot change the assignee.
- After the customer has answered the phone, a new pop-up with call controls will be displayed.
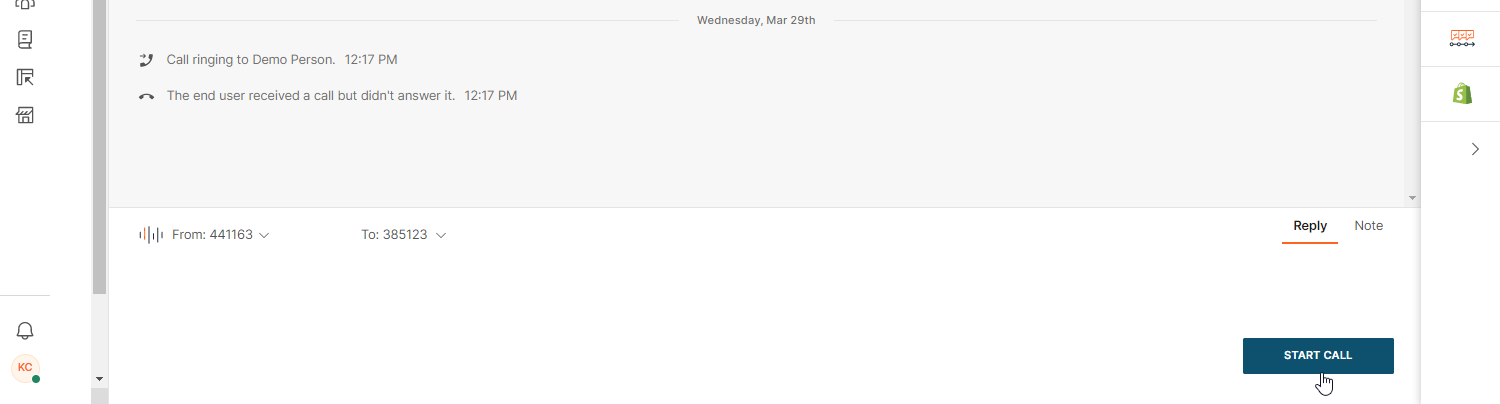
Make a follow-up call
After you have been contacted by the customer, you can also call them back:
- Change the channel to Voice.
- Select the number and use the Start Call button shown in the reply message box.
Generate call link
You can use the call link feature as a fast and simple way to engage your customers in an audio or video call. You can create and send branded customized web links that your customers can access and use to initiate audio or video calls towards the Conversations contact center.
Links can be created for existing conversations as well as new ones. If calls are to be scheduled, time-frame input from agents are required.
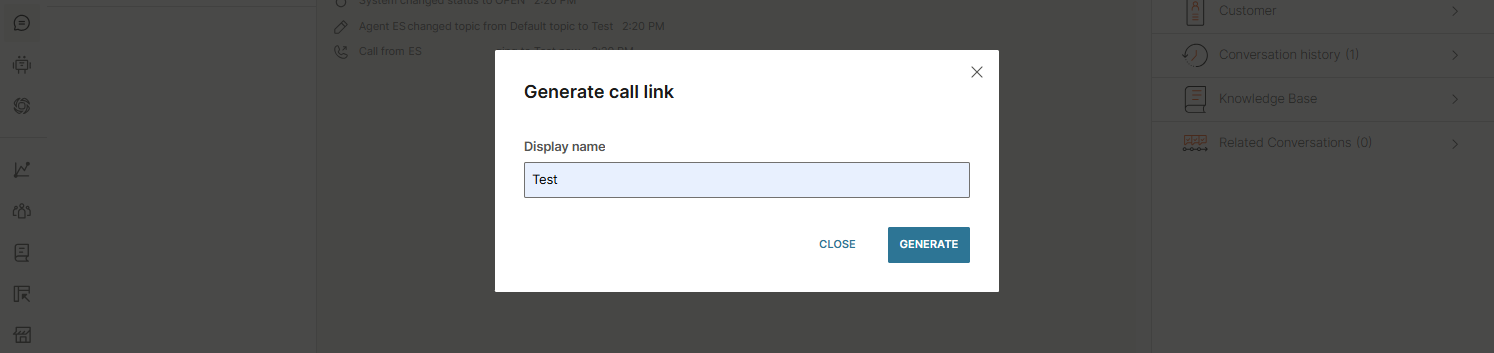
Create call link for guest conversations [#create-call-link-for-guest-conversations-generate-call-link]
You can create call links unrelated to existing conversations.
To do that:
- Select the + menu in the Conversations window and choose the Generate call link option.

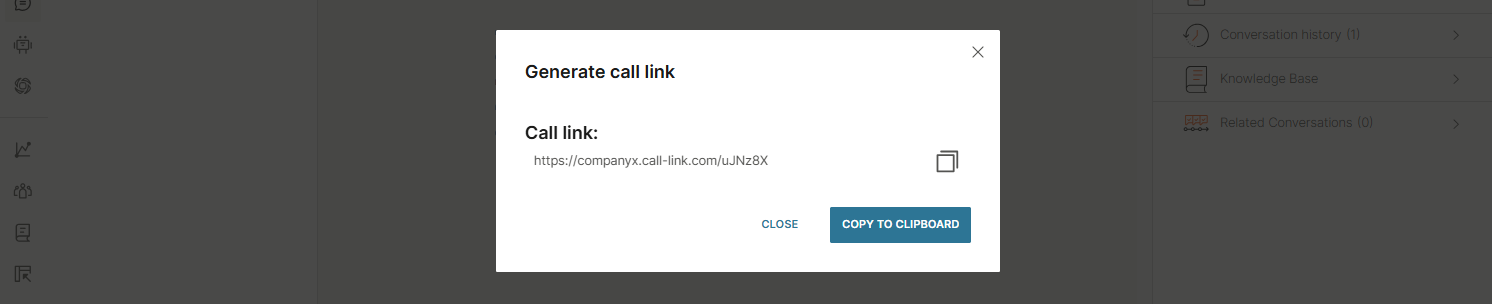
- Add the display name and select the Generate button.
- A link for the call will be created. The link can be copied to clipboard and shared with the customer over any available channel.
Create call link from existing conversation [#create-call-link-from-existing-conversation-generate-call-link]
If you are already engaged with the customer in an existing conversation via one of the available channels and you want to create and share the call link:
- Use the Generate call link icon in the message box.

- If the link has been configured as time-frame, then you will be prompted to enter the link validity period in a pop-up window.
- Selecting the Generate option will create the link. If the link type has been configured as one-time or expiry, the link will be generated automatically upon clicking the Generate button.
- You can send the link immediately or copy it and send it as part of the next message intended for your customer.
- After the customer has received the link, they will be able to access the web page in line with steps explained in the call link configuration and setup.
- When they make a call using this link, you will receive the call in the Conversations panel.
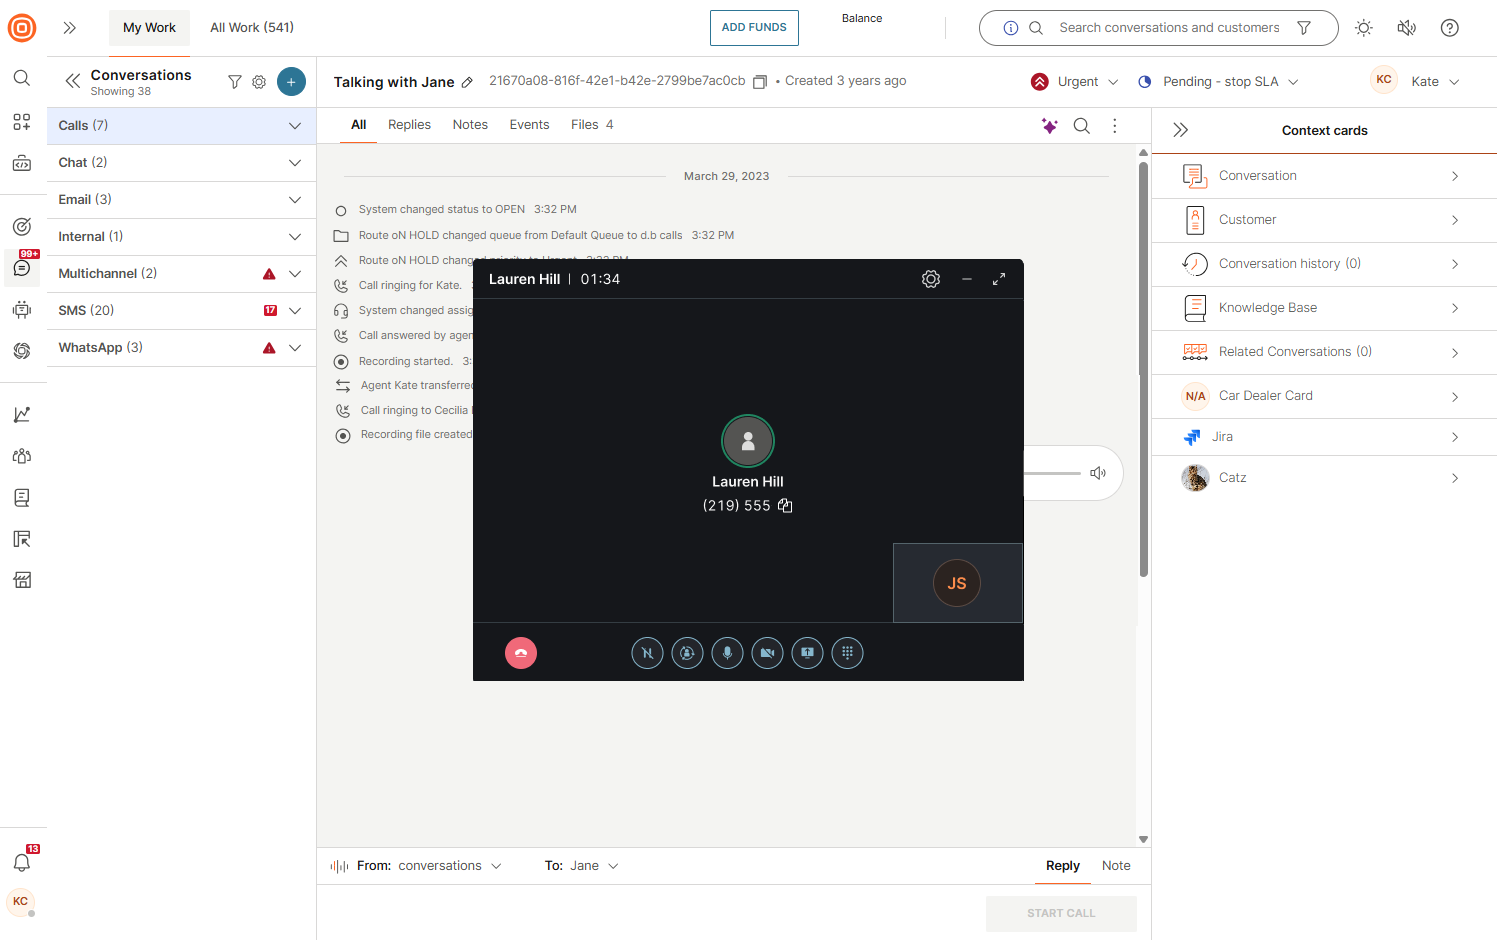
Call options
Here you can find all the audio and video call options available to agents, both during a call and after it ends.
Call controls are dynamic and appear only when relevant. For example, video and screen-sharing options are not shown during a regular phone call. The exact set of controls may vary, but the most common ones include:
- End call
- Hold
- Transfer
- Mute/unmute
- Turn camera on/off
- Share screen
- Dial pad
In addition, agents can adjust settings or minimize/expand the call window for better multitasking.
Call shortcuts [#call-shortcuts-call-options]
Call shortcuts let you quickly control key actions during a call without navigating through the call menu. With simple keyboard combinations, you can mute or unmute yourself, switch your camera on or off, or instantly start and stop screen sharing.
- Mute/Unmute:
Ctrl + M - Camera on/off:
Ctrl + V - Share/Stop sharing:
Ctrl + S
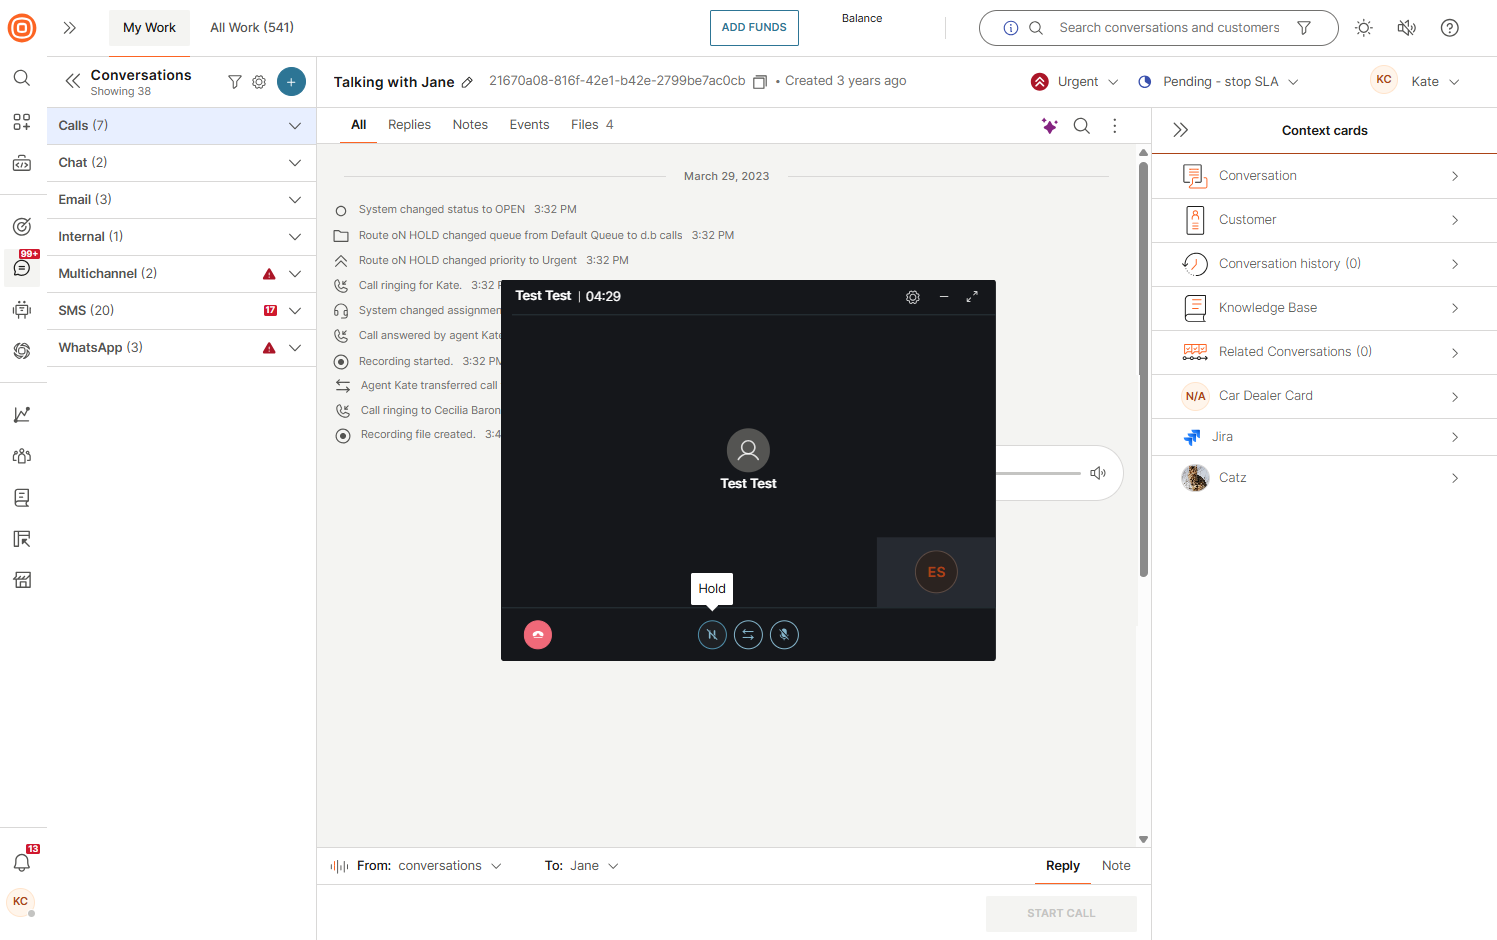
Call on hold
When you answer a call, you can choose to place the customer on hold if you need time to verify information or perform another task.
Follow these steps if you need to place a customer on hold during a call:
- While on an active call, select Hold.
- Your status will change to On hold until you resume the call.
- The agent panel will log this action as a Call on hold event. Admins can use this data to monitor hold duration and service quality.
- While on hold, the customer will hear an audio cue (music or a pre-recorded announcement, depending on the setup).
- When ready, select Resume to return to the conversation.
Admins can configure music on hold and the announcement per queue (every queue can have a different setup). The Hold option is available on mobile as well.
Transfer call to agent
Transferring a call sends it to another agent in the same queue, who can accept or reject the incoming call.
To transfer a call:
- Select the Transfer button.
- Click the Agents in '...' tab (the name is dynamic as it depends on how the queue is called).
- Then select or search for the available agent from the current queue you want to transfer the call to. Available agents are shown first on the list, and you can also use the refresh button next to the list to populate it in real time.
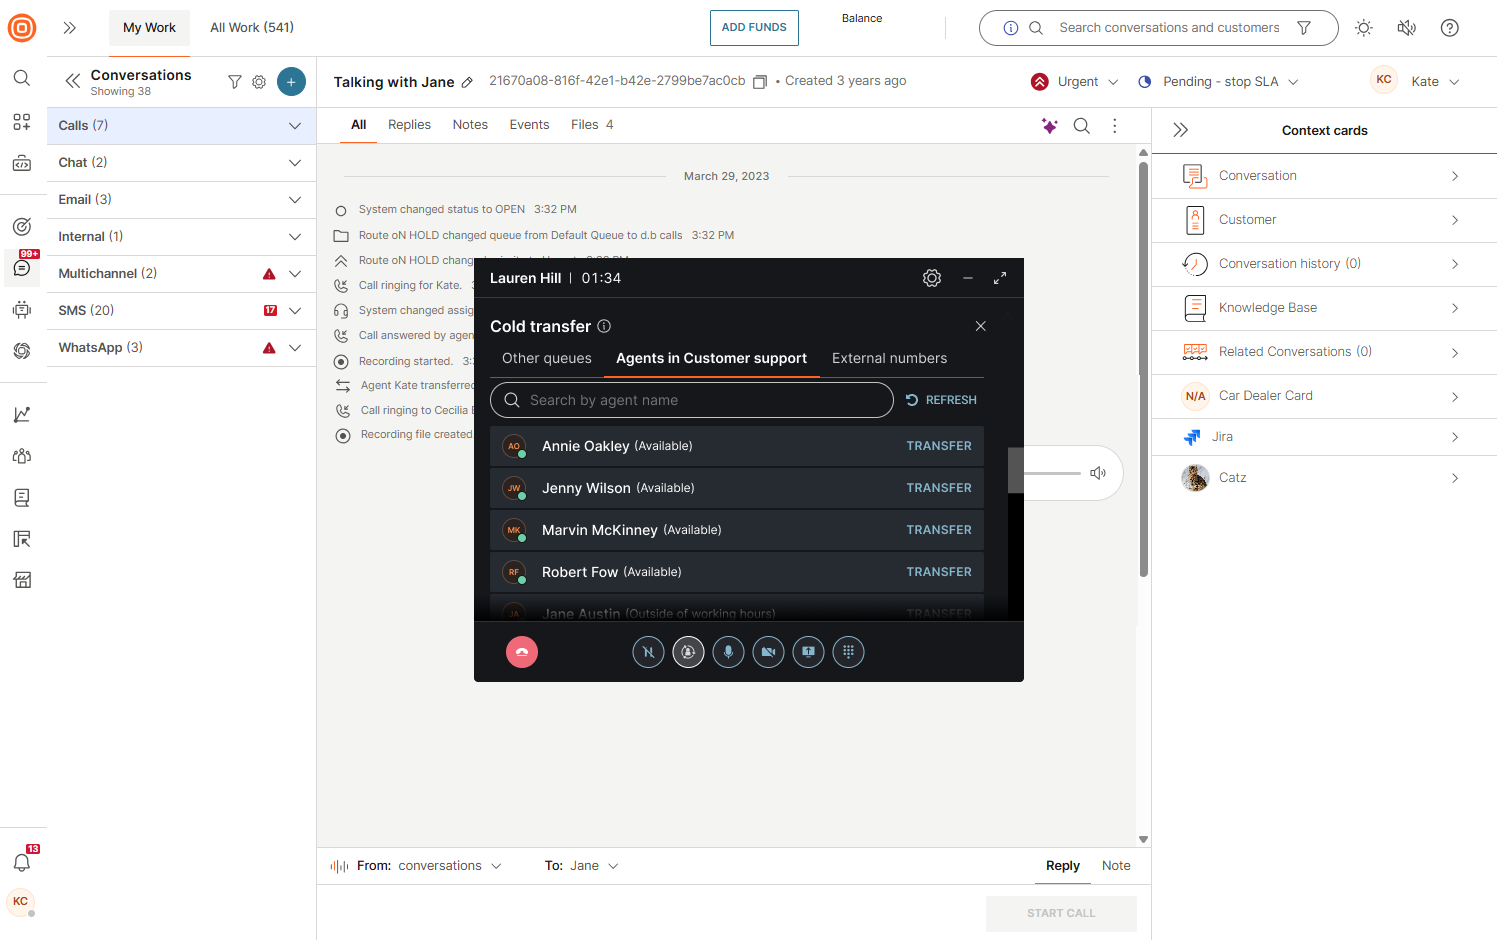
- When you transfer the call, it will end on your side and continue with the transferred agent and the customer.
- Additionally, the customer hears the ringing sound while being connected to the other agent.
- If you click the Hang up button, it will end the call for both parties.
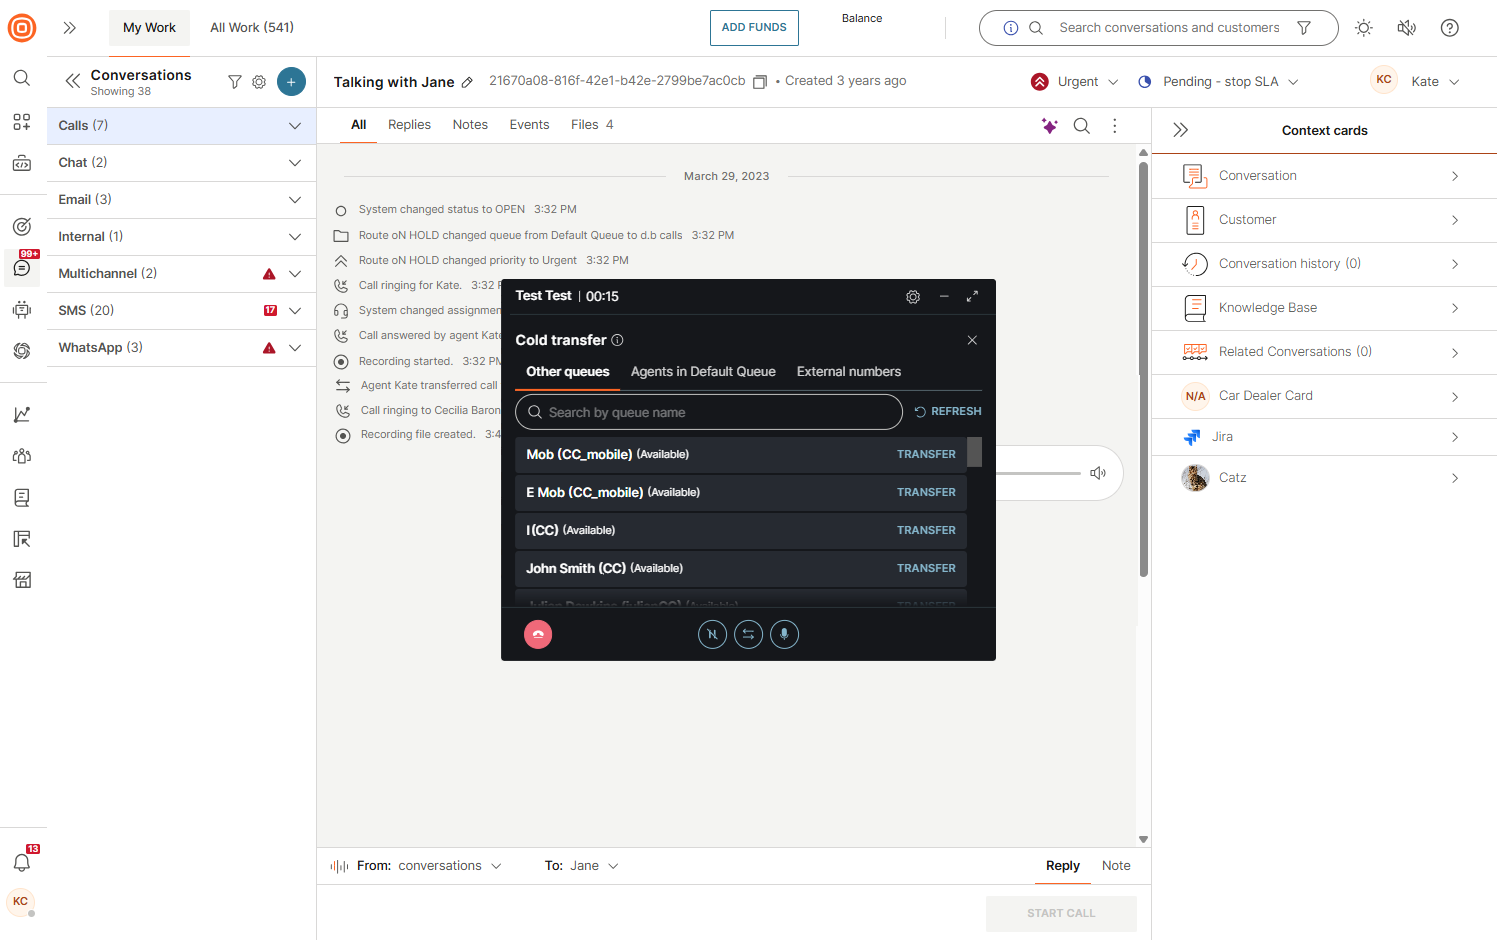
Transfer call to queue
You can transfer a call either to another agent within the same queue or to a different queue. Keep in mind that it is not possible to select a specific agent from a different queue.
To transfer a call:
- Select the Transfer button.
- In the call modal drop-down, choose choose the desired queue (note: you cannot pick a specific agent from a different queue). Alternatively, choose an agent from the same queue. The drop-down options during transfer show which queues and agents are available in the order of their availability.
- Select the Refresh button to update real-time statuses.
- When you select the desired queue and click the Transfer button, the call will be redirected to that queue and automatically ended on your side.
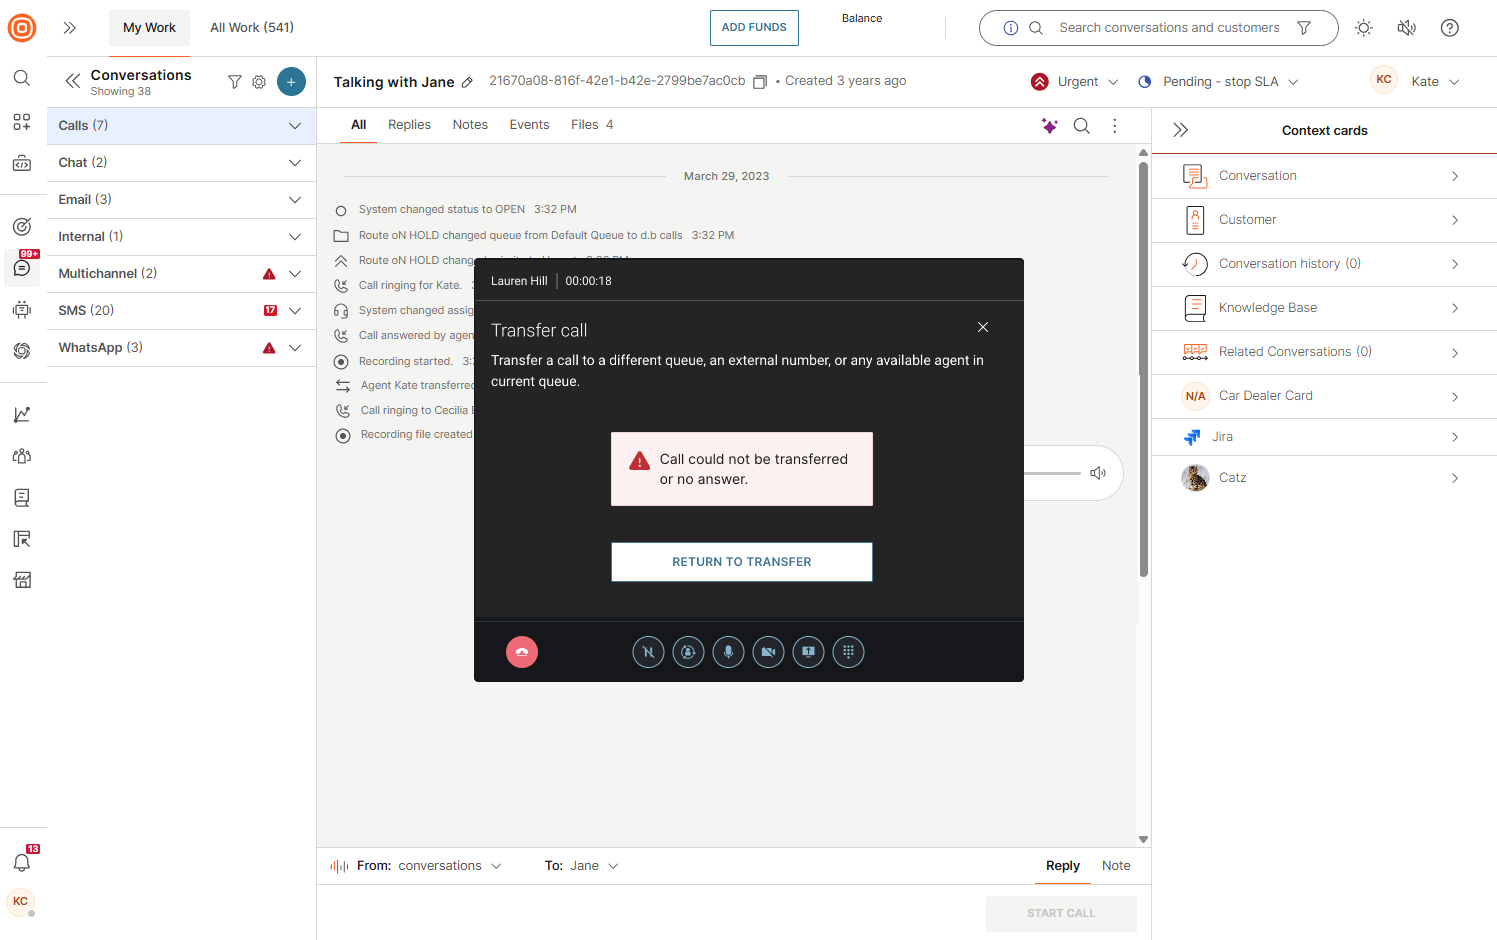
- If the transfer fails (for example, due to an error, the agent going offline, or becoming busy), the call modal will display a warning that the call cannot be transferred.
Queues that do not have the Automatic agent assignment turned on will not have the Transfer option available.
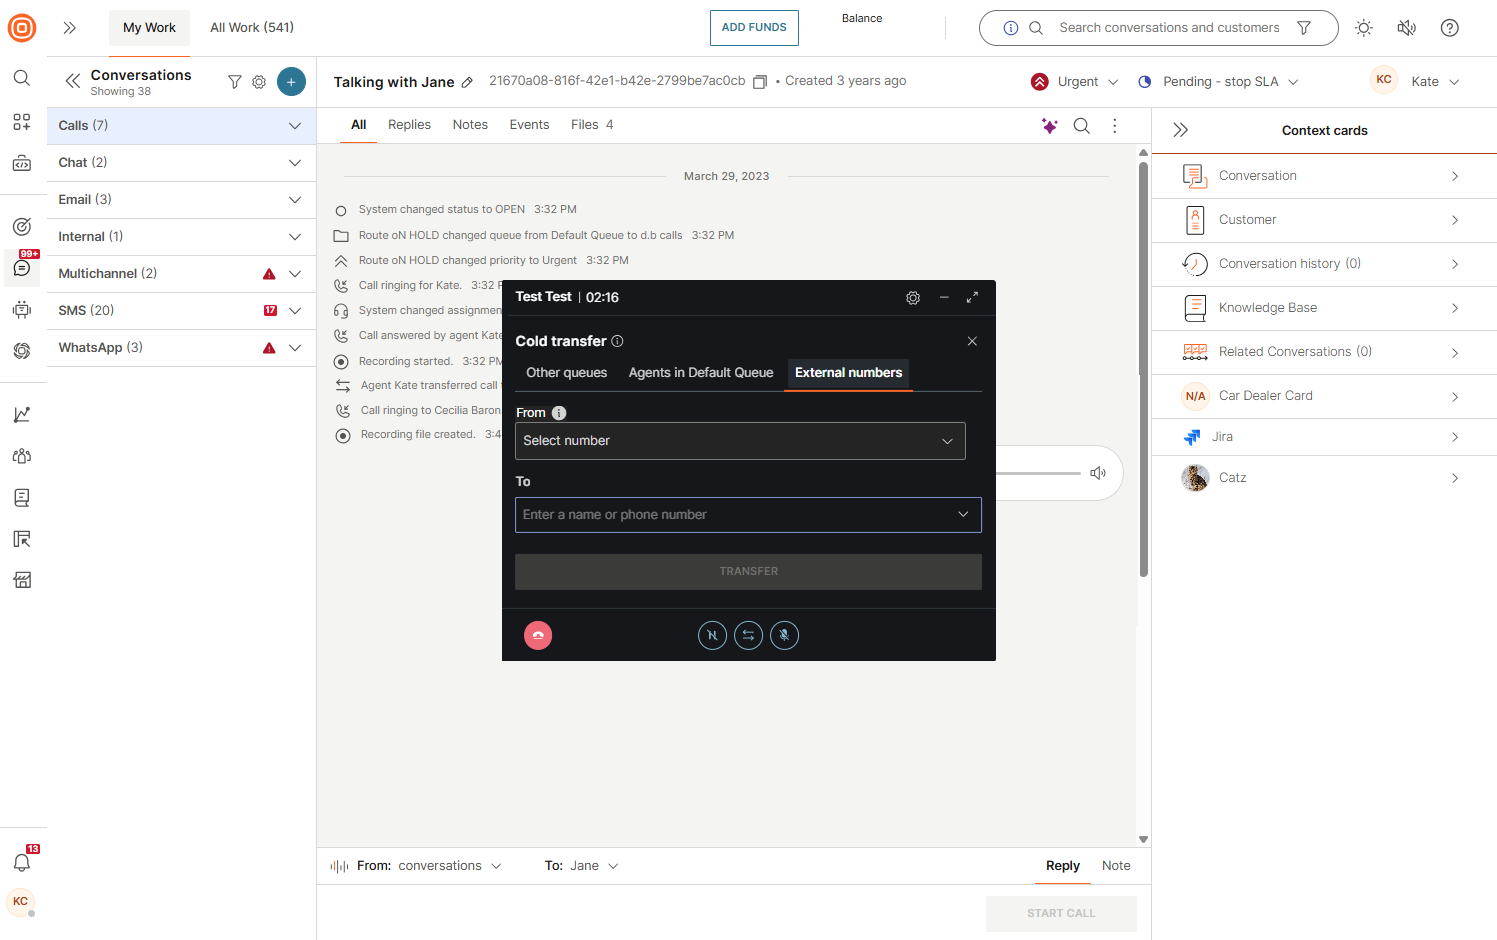
Transfer call to external number
You can use the Transfer to external number option to transfer customers to any valid E.164 formatted phone number. Phone numbers can be stored in People under Contacts or entered manually.
A system administrator or supervisor needs to pre-configure the application to enable external transfers. Based on the settings, agents will either be limited to external phone numbers stored in People and/or can enter phone numbers manually.
The flow varies slightly depending on the settings:
- Select the Transfer button.
- Click the External number tab to make the transfer to an external number.
- The From field is the number shown to the external party during the transfer and this field allows you to choose a number from the list menu or leave it for the system to choose automatically.
- The To field represents the destination phone number for the external transfer where you can enter a name or a phone number based on the following:
- If the application is configured to allow phone numbers to be entered manually, enter the desired destination phone number.
- A number is offered if a person in People has a phone number to be shown.
- If you start typing a name or a phone number for a specific person/third party, all phone numbers for a People contact are shown.
- Select the Transfer button.
- Once you transfer the call, you are disconnected from it and the external party continues the conversation with the customer.
While the transfer is in progress and the call is successfully dialed, the customer hears music or the ringing sound that stops when the call is established. If the external number is busy or not answering, the music/ringing sound stops, and the call is ended.
If the option to transfer the call to numbers that are not stored in People is disabled, and you enter a valid number in the To field, the transfer button is disabled with a message that the number or name is not found in the phone book.
Once you transfer the call, the wrap-up modal shows up allowing you to handle the conversation as you want (for example, close it) and an event is shown in the conversation indicating that you transferred the call to a specific number or person.
The recording does not continue after the call has been transferred, meaning that the system is recording the call up to the point of transfer and the rest is not recorded.
If the call transfer fails due to some technical difficulties, the call is returned to the agent.
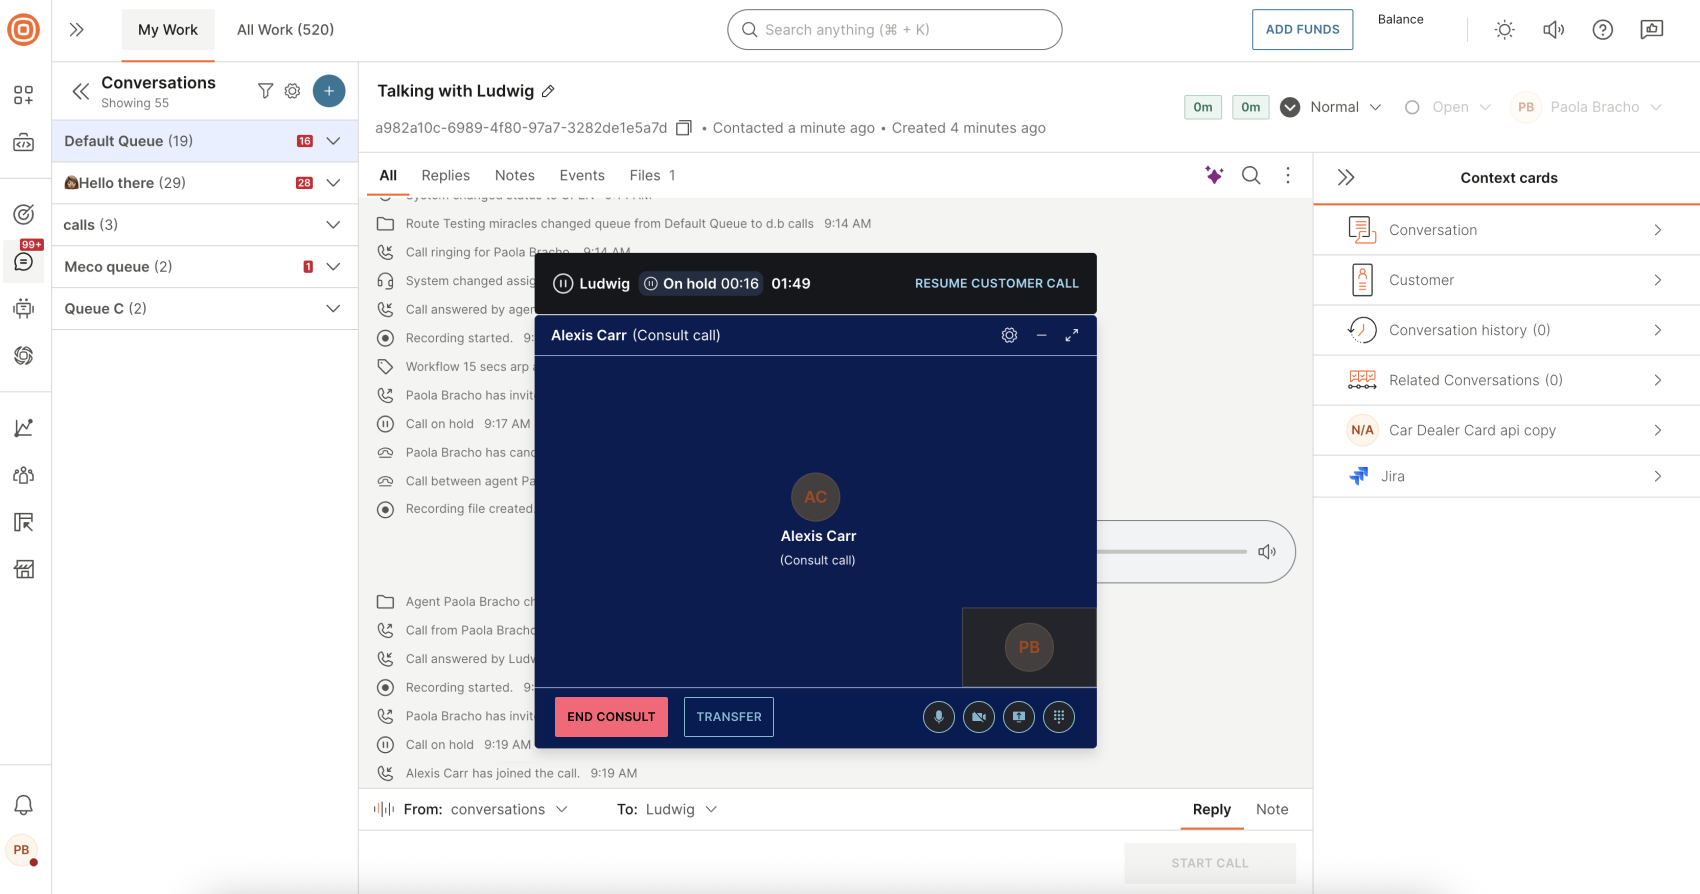
Consult call
EARLY ACCESS
This feature is released as Early Access.
Consult call allows agents to invite another colleague into an ongoing call privately and in real time, without the customer hearing the consultation. This enables you to quickly seek guidance, verify information, or confirm next steps while continuing to handle the customer interaction.
What can you do with a consult call
Using a consult call, you can:
- Consult a colleague without the customer hearing the conversation
- Collaborate on resolving customer issues in real time
- Obtain approvals, clarifications, or expert input during the call
- Merge calls
Consulting is optional and does not require a call transfer. After the consultation, you can either resume speaking with the customer or proceed with a warm transfer if needed.
Who can join a consult session [#who-can-join-a-consult-session-call-consult-call]
You can invite:
- Agents from specific queues (first available agent joins)
- Specific agents from the initial queue (direct targeted consult)
- External phone numbers (such as subject-matter experts)
- Additional participants can join for a consultation only (the customer does not hear the discussion)
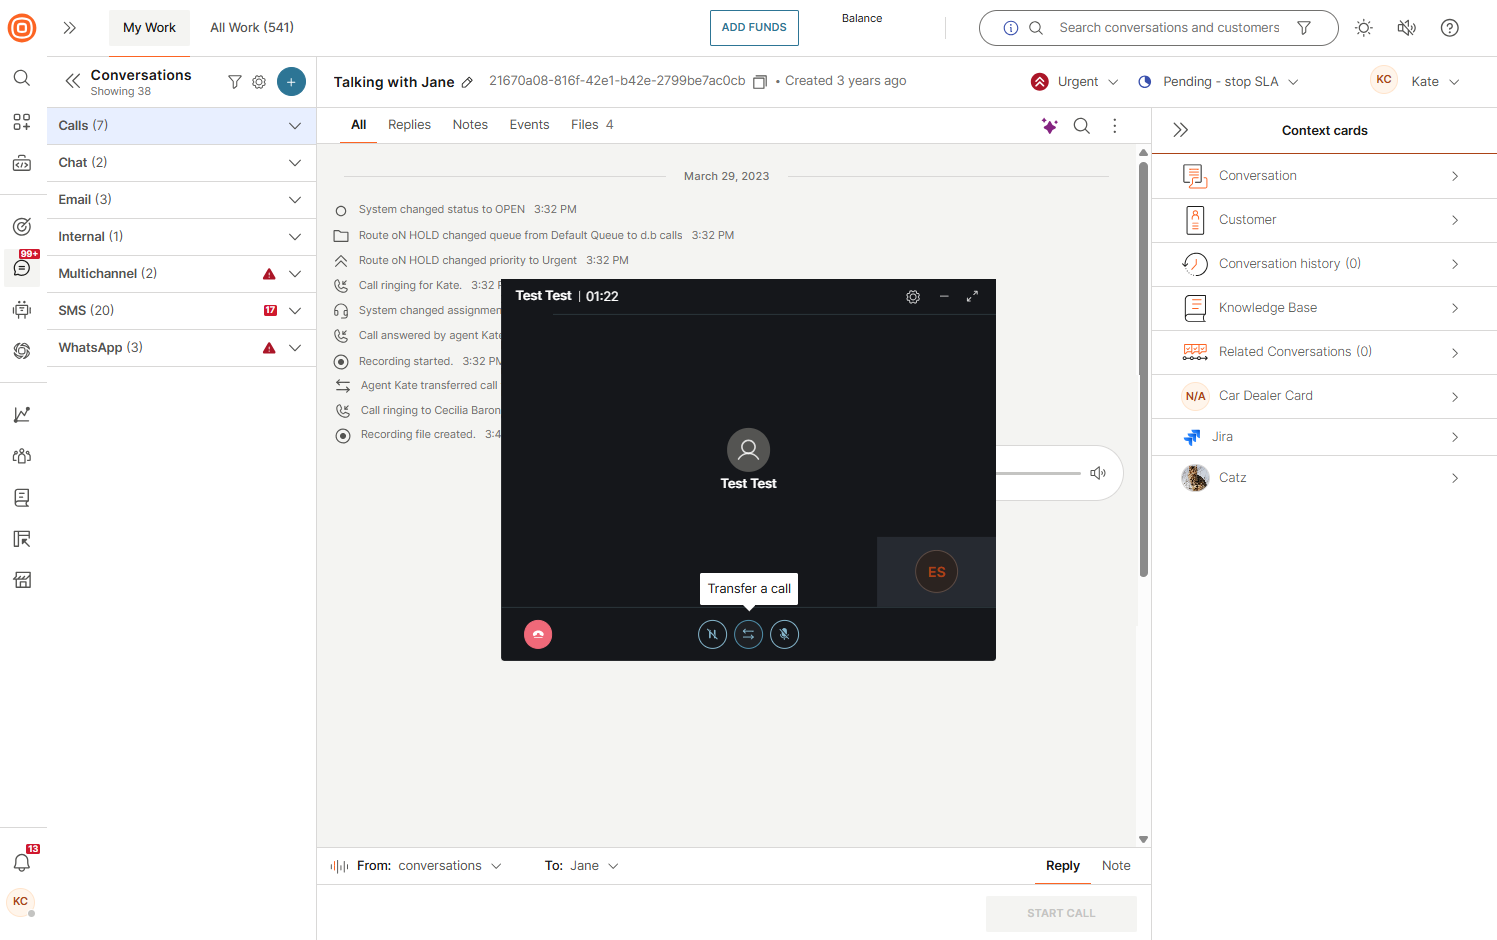
Start a consult call [#start-a-consult-call-consult-call]
To start a consult call:
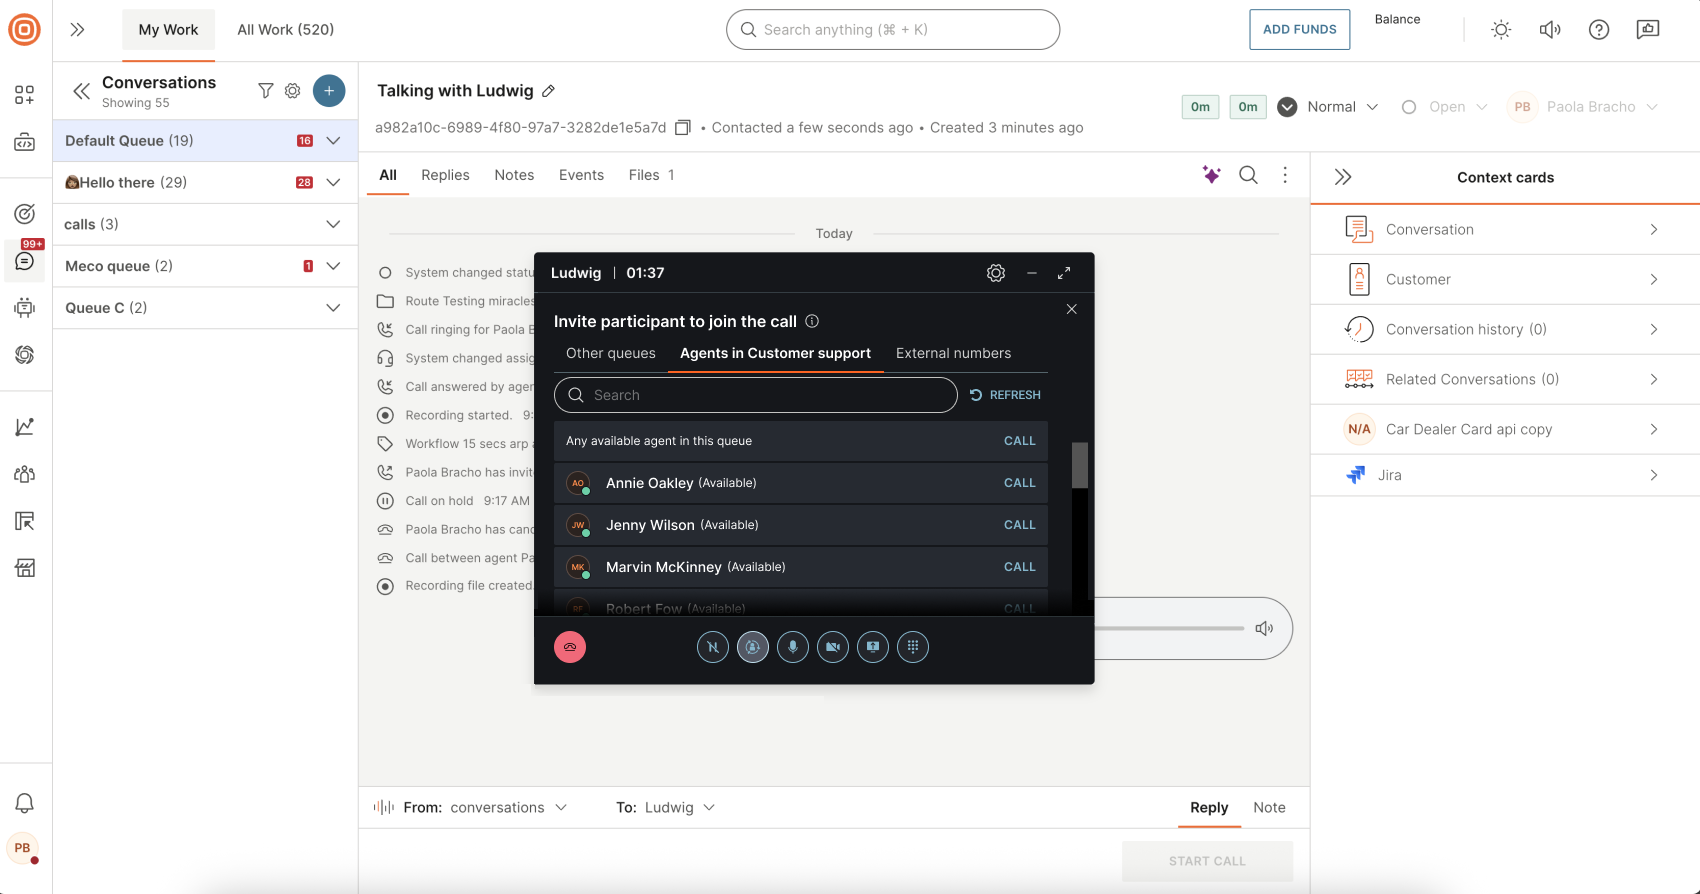
- Select the Transfer a call, consult or invite the agent button and choose the Invite participant to call option.
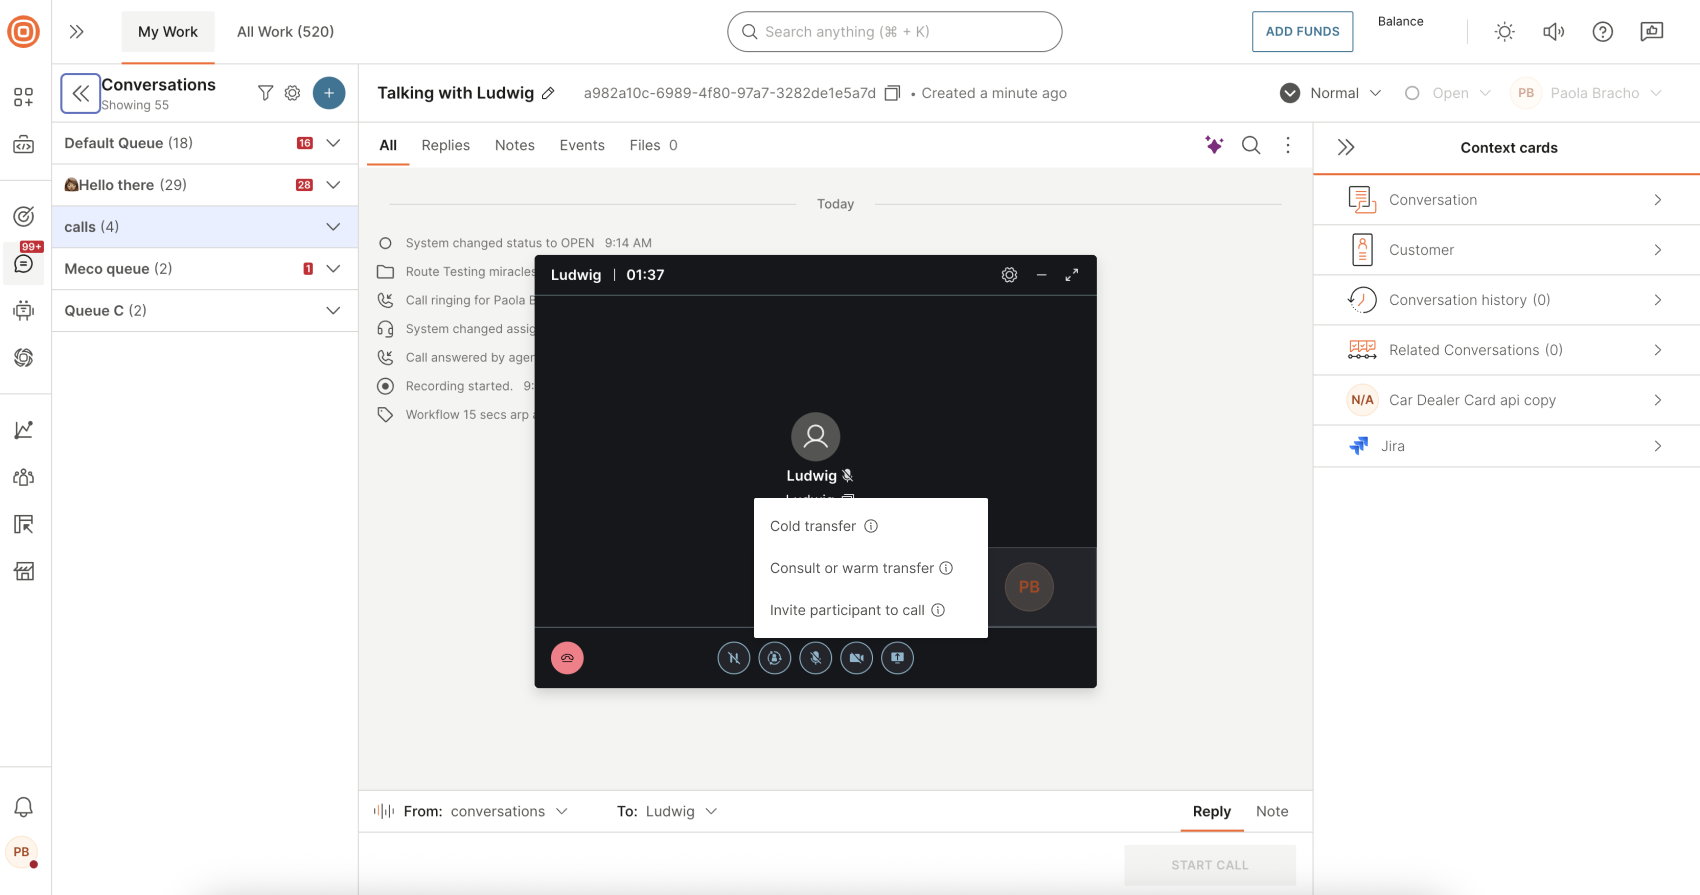
- Choose who you want to consult:
- A queue from the list of active queues (the first available agent from that queue will join the call)
- A specific available agent from the list (typically, a teammate you know can assist)
Both queue and agent lists are searchable, and limited to active queues (within working hours and with available agents) and available agents only.
- An external phone number (for example, a subject-matter expert)
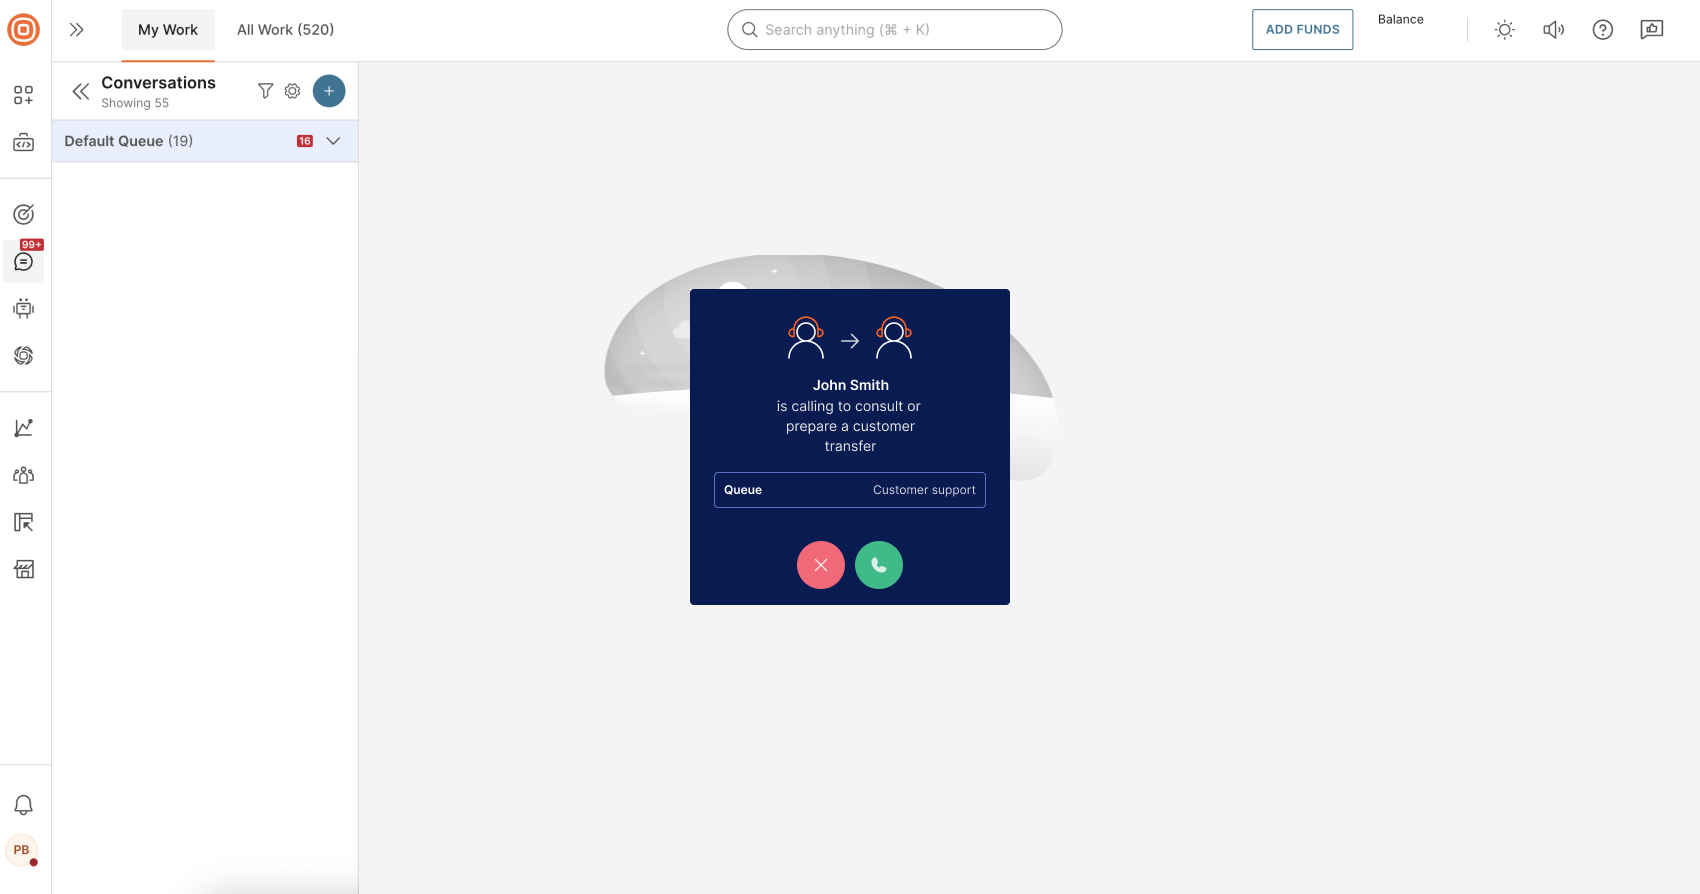
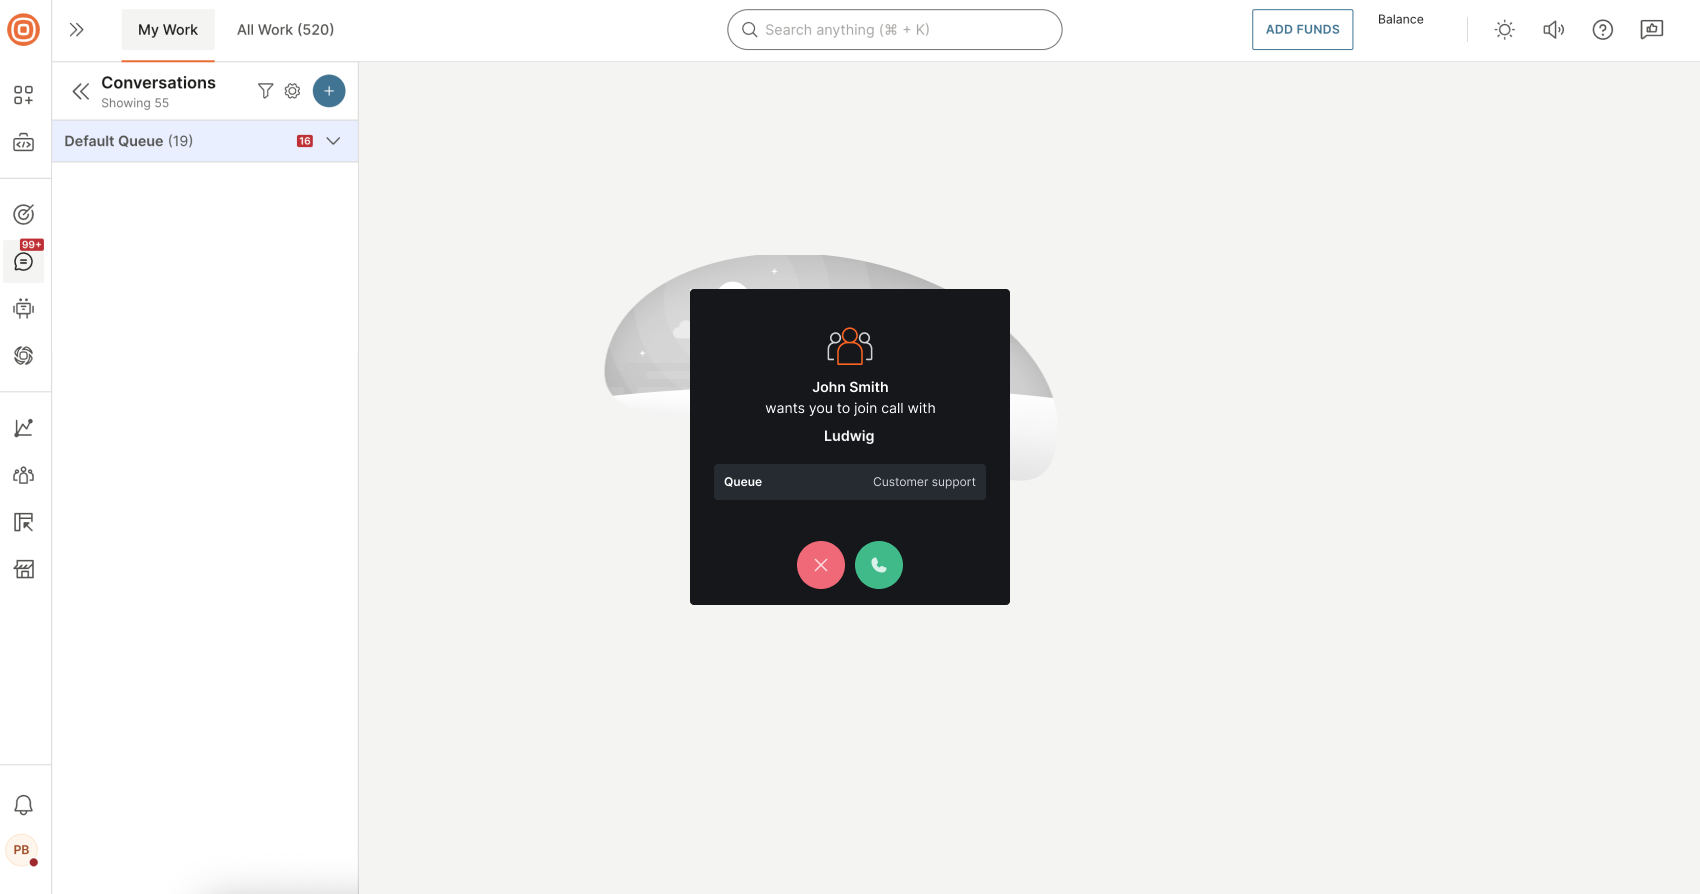
- When a consult call is initiated, the receiving agent sees an incoming call pop-up that includes:
- The name of the agent initiating the call
- An indication that the call is a consult call or a warm transfer, depending on how the call was initiated
- The name of the queue the call is coming from
- Options to accept or decline the call
If the receiving agent accepts the call, the consult call starts while the customer remains on hold. The initiating agent can then share context and decide whether to return to the customer or complete a transfer.
- After the consultant answers, you can use the following actions:
- Resume customer call (you can temporarily return to the customer while the consult remains)
- End consult (end the consult call and resume the customer call)
- Transfer call to consultant (complete a warm transfer to the consulted agent)
- Merge calls - Instead of ending the consult and going back to the customer, select the Merge option. That converts the consult session into a three-way conference.
- In addition, standard call controls remain available during the consult session, including mute/unmute, video, and screen sharing. When consulting with an external phone number, video and screen sharing are not available. Only audio and dial-pad actions are supported.

Merge calls [#merge-calls-consult-call]
The Merge calls option is used when:
- The host agent is speaking with the customer.
- The host starts a consult call with another agent (customer is on hold).
- The host decides to bring everyone into the same conversation.
- Instead of ending the consult and going back to the customer, the host selects Merge. That converts the consult session into a group call.

Consult call recording [#consult-call-recording-consult-call]
The call is recorded according to the recording settings applied to the first agent who received the call.
The recording file can be:
- Composed
- Non-composed (per leg)
You can play the file only if it is composed. If the file is non-composed and a consult call occurs, the consult segment will not appear in the recording player in the Conversations timeline. It will not be available for in-app playback.
The consult segment is still recorded, but to review it you must download the recording file to your computer and play it locally.
Warm call transfer
EARLY ACCESS
This feature is released as Early Access.
A warm call transfer allows the initiating agent to speak with the receiving agent before the customer is fully transferred. This ensures the receiving agent has the necessary context and can continue the conversation seamlessly.
During a warm transfer, the initiating agent places the customer on hold, connects with the receiving party, shares relevant information, and then completes the transfer.
Who can join a warm call transfer [#who-can-join-a-warm-call-transfer-warm-call-transfer]
You can invite the following participants to a warm transfer session:
- Agents from specific queues (the first available agent from the selected queue joins the call session)
- Specific agents from the initial queue (a targeted agent is selected and invited directly)
- External numbers (external participants, such as subject-matter experts or third-party support, can be added using a phone number)
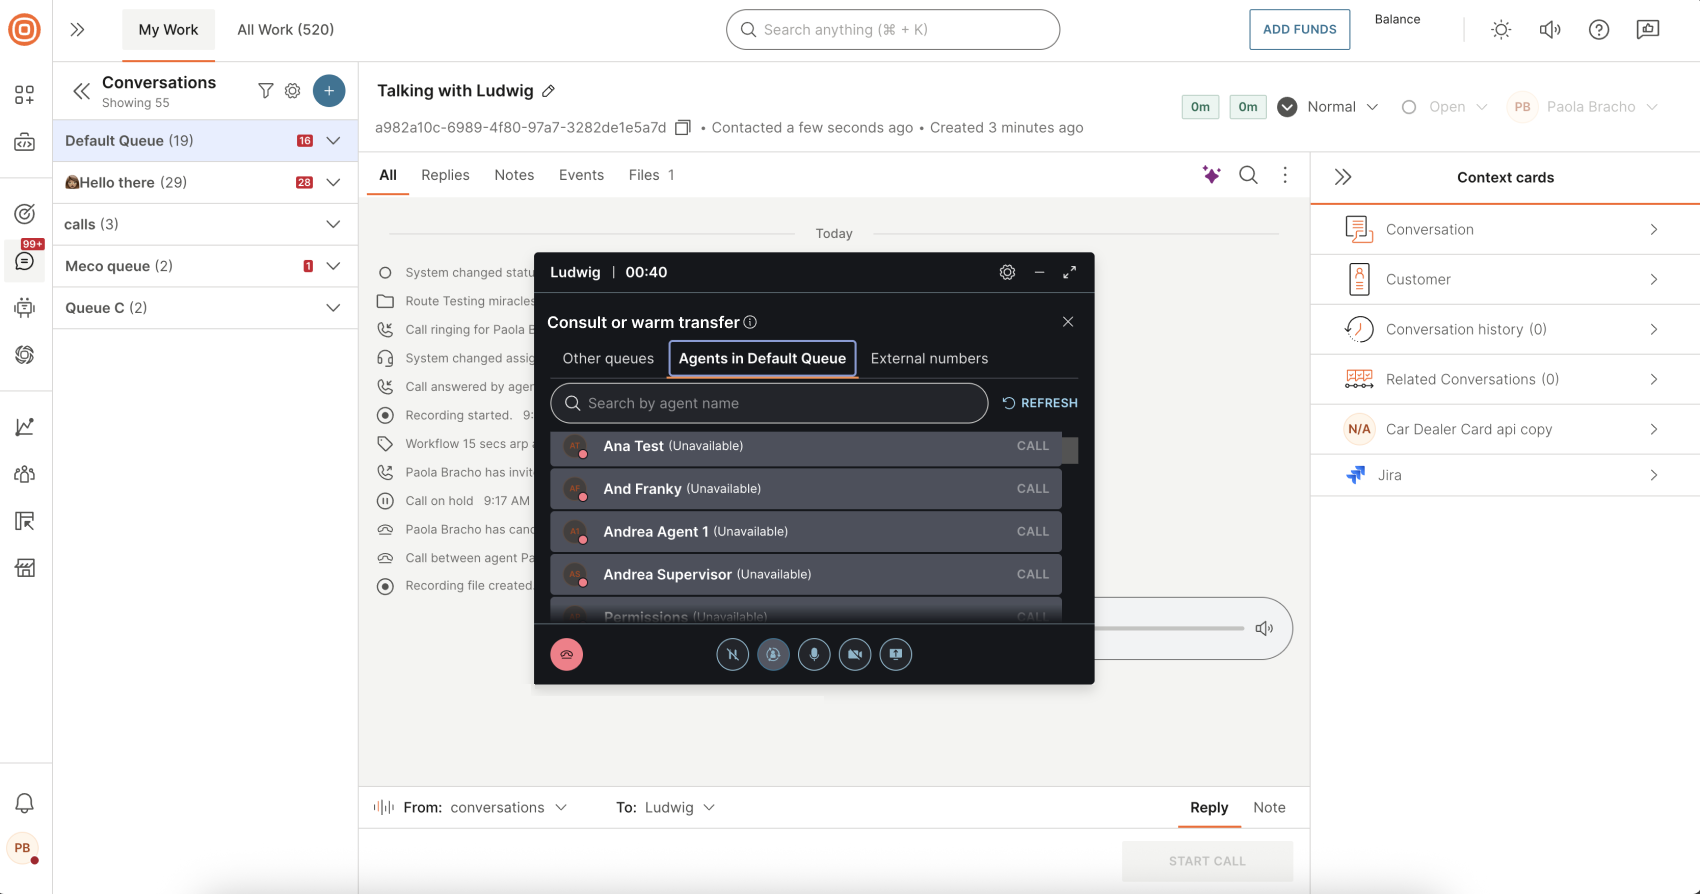
Start a warm call transfer [#start-a-warm-call-transfer-warm-call-transfer]
To start a warm transfer:
- Select the Transfer a call, consult or invite the agent button and choose the Invite participant to call option.
- Choose who you want to transfer the call to:
- A queue from the list of active queues (the first available agent from the selected queue joins the warm transfer)
- A specific available agent from the list (typically, a teammate you know can assist)
Both queue and agent lists are searchable, and limited to active queues (within working hours and with available agents) and available agents only.
- An external phone number (for example, a subject-matter expert)
- When a warm transfer is initiated, the receiving agent sees an incoming call pop-up that includes:
- The name of the agent initiating the call
- An indication that the call is either a consult call or a warm transfer, depending on how the call was initiated
- The name of the queue the call is coming from
- Options to accept or decline the call
If the receiving agent accepts the call, the consult or warm transfer session starts while the customer remains on hold.
- After the receiving party answers, you can use the following actions:
- Resume customer call (return to the original caller)
- End consult (end the warm transfer session and return to the customer)
- Transfer (transfer the call to the receiving agent and leave the conversation)
- In addition, standard call controls remain available during a warm transfer, including mute/unmute, video, and screen sharing. When completing a warm transfer with an external phone number, video and screen sharing are not available. Only audio and dial-pad actions are supported.
Warm call transfer recording [#warm-call-transfer-recording-warm-call-transfer]
Warm call transfers are recorded as separate recordings, based on who is hosting each part of the call.
How recordings are created
A warm transfer results in two distinct recordings:
- Recording 1: Covers the initial call handled by the initiating agent, including the warm transfer (private conversation) with the receiving agent while the customer is on hold.
- Recording 2: Starts after the warm transfer is completed and the receiving agent becomes the new host of the call.
Each recording is saved independently and may have different recording settings applied.
Which recording configuration is used
Recording behavior depends on the agent hosting that part of the call:
- Recording 1 uses the recording configuration of the initiating agent
- Recording 2 uses the recording configuration of the receiving agent, who becomes the new call host after the transfer
If call recording is disabled for an agent, the corresponding part of the call is not recorded, even if recording was enabled earlier in the call.
Group call
EARLY ACCESS
This feature is released as Early Access.
Group calls extend standard voice sessions by allowing more than two participants to join the same active call. A group call can be initiated by a host agent from an active voice session or from an active consult session using the merge calls option.
A group call consists of:
- A host agent
- A customer
- An additional agent or an external phone number
Who can join a group call
You can invite the following participants to a group call:
- Agents from specific queues (the first available agent from the selected queue joins the call session)
- Specific agents from the initial queue (a targeted agent is selected and invited directly)
- External phone numbers (external participants, such as subject-matter experts or third-party support, can be added using a phone number)
Start a group call
You can start a group call in two ways:
- From an active voice session: Use the Invite participant to call option (described below).
- From an active consult session: Use the merge calls option to convert the consult session into a group call.
To start a group call from an active voice session:
- Select the Transfer a call, consult or invite the agent button and choose the Invite participant to call option.
- Choose who you want to invite:
- A queue from the list of active queues (the first available agent from that queue joins the call)
- A specific available agent from the list (typically, a teammate you know can assist)
- An external number (for example, a subject-matter expert)
Both queue and agent lists are searchable and limited to active queues (within working hours and with available agents) and available agents only.
- When the invitation is sent, the invited agent sees an incoming call pop-up that includes:
- The name of the agent initiating the call
- The name of the queue the call is coming from
- Options to accept or decline the call
While the invitation is pending, you can cancel the ongoing invite at any time, regardless of whether the invite was sent to a queue, a specific agent, or an external number.
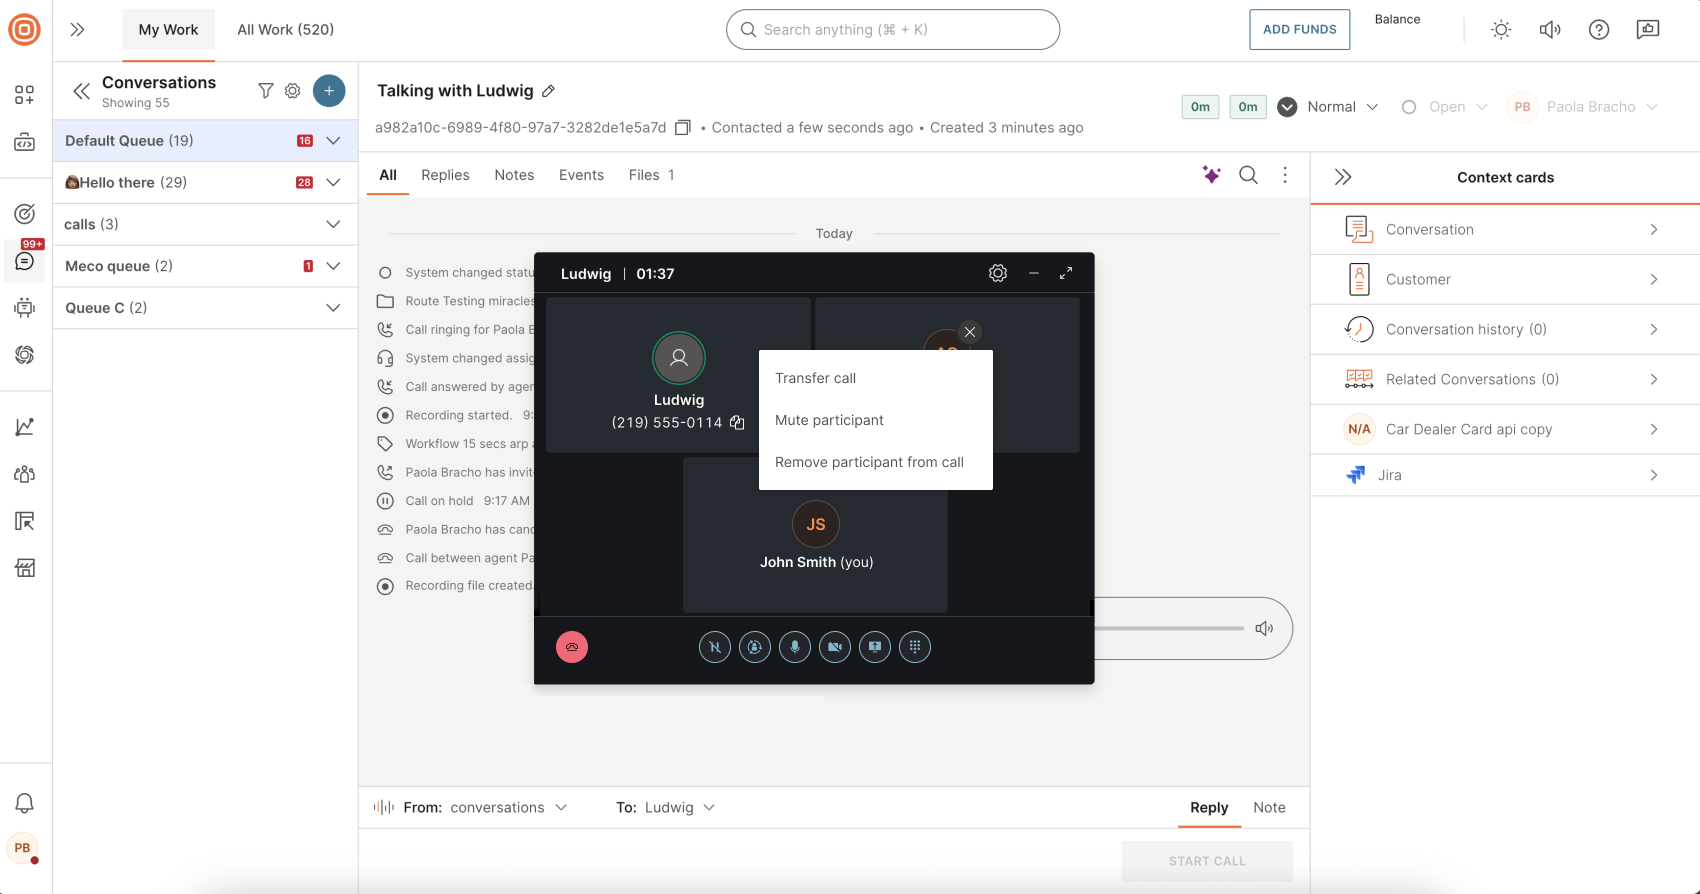
- Once the invitee answers, the call becomes a group session. You can then:
- Transfer the call
- Mute the participant
- Remove the participant
- Place the customer on hold
- When a transfer is completed, the receiving participant becomes the new host of the call and the initiating agent is disconnected from the session. The transfer also affects how the call is recorded. Refer to Group call recording for details.
- In addition, standard call controls remain available during the session, including mute/unmute, video, and screen sharing. When inviting an external phone number, video and screen sharing are not available.
Group call recording
The call is recorded according to the recording settings applied to the first agent who received the call.
When a transfer occurs during a group call, the recording is restarted and the new host agent's recording configuration applies. This results in two distinct recordings, similar to warm call transfer recordings:
- Recording 1: Covers the call handled by the initiating agent, up to and including the group session.
- Recording 2: Starts after the transfer is completed and the receiving agent becomes the new host of the call.
If call recording is disabled for an agent, the corresponding part of the call is not recorded, even if recording was enabled earlier in the call.
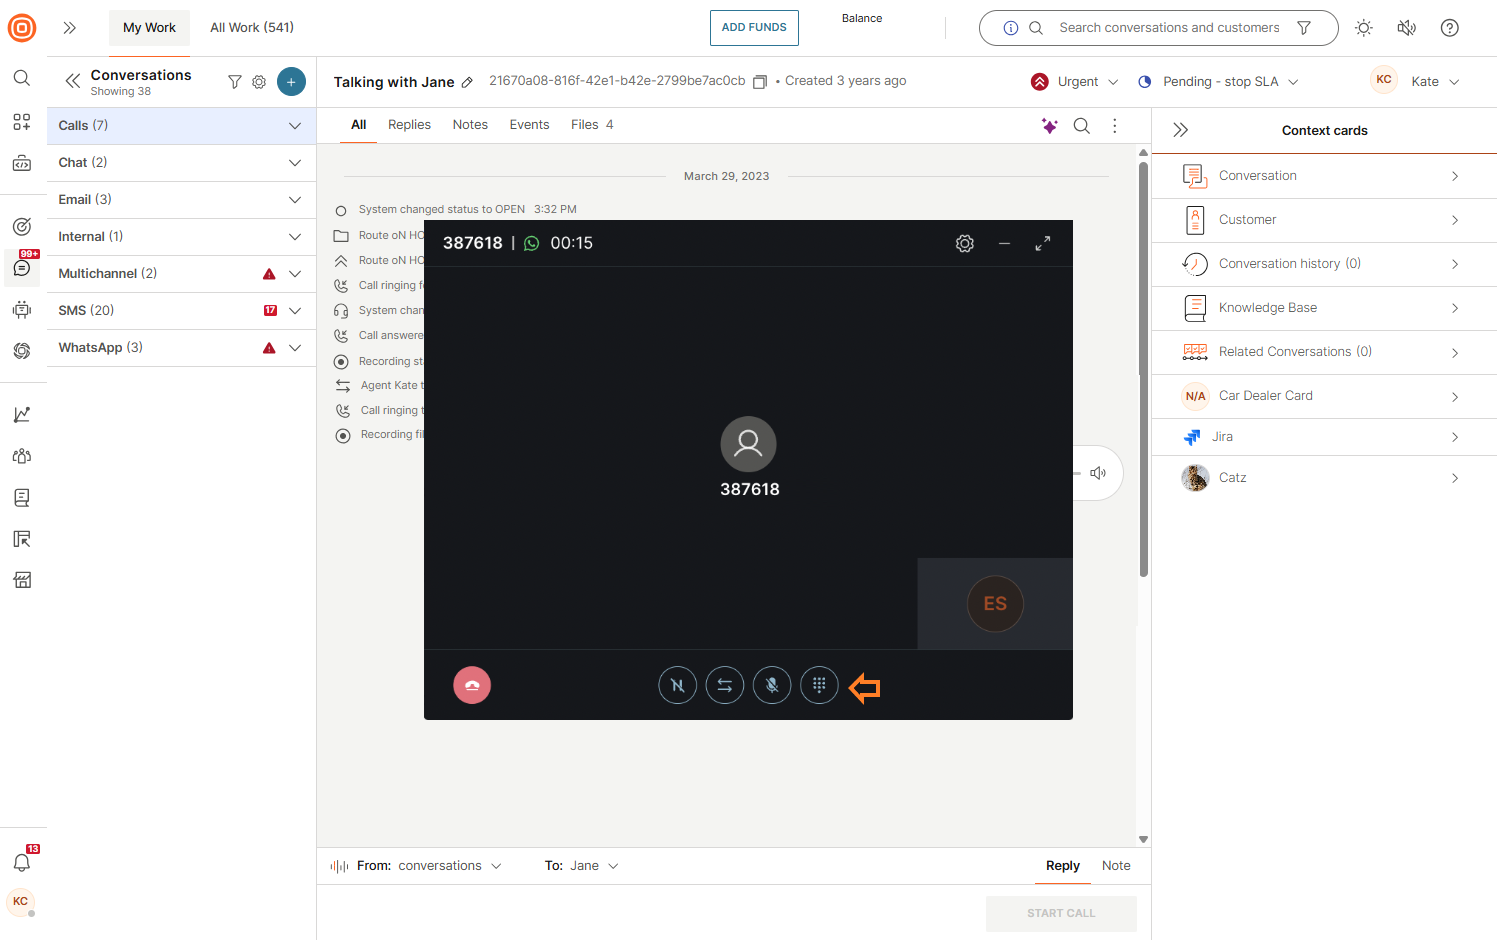
Dial pad
When making outbound phone calls, under the three dots menu, agents can find the Dial pad feature. With a dial pad, agents can collect and send DTMF inputs when required to interact with an IVR.
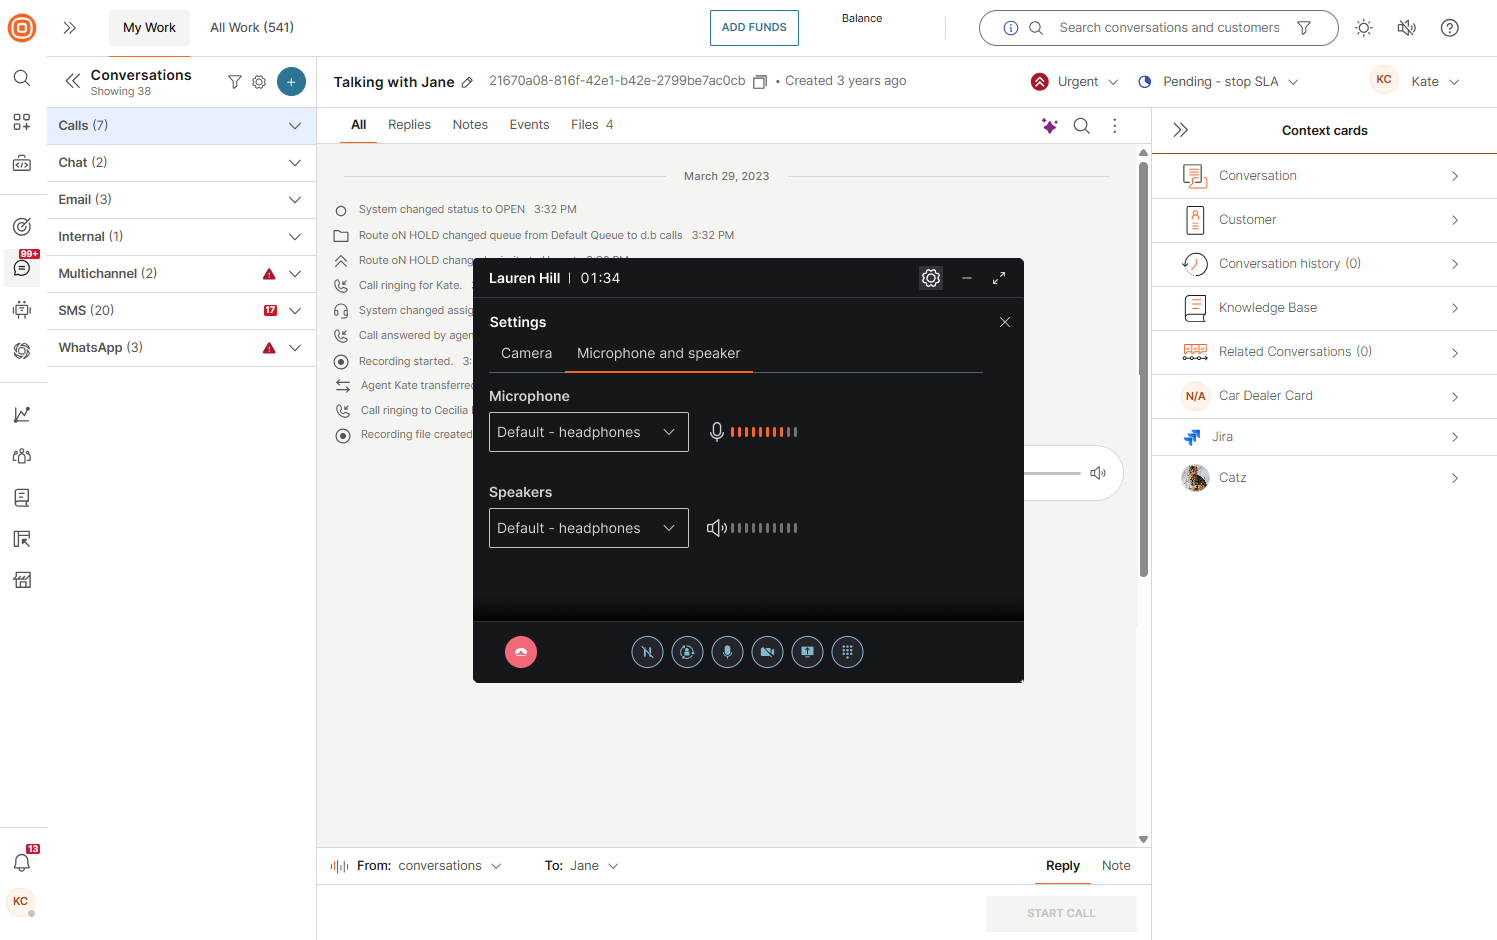
Microphone and speaker settings
During WebRTC video calls, you can adjust your audio settings to ensure clear communication and minimize distractions.
- Go to Settings → Microphone and speaker settings.
- From here, you can:
- Microphone - Select and test the microphone you want to use.
- Speakers - Select and test the speakers for audio playback.
Background options for video calls
You can personalize your background during WebRTC video calls to reduce distractions or add a professional touch.
The default state is None (no effects applied).
To apply effects:
- Select the Settings icon → Camera tab.
- Select one of the following:
- Blur - Hides your surroundings by softening the background.
- Face trace - Keeps your face centered and in focus as you move.
- Custom + Add - Upload and use a custom background image.
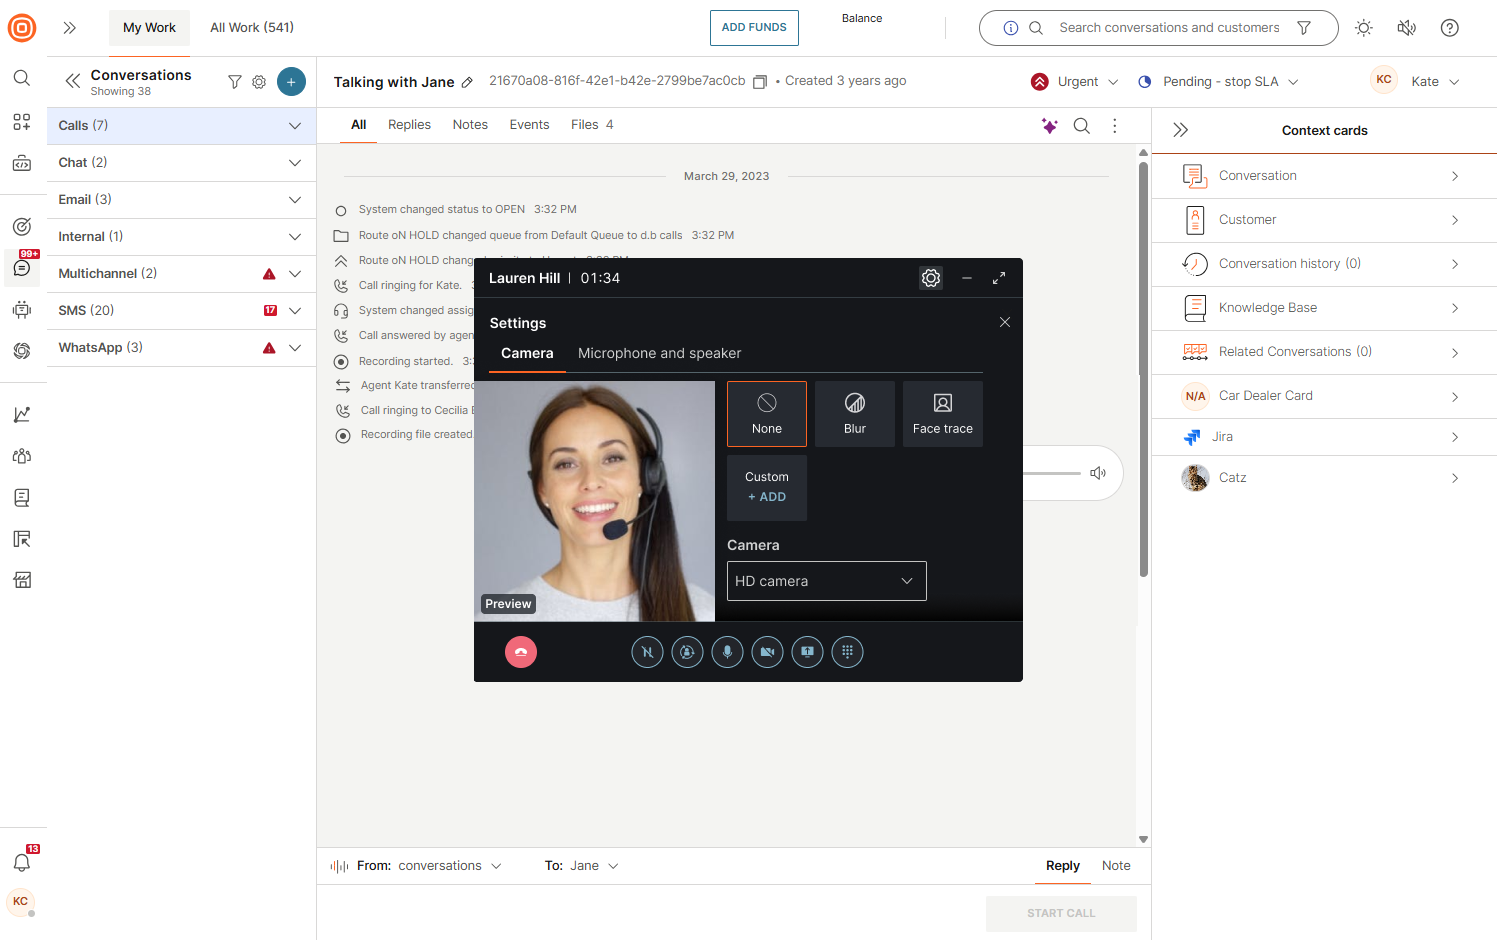
Once selected, the chosen video effect setting will persist and be automatically applied to all following calls without requiring manual adjustments.
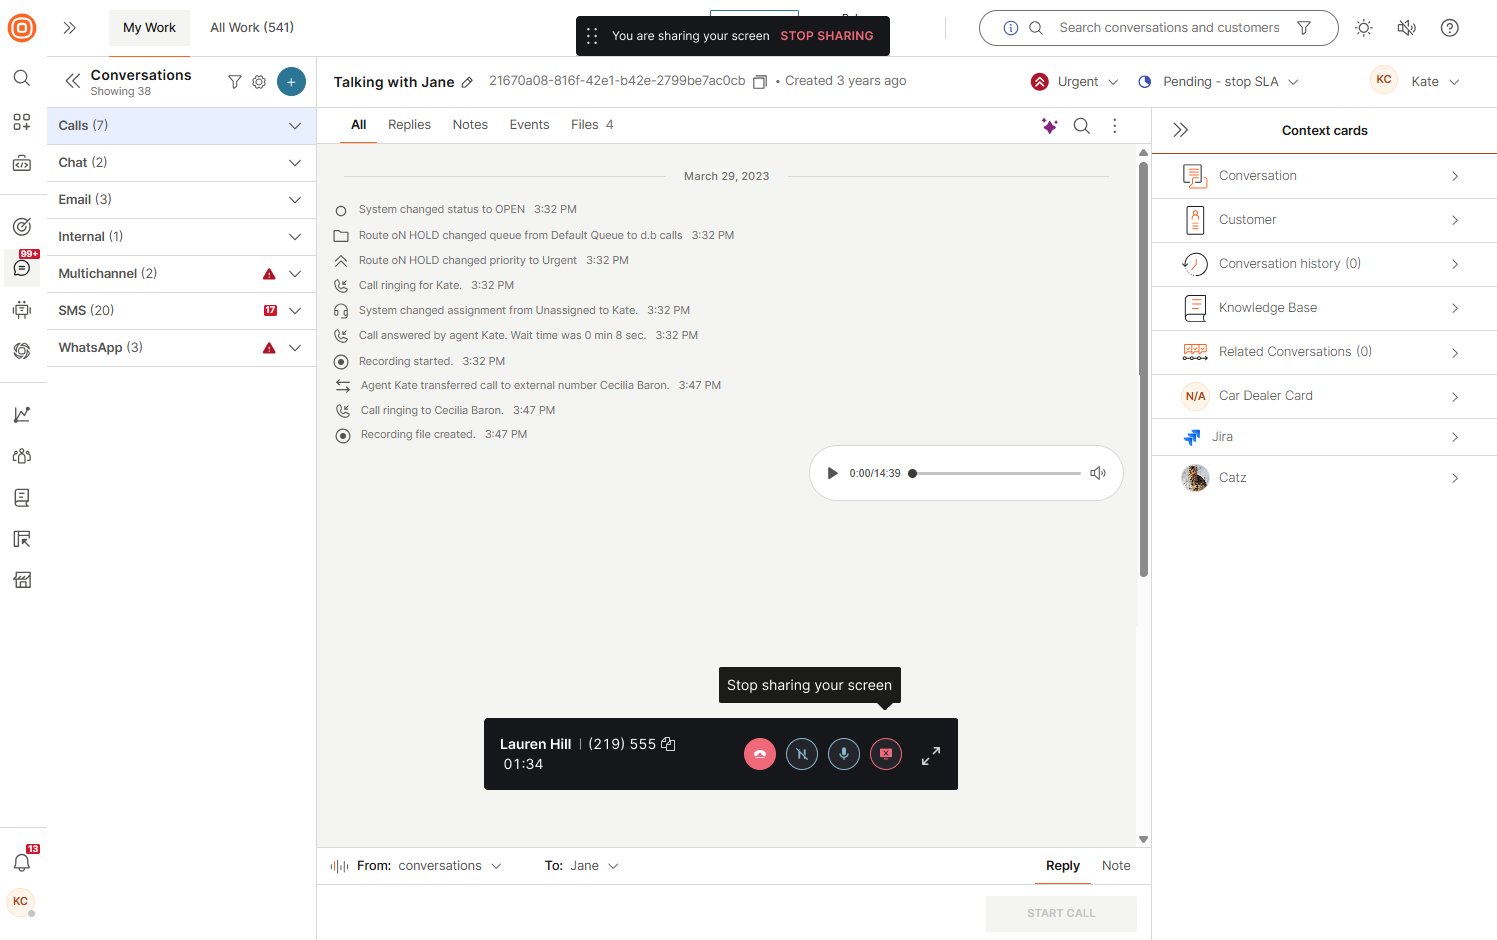
Screen sharing
Both agents and customers can share their screens during WebRTC calls.
You can choose to share your entire screen, a specific application window, or a browser tab with the person you are connected to. The available sharing options may vary depending on the browser in use, and in some cases, certain windows or screens may not be available for sharing.
Write messages during a call
During an active call, both agents and customers can continue communicating through messages or emails. This allows you to handle multiple tasks at once and improves the overall customer experience.
You can initiate a new conversation channel, such as email or live chat, while on a call. However, starting another call at the same time is not possible - you can only maintain one active voice or video conversation.
- If the additional conversation is with the same customer, all messages are included in the ongoing call conversation.
- If the conversation involves a different customer, a new conversation will be created.
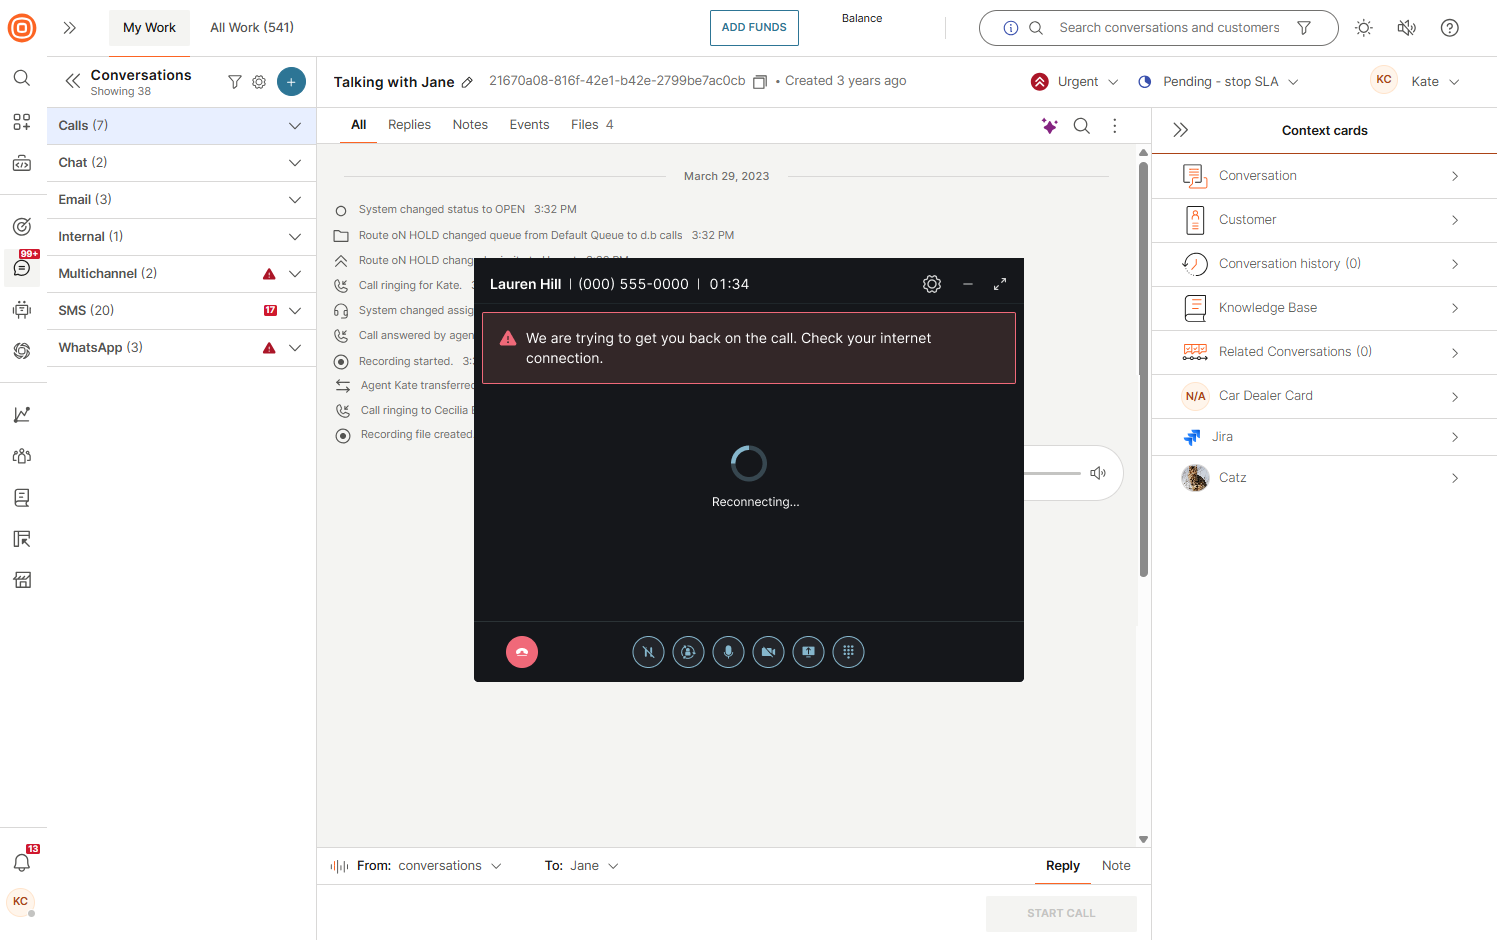
Automatic call reconnection
When your internet connection is disrupted, calls may drop or experience poor audio quality. By automatically reconnecting calls once the internet stabilizes, disruptions are minimized, eliminating the need for manual redialing.
The system offers automatic call reconnection whenever your internet connection becomes unstable and later stabilizes. It includes intelligent monitoring to detect connection issues in real-time and a notification mechanism to keep you informed about the reconnection status during interruptions.
When a call disconnects, you will receive a sound notification informing you of the drop.
Callback
The Callback feature allows customers to request a return call from agents when they are unable to reach one immediately.
Admins can configure two types of callbacks:
- Automated callback
- Manual call back
Automated callback [#automated-callback-callback]
- Callback requests are automatically assigned to agents.
- Agents do not need to search for requests; callbacks ring directly on their desktop or mobile device.
- The customer's number is automatically dialed and connected once the agent answers.
- If the customer does not respond on the first attempt, the Conversations platform will retry the call according to the supervisor's configuration.
- Callback retries are logged automatically and require no additional action from the agent.
Manual callback [#manual-callback-callback]
- Agents must manually go to the callback list and select a request.
- Each agent has an assigned list of callback requests.
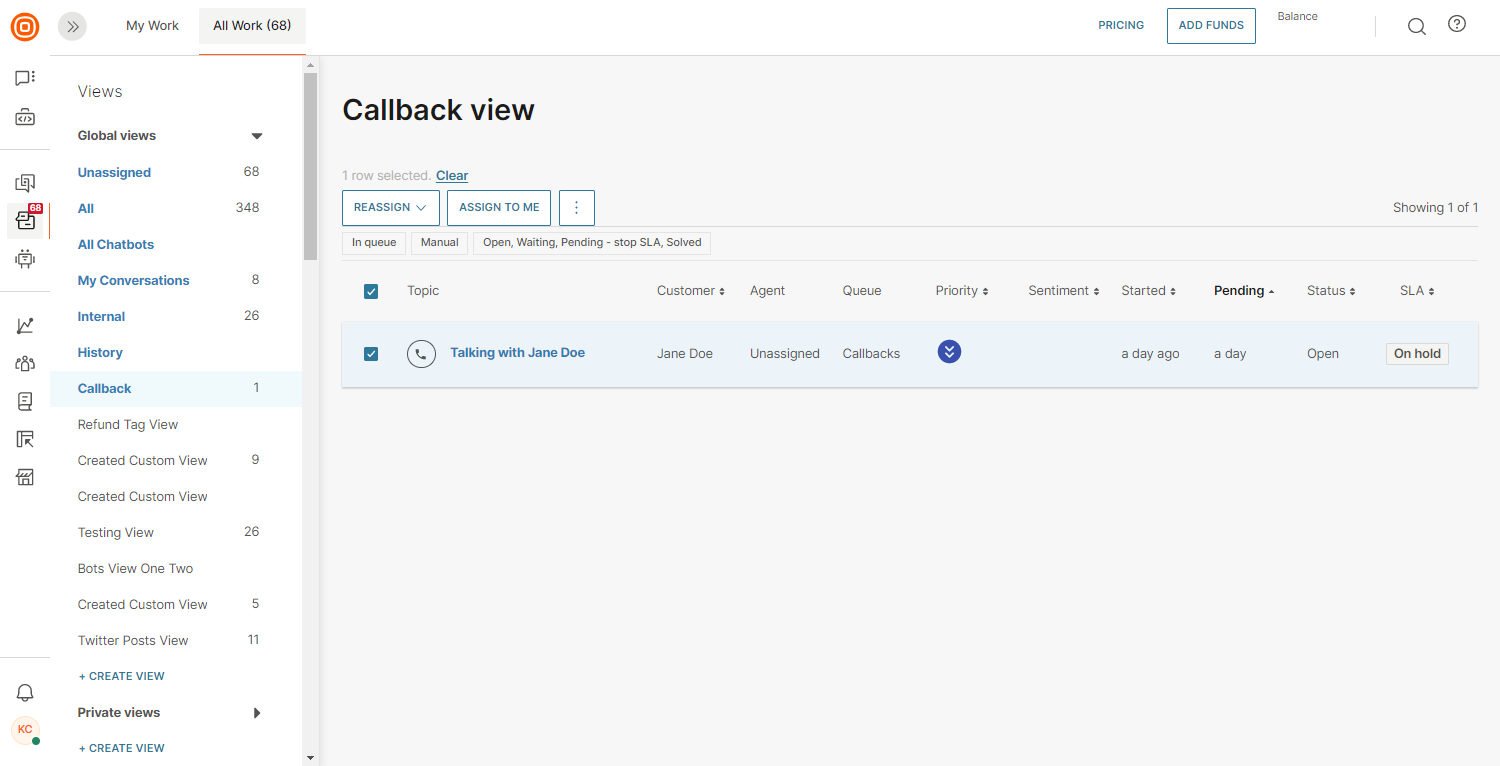
To take ownership of a callback:
- Go to All Work.
- Find the Callback option in Views.
- Find the wanted request and select Assign to me. The conversation then appears in My Work, where you can review details and initiate the call.
- After completing the call, wrap up the conversation. The callback status will automatically change to Done once the customer has answered.
Callback statuses and event logs [#callback-statuses-and-event-logs-callback]
Regardless of the conversation status, a callback has its own status, and a callback call can specifically go through the following:
- In a queue - The customer requested a callback, the conversation is in the queue list, and an agent is not assigned.
- Assigned - An agent is assigned to a callback conversation.
- Active - The agent is assigned to a callback conversation; the call is currently in progress.
- No reply - The agent called the customer, but they did not answer.
- Done - The agent had a successful call with the customer.
Event logs are part of the Conversations timeline, where you can see the precise time the callback was requested, whether another callback has been asked in the meantime, and if the customer has not responded.

Call wrap-up window
After a call ends, the wrap-up window appears, giving agents time to finalize call-related tasks before closing the conversation.
Key features:
- Notes and summaries - Record important details, call outcomes, or follow-up actions in the right-hand panel. Saved notes can be reviewed later if needed.
- Call quality feedback - Rate the call quality to provide feedback.
- Configurable wrap-up time - By default, agents have 30 seconds, but supervisors can adjust this at the system or agent level. During this time, the agent is marked as busy, and the countdown timer is shown.
- Extendable time - If enabled by the supervisor, agents can extend the wrap-up period by selecting +10 seconds or + More time.
Before closing the wrap-up window, agents can set the conversation status:
- If marked as Closed, the conversation ends fully.
- If left open, any follow-up communication from the same customer is automatically routed to the ongoing conversation.

Call rating is only available for specific regions. Contact your account manager or Support for more details.
Call recordings
The agents have the option to listen to the call recordings (audio and video) in case they need to remind themselves of the call content to note it down and/or update the customer data properly.
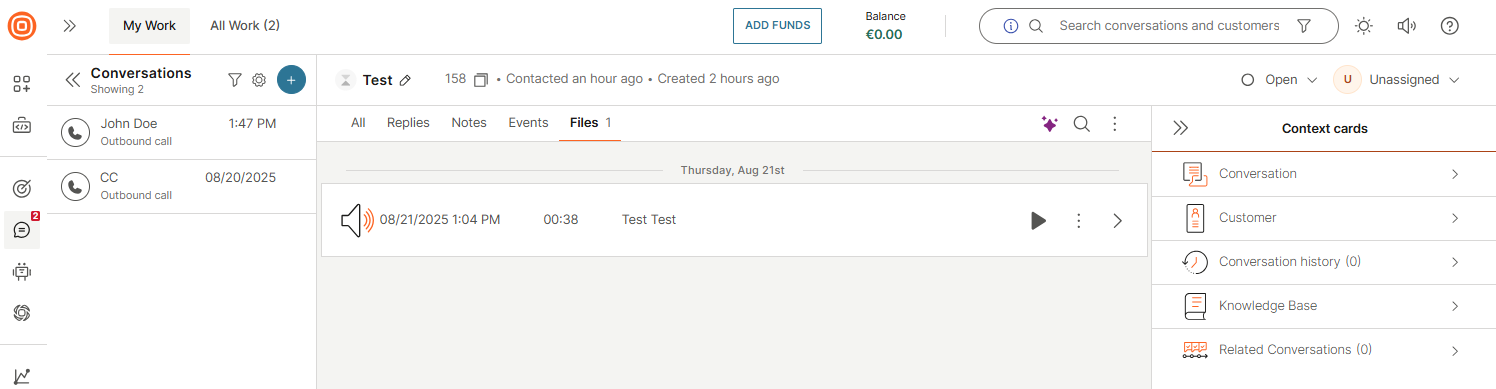
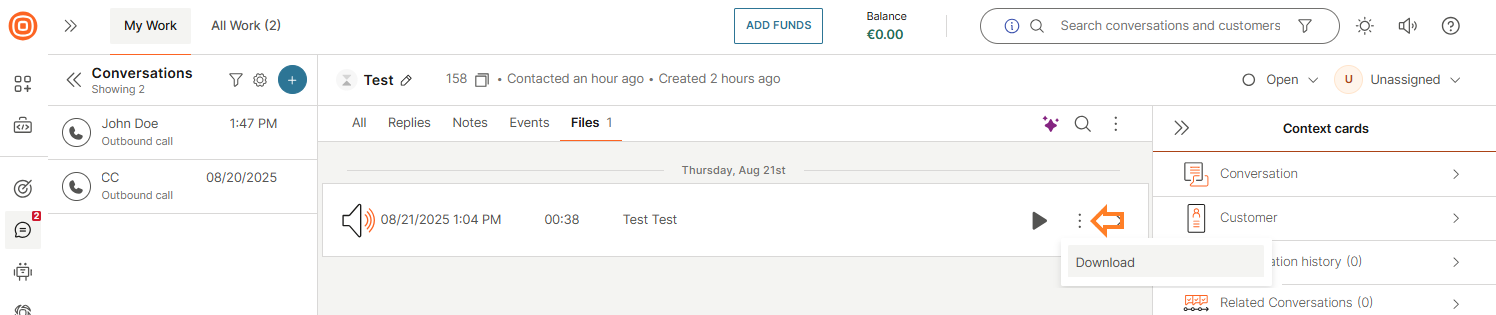
- You can access the recording files directly in the conversation or by clicking the Files tab in My Work.
- Once you play the audio or video recording, you can pause and resume playback, as well as fast forward or backward the recording file by sliding the progress bar or set a custom start point to listen to a specific recording part.
- By hovering over the speaker symbol, you can adjust the volume or mute the sound.

- If needed, you can play the video recording in full-screen mode by clicking the respective button.
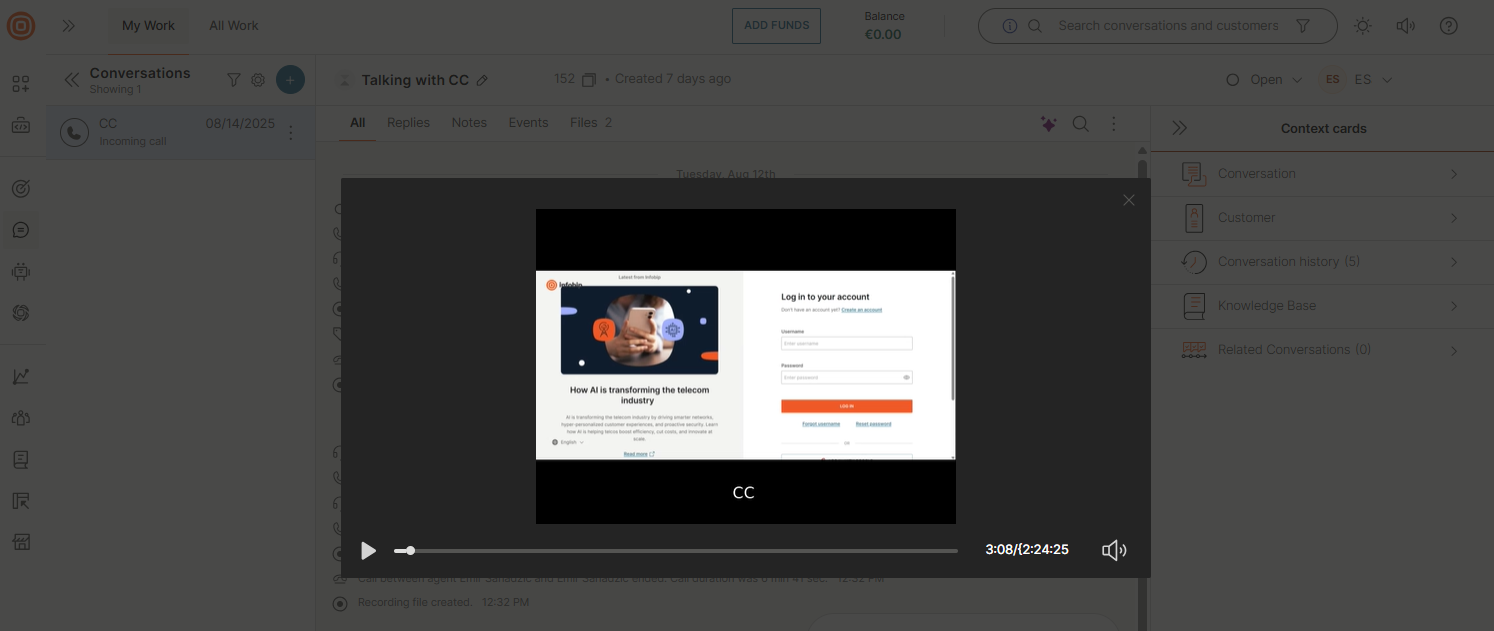
- Finally, you can close the player at any time during playback.
You only have access to your recordings where you can preview the associated recording information.
Besides this, you can download the recording file by selecting the three dots and stream it from an in-built player.
Agents cannot delete the recording files.