Manage messages
Create a message
Guidelines [#guidelines-create-a-message]
- Each message is applicable only to a specific channel.
- For each channel, you can create a message type that is supported by that channel. Example: For RCS, you can create text, rich card, and carousel messages.
- To personalize the message, use variables as placeholders.
Create a message through the Message editor [#create-a-message-from-the-message-editor-create-a-message]
-
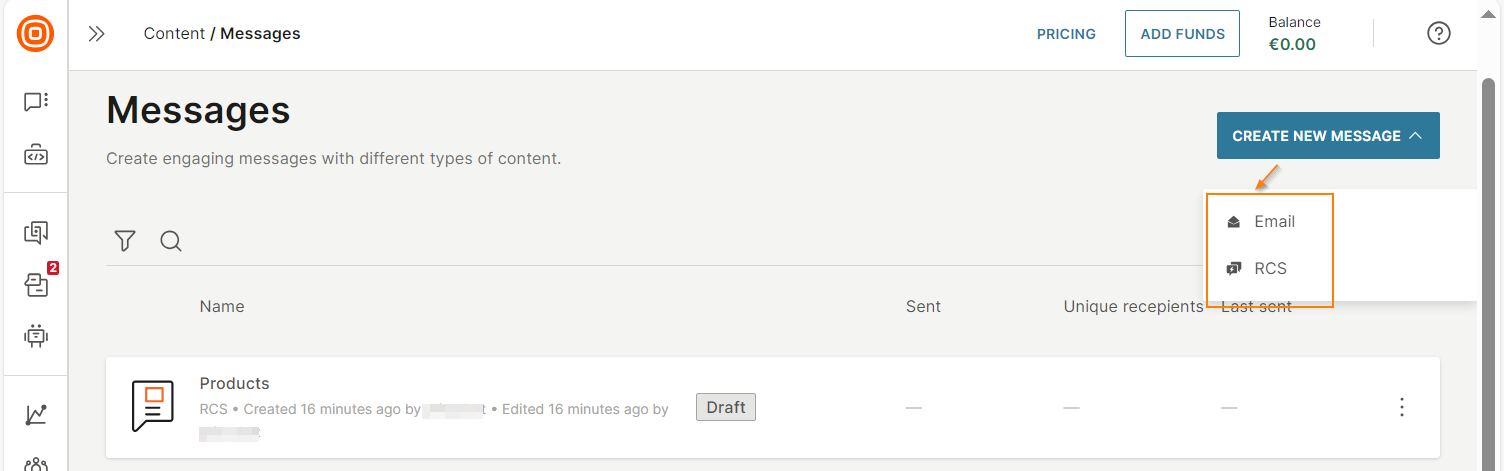
Go to Content > Messages. Select Create new message.
-
Select the channel for which you want to create the message.
-
In the editor, configure the fields in the message. Add basic information such as sender details, recipient, subject, and message content. You can also enable tracking and set advanced options.
All changes are saved automatically.
NoteDepending on the channel, the fields in the editor might be different.
For the fields in email messages, refer to the Email editor documentation.
-
(Optional) Add attachments to the message.
-
(Optional) Add variables as placeholders in the message.
-
After you finish configuring the message, select Activate.
The message is now available to use in your communications.
Create a message through Moments [#create-a-message-from-moments-create-a-message]
-
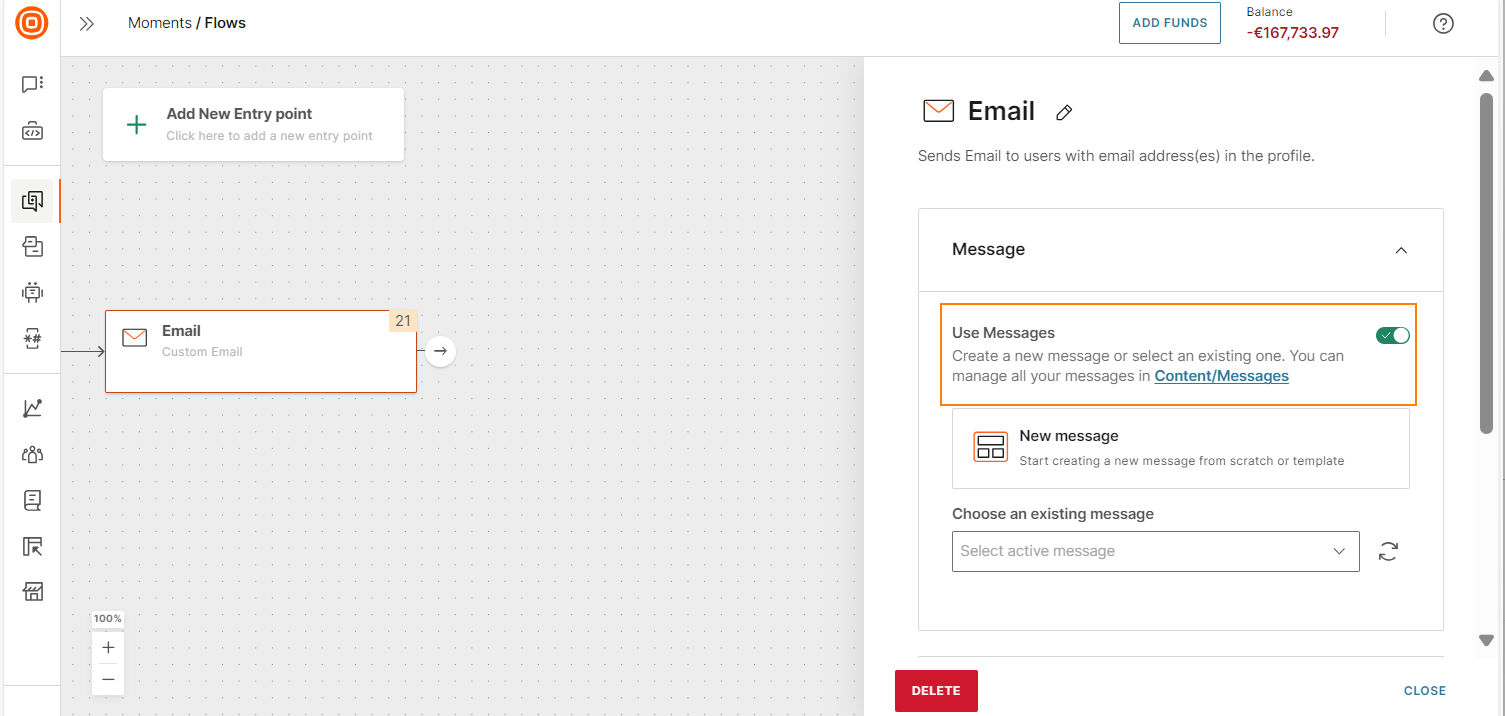
In the channel element in the flow, enable Use messages.
-
Select New message to open the message editor.
-
In the editor, configure the fields in the message. Add basic information such as sender details, recipient, subject, and message content. You can also add attachments, enable tracking, and set advanced options. All changes are saved automatically.
NoteDepending on the channel, the fields in the editor might be different.
-
(Optional) Add variables as placeholders in the message.
-
After you finish configuring the message, select Activate.
The message is now available to use in your flow. For more information, refer to the Add a message to a flow section.
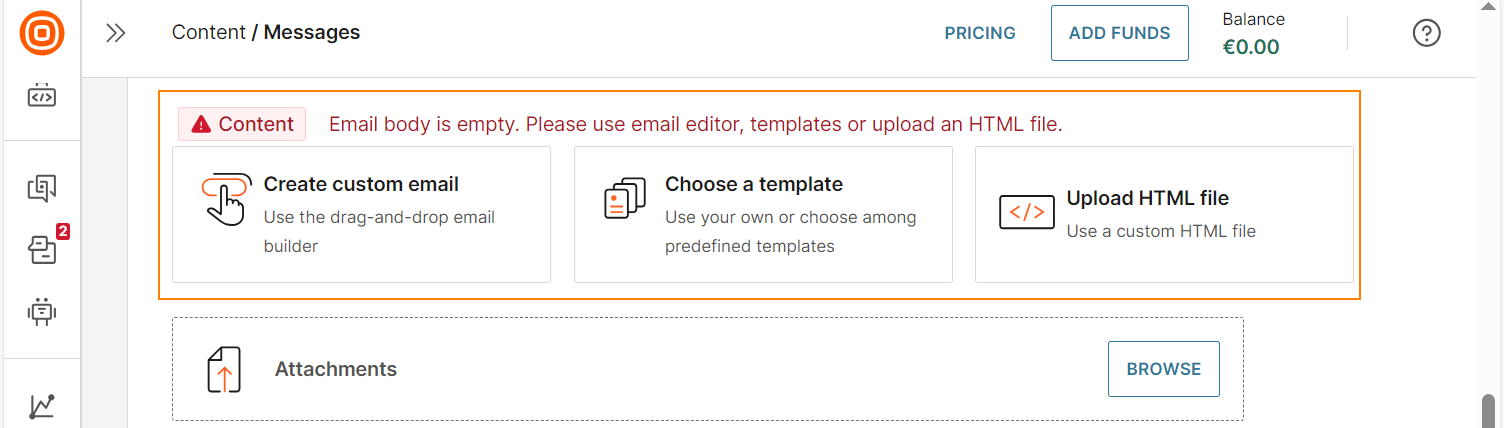
Add attachments to the message [#attachments]
To add an attachment to the message, go to the Attachments field.
Select Browse and then select one of the following options:
- File from computer: Upload a predefined static file. Example: newsletter.
- File from personalized location (Email only): Add personalized files based on the end user's profile. Example: For transactional use cases, send personalized files such as invoices, tickets, or account statements.
You can add multiple attachments to the message.
Upload file from personalized location
This option is currently available only when you create an Email message in Messages and use it in a flow.
Use this option to send personalized files to end users.
Do the following:
-
In the message in Messages, do the following for each personalized file that you want to attach:
-
Go to the Attachments section.
-
Select Browse > File from personalized location.
A message file variable is automatically created as a placeholder for the personalized file.
This variable is listed in the Variables section of the message.
-
-
Create the personalized files that you want to add to the message.
-
Attach the personalized files to the message. For each file, do the following in your communication:
-
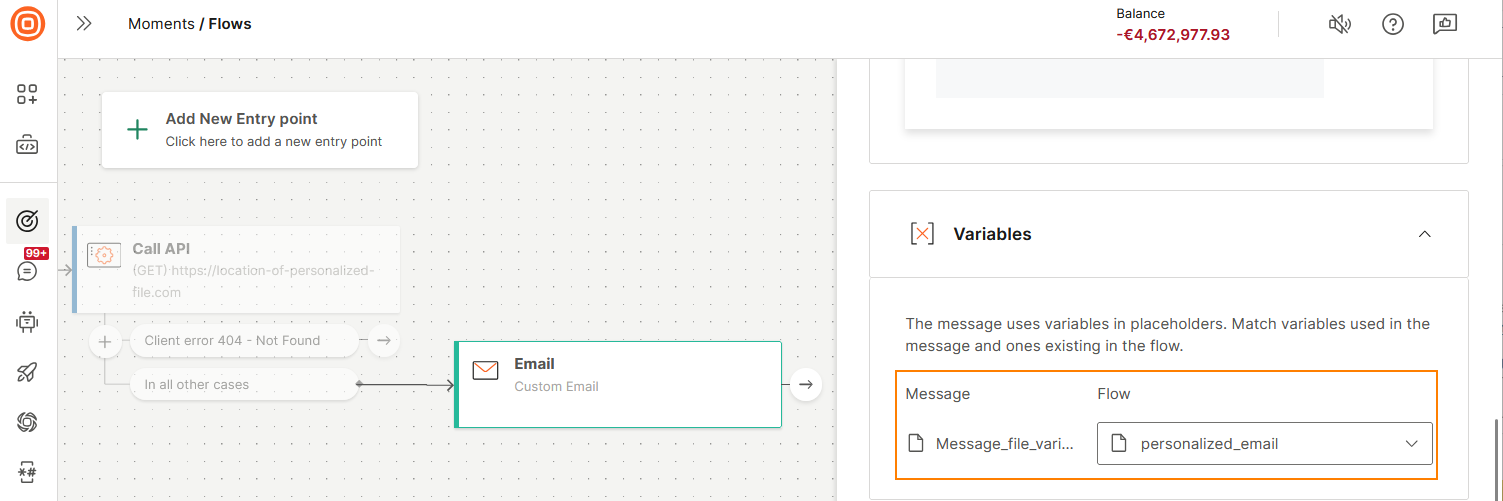
To retrieve the personalized file, make an API request. The request URL must include a dynamic part to fetch the correct file for each recipient.
Example: In Flow, use the Call API element to make a GET to retrieve the file. In the Request URL, include a placeholder such as {FileURL}.
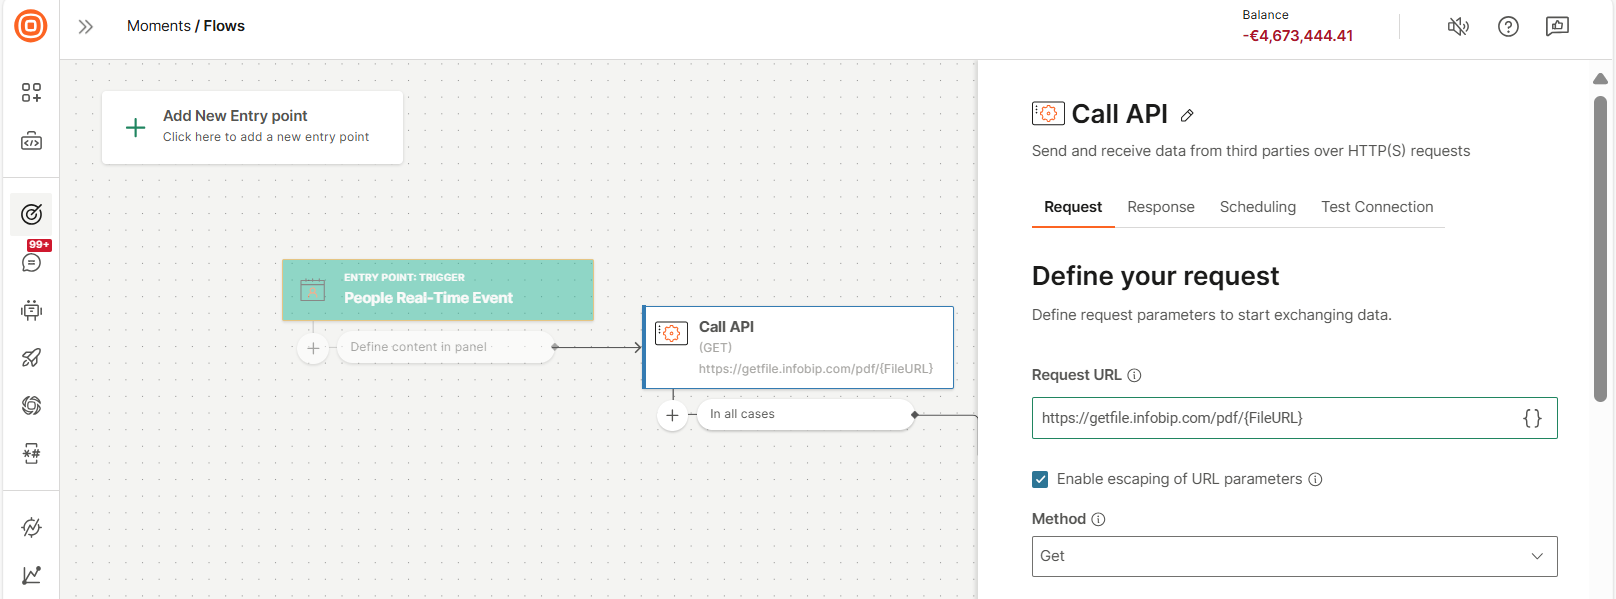
-
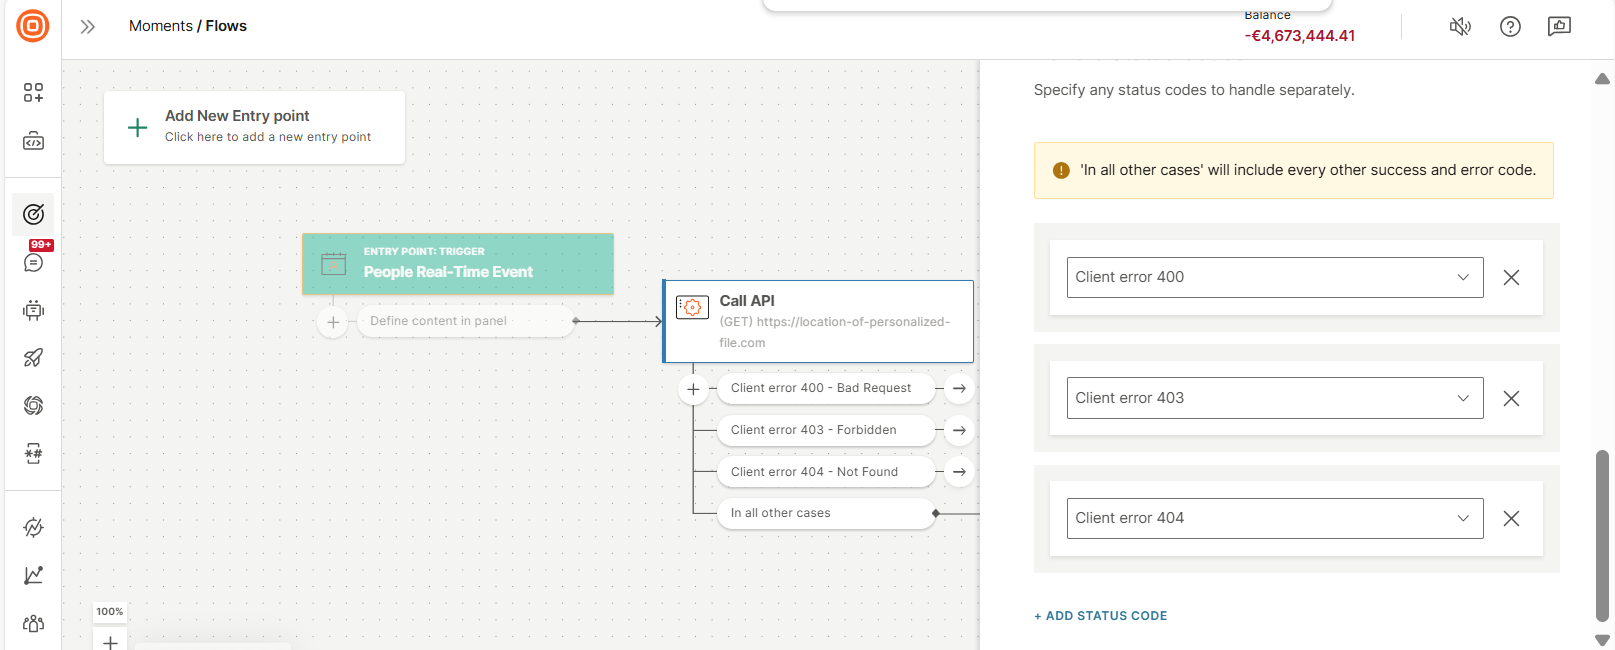
Manage failed API calls such as the file is not found, the file location is incorrect, or API call has incorrect authorization parameters.
Example: In Flow, select the relevant status codes to manage failed API calls.
-
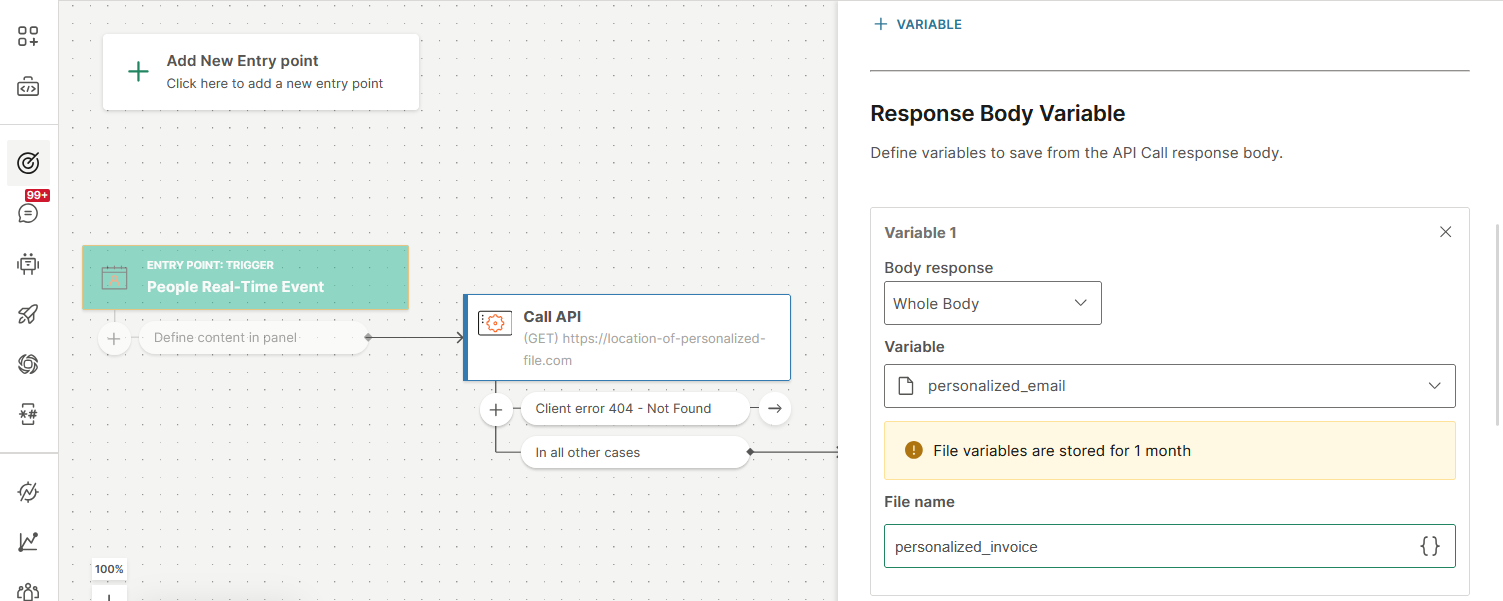
To save the file, save the entire response body of the API call to a variable of type File.
Example: In Flow, do the following:
- Create a Flow variable of type File. Example: personalized_email.
- In the Call API element, go to the Response tab.
- In the Body response field, select Whole body.
- In the Variable field, select the flow variable that you created.
- In the File name field, add a file name. You can personalize this name, if required.
NoteFiles that are saved in variables are stored for one month.
-
-
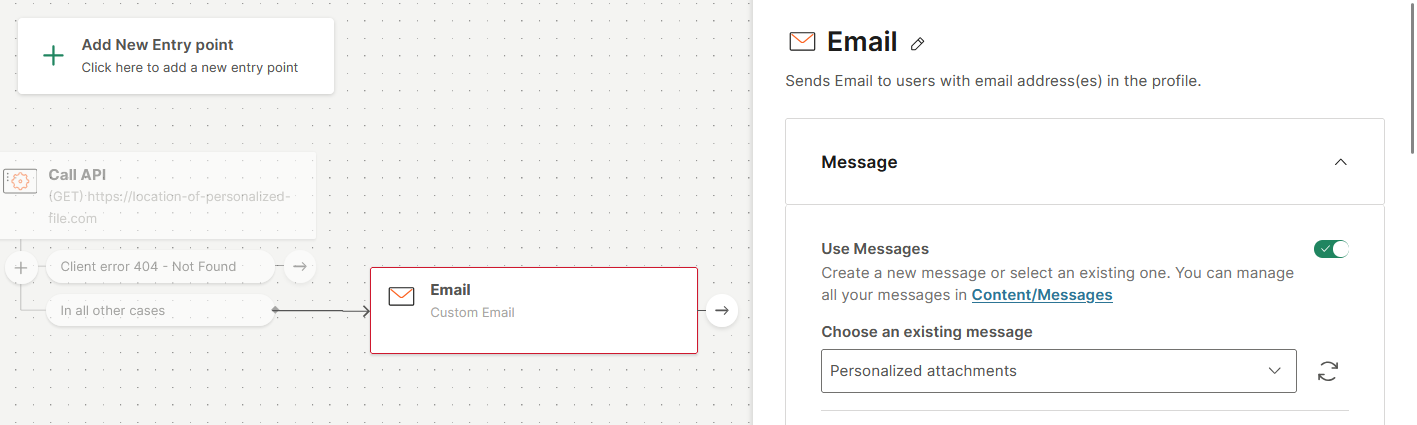
Add the email message to the communication.
ImportantFor each file you want to attach, make sure that the Send element is immediately after the API call that retrieves the file. This ensures that each message has the correct file.
Example: In Flow, add the Email element and select the email message.
-
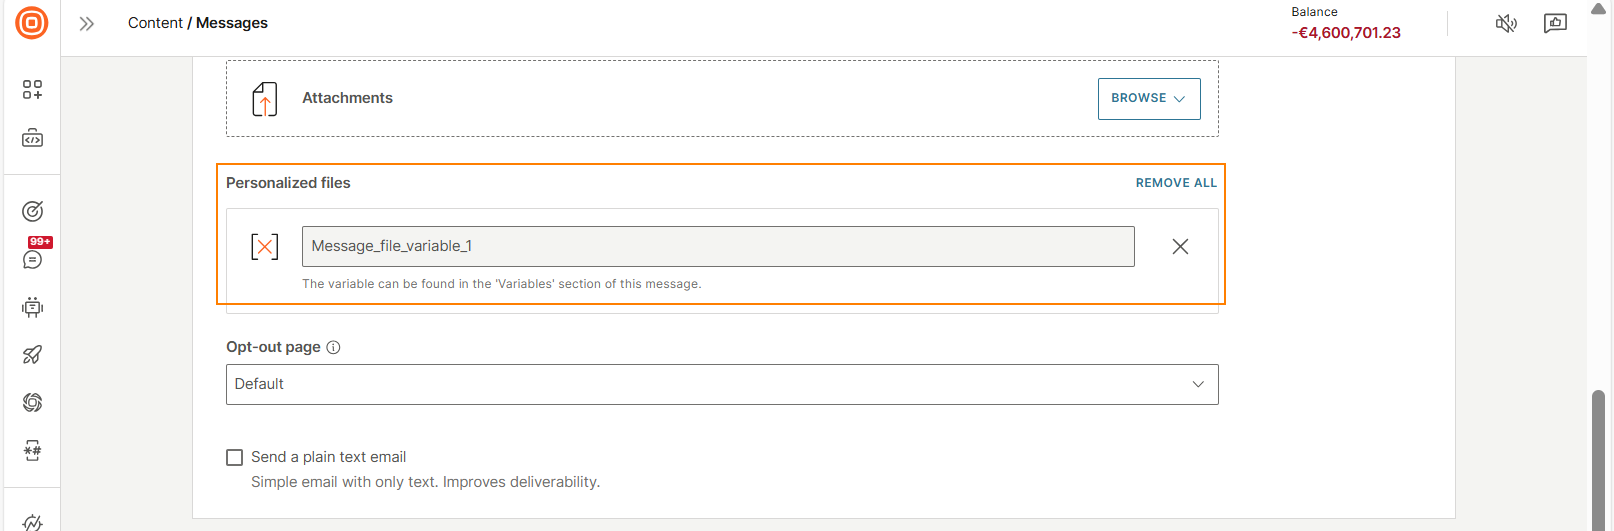
Add the file to the email. To do this, map the variable in which the file is saved to the Message variable.
Example: In Flow, map the Message variable to the Flow variable that you created.
In the following image, Message_file_variable is the placeholder in the message and personalized_email is the Flow variable.
When you send the communication, the email includes the personalized file as an attachment.
Use variables as placeholders in the message
Use placeholders to personalize messages with temporary session data that is stored in Flow variables. In the message, create a placeholder for the flow variable. When you select the message in a flow, map the message variable to the flow variable to populate the placeholder in the message.
Example: You can use the variable, orderId, as a placeholder in the message. When the message is used in a communication, the placeholder is replaced by the order ID.
There is no limit to the number of variables that you can add to the message.
To use message variables in a communication, do the following.
- Create a variable in the message editor.
- Add the variable to the message.
- Map this message variable to an equivalent variable in the communication. Refer to the Add a message to a communication documentation.
Create a variable [#create-a-variable-use-variables-as-placeholders-in-the-message]
You can create a variable only if the message is not used in an active communication.
The following images and instructions are for the Email channel. The interface might be different for other channels.
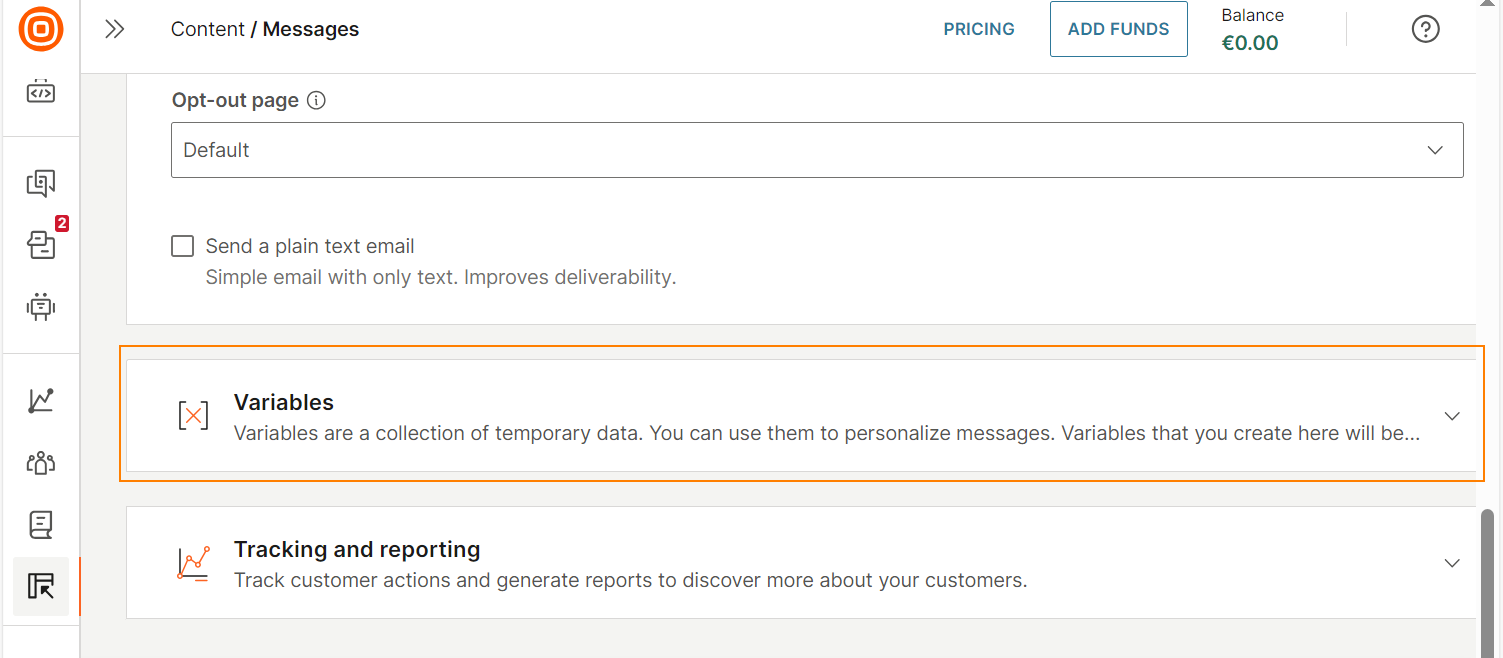
In the message editor, do the following.
-
Select Variables.
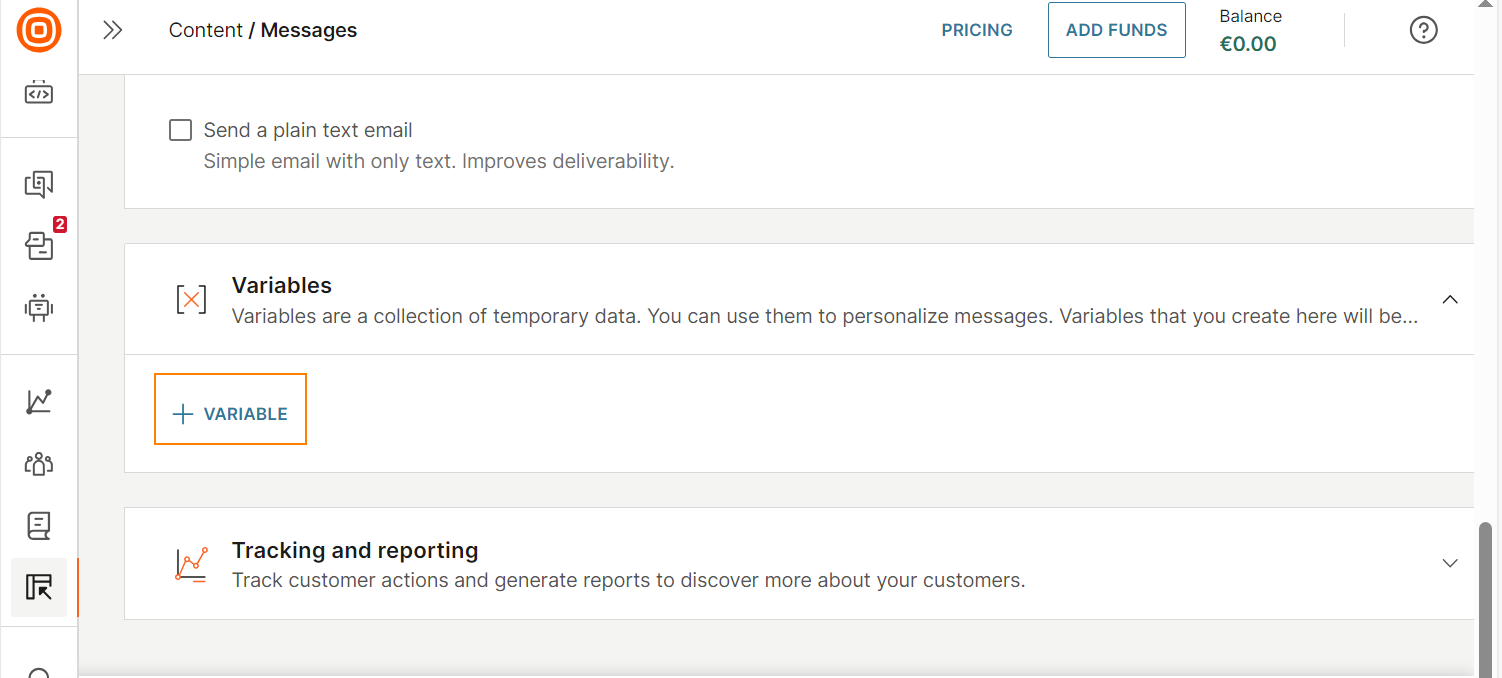
-
Select Variable to create a variable.
-
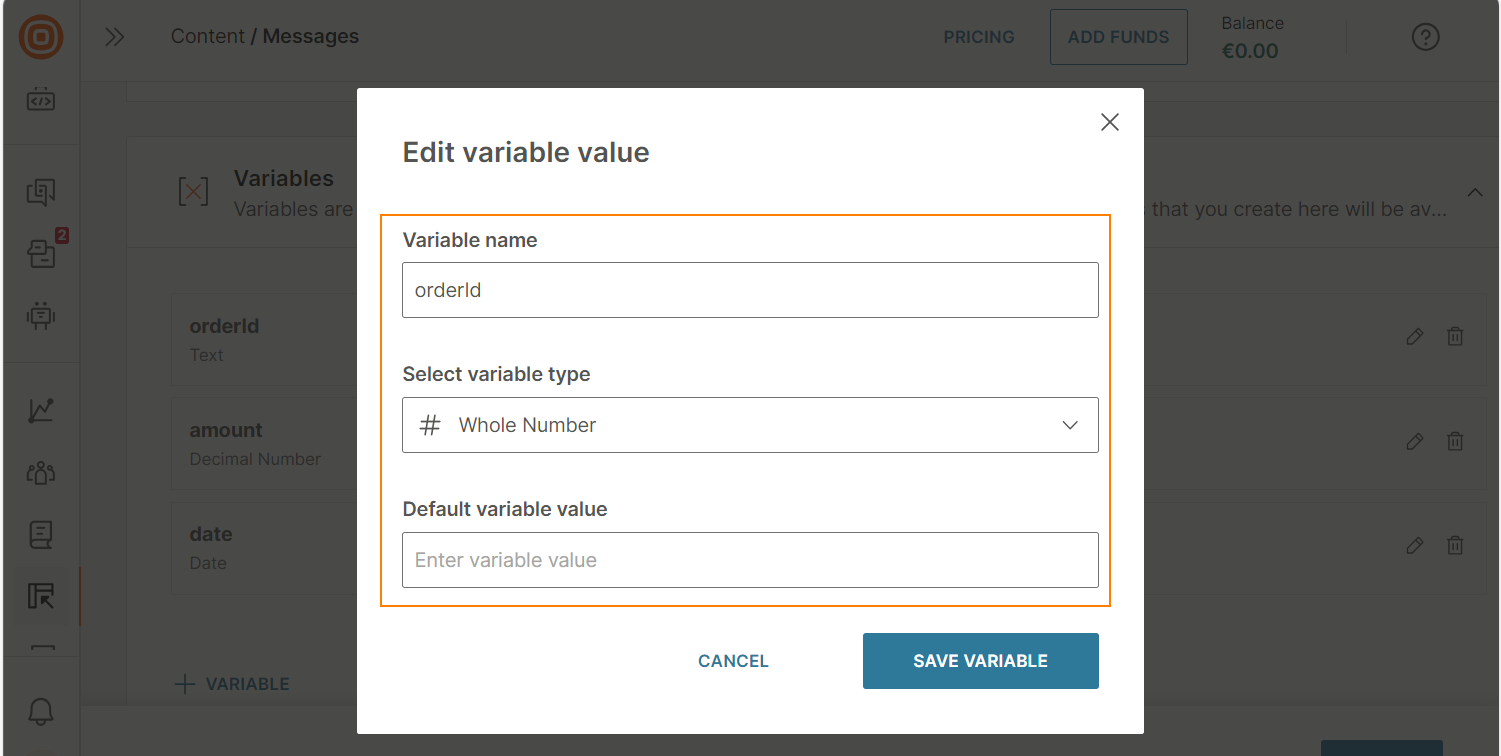
Configure the following fields.
- Variable name: Enter a name for the variable. Example: orderId.
- Select variable type: Make sure that the variable type matches the type of information you want to use in the variable. Example: For an order ID, use a variable type Whole number. For price, use a variable type Decimal number.
- Default variable value (Optional): Specify a default value to use in case the variable value is empty in the communication.
-
Select Save variable.
You can now view the variables that you created.

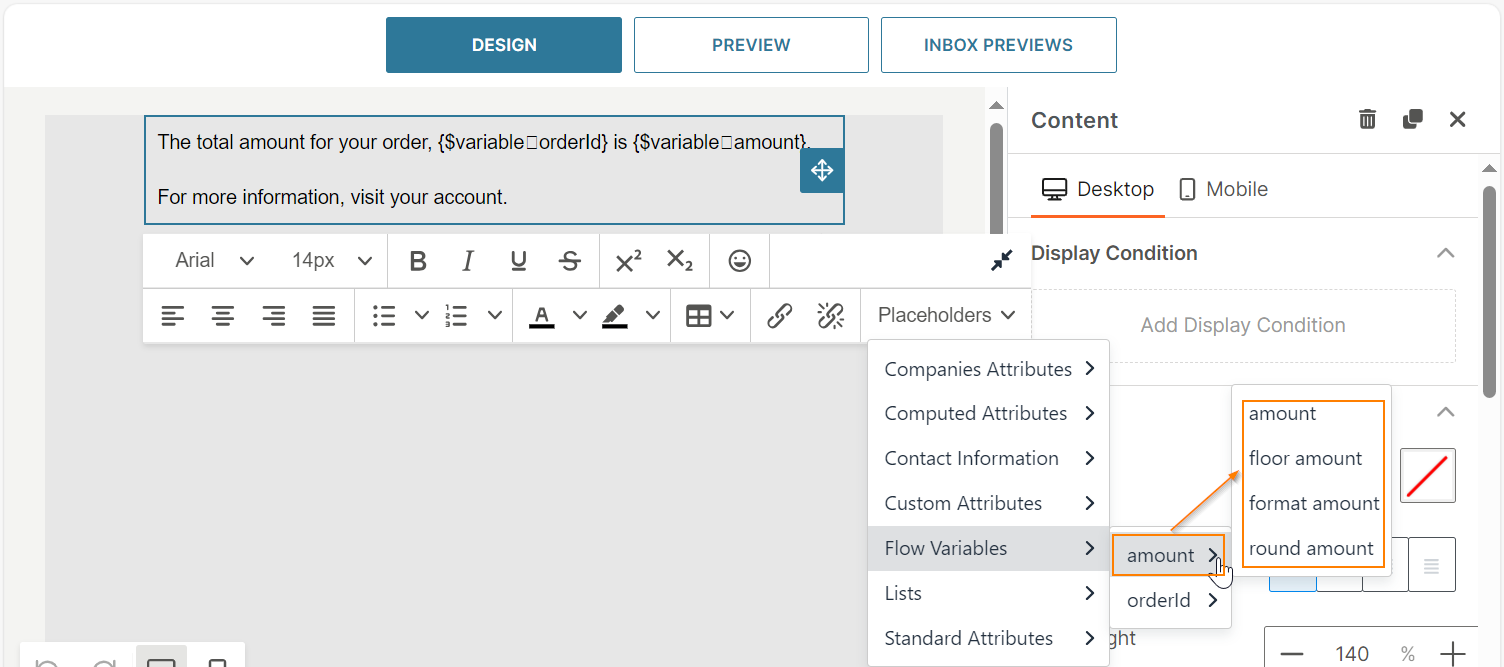
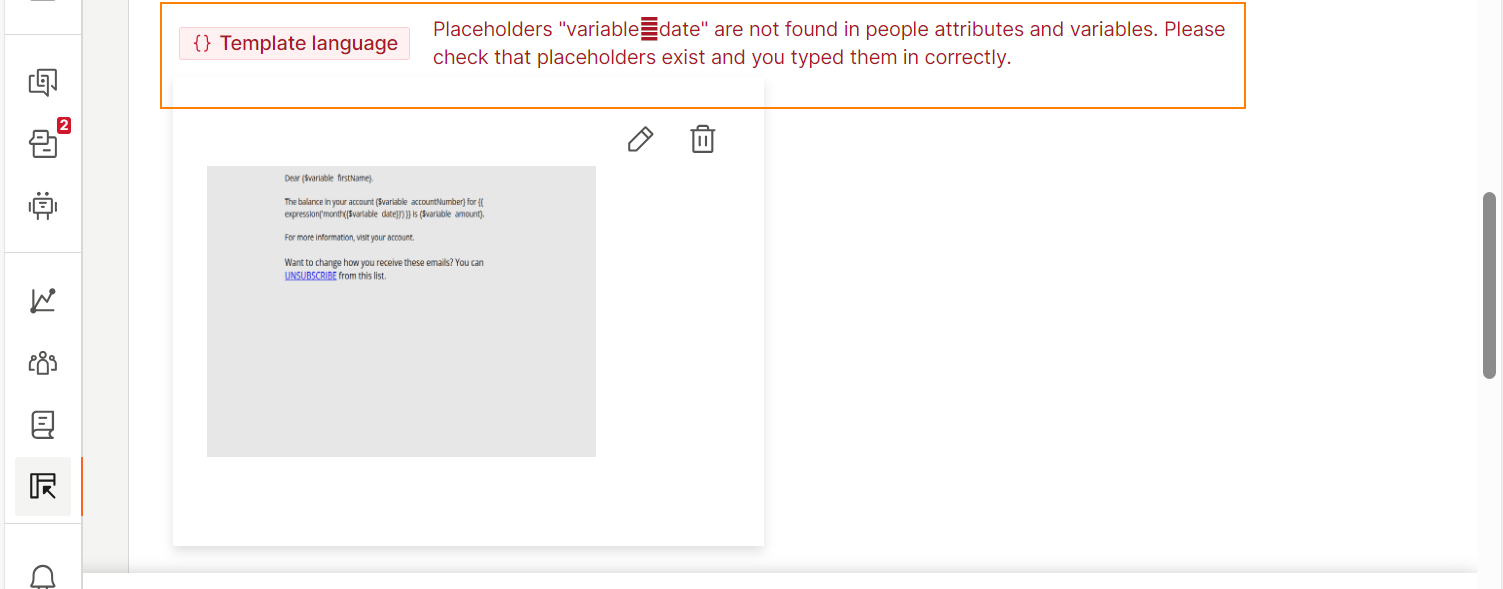
Add the variable to the message [#add-the-variable-to-the-message-use-variables-as-placeholders-in-the-message]
Add variables to the message content. Only variables that you add to the message content are available in the communication.
The following images and instructions are for the Email channel. The interface might be different for other channels.
- Create a new message or open an existing message for editing.
- In the email editor, click or tap within the message content.
- Select Placeholders > Flow variables, select the variable that you created.
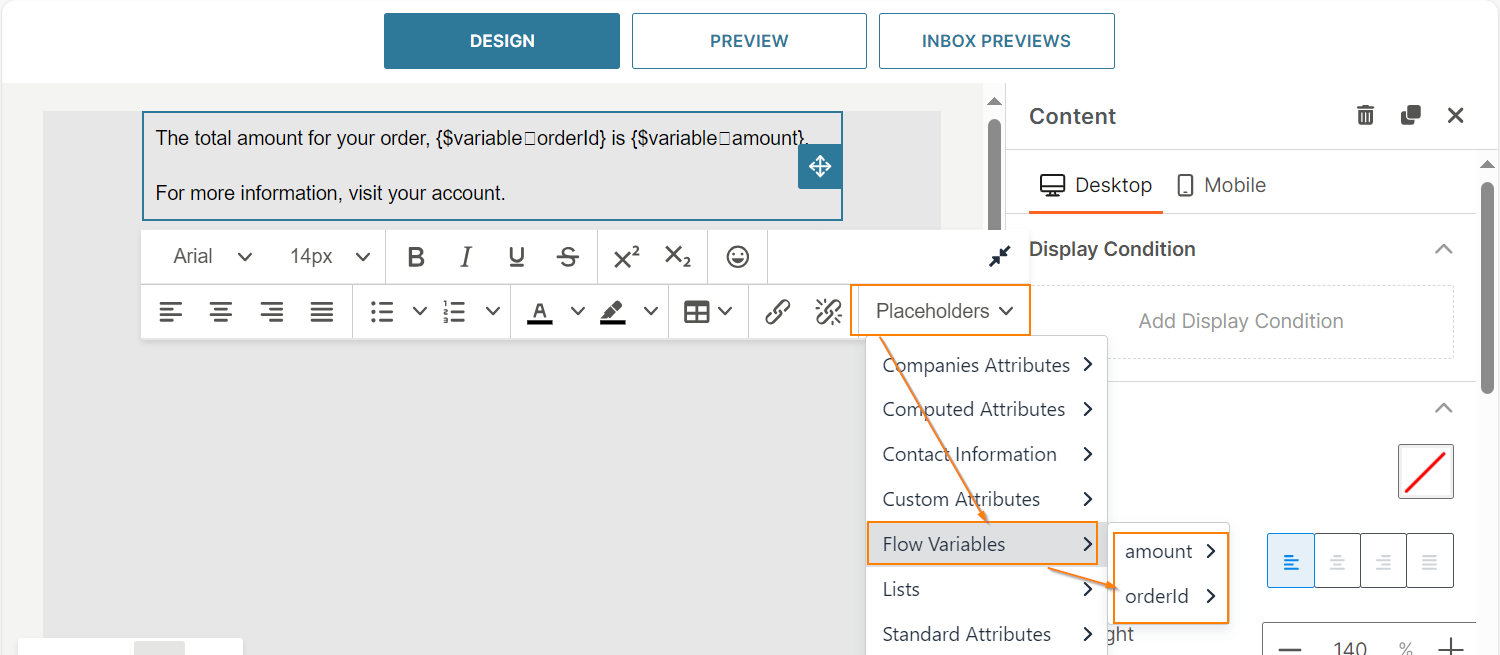
For some variables, you can refine the variable further. Example: For the amountvariable, you can select the type of formatting for the amount value.
You do not need to add all the variables that are listed in the Variables section. Add as many variables as required for the message.
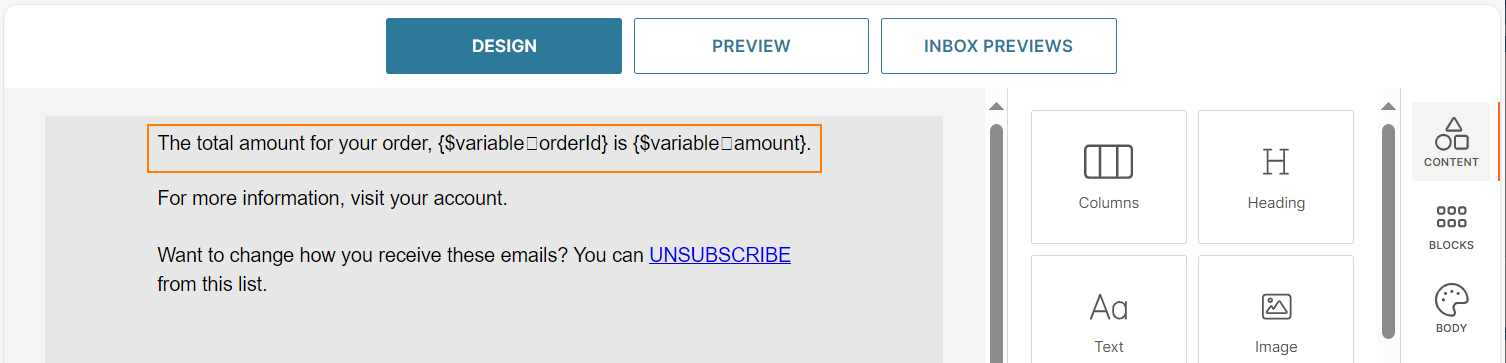
The following image shows a message that contains variables.
Edit a variable [#edit-a-variable-use-variables-as-placeholders-in-the-message]
You can edit a variable in a message only if the message is not used in an active communication.
Select the Edit icon next to a variable and make the required changes.
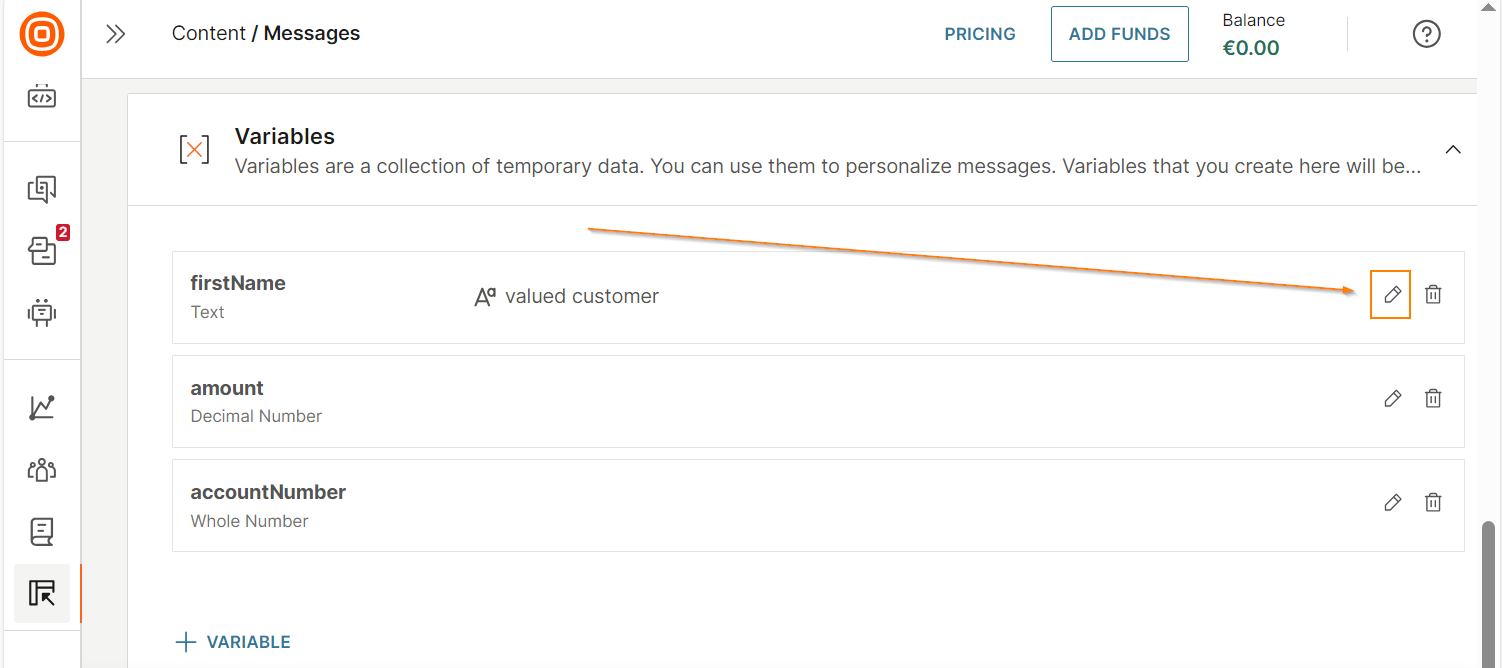
If you update the Variable name, and the message content uses this variable, do the following.
- In the message content, remove the older variable.
- Add the new variable.
Delete a variable [#delete-a-variable-use-variables-as-placeholders-in-the-message]
You can delete a variable in a message only if the message is not used in an active communication.
Select the Delete icon next to a variable.
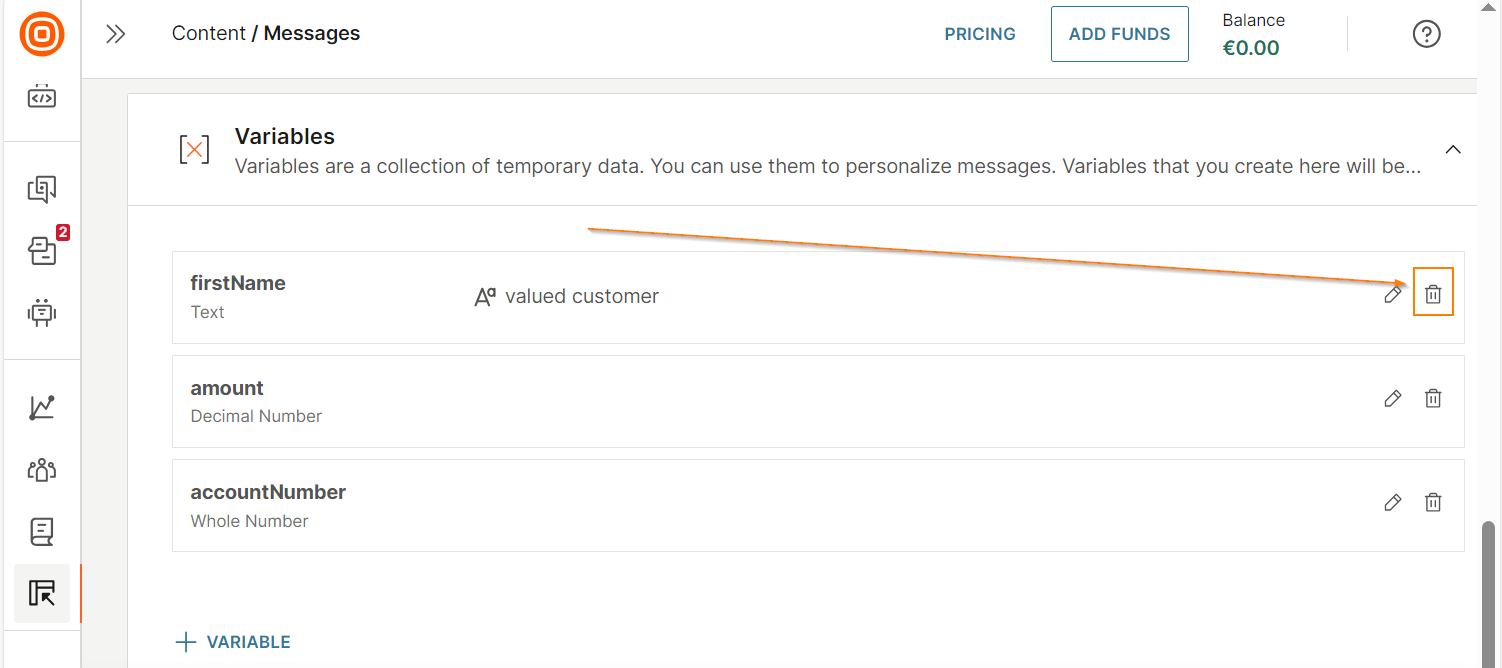
If the message content uses the deleted variable, update the message content to remove the variable.
Tracking and reporting [#url-shortening-and-tracking]
Shorten URLs [#url-shortening]
You can reduce the length of the URLs that you share with end users.
Why URL shortening is needed
If the links (URLs) that you include in messages to end users are long or contain other parameters, it can cause the following challenges:
- End users might consider such links untrustworthy or spam.
- Some channels, such as SMS, might have a limit on the number of characters in a message. If a message contains long URLs, it increases the length of the message. If the message exceeds the character limit, the message might be divided into multiple messages, which could increase costs.
- Long URLs increase the screen space occupied by the message on the end user's device, and makes the message less readable.
To avoid these challenges, shorten the URLs that you share with end users.
Channels that support shortening URLs
URL shortening is available for the following channels:
How URL shortening works
URL shortening behavior depends on the settings that you choose. These settings are applied to all the URLs in the message.
You can shorten the following types of links:
- URLs that contain only a primary or default domain. Example: www.infobip.com.
- URLs that contain a custom domain or subdomain. Example: www.dev.infobip.com.
URL shortening for call-to-action buttons in WhatsApp message templates is only supported for dynamic URLs (URLs that include a placeholder, such as {{1}}, at the end). Static (hardcoded) URLs in CTA buttons cannot be shortened because the link is locked at template registration time — without a placeholder, the system cannot modify it at send time.
For more information, refer to the following sections.
Shorten URLs that contain a default domain[#shorten-the-url-for-a-default-domain]
Use this option to shorten URLs that contain only a primary or default domain. When you select this option, the entire URL is shortened.
Do the following:
- In the Tracking and reporting section, select Shorten URLs.
- In the Choose a domain section, select default domain.
- (Optional) To remove the protocol from the URL, select Remove https:// from domain. This removes the 'http' or 'https' prefix from the URL.
Example:
| Original URL | https://www.infobip.com/docs/moments/flow-elements#flow-entry-exit |
| Shortened URL | https://rrj.nu/x5T3jd2Y The entire URL is shortened. |
| Shortened URL with protocol removed | rrj.nu/x5T3jd2Y The entire URL is shortened, and the protocol https is removed. |
Shorten URLs that contain a custom domain [#shorten-the-url-for-a-custom-domain]
Use this option to shorten URLs that contain a custom domain or subdomain.
When you select this option, the URL is shortened such that it retains the custom domain. Use this option to send personalized, branded links to end users.
Do the following:
-
In the Tracking and reporting section, select Shorten URLs.
-
In the Choose a domain section, select the custom domain that you have registered.
If you have not registered the custom domain with Infobip, select Add domain. For more information about adding a custom domain, refer to the URL shortening documentation.
-
(Optional) To remove the protocol from the URL, select Remove https:// from domain. This removes the 'http' or 'https' prefix from the URL.
Example:
| Original URL | https://www.dev.infobip.com/docs/api/customer-engagement/moments |
| Shortened URL | https://www.dev.infobip.com/x5T3jd2Y The custom domain https://www.dev.infobip.com is retained. The URL content after the custom domain is shortened. |
| Shortened URL with protocol removed | www.dev.infobip.com/x5T3jd2Y The custom domain www.dev.infobip.com is retained, the URL content after the custom domain is shortened, and the protocol https is removed. |
Tracking options [#url-tracking]
Track the clicks for the links in your messages. You can identify the following information:
- Which campaign links end users clicked.
- How many times end users clicked a specific link.
- Which end users clicked which links.
Enable Track URL clicks.
URL tracking for call-to-action buttons in WhatsApp message templates requires URL shortening to be enabled. Shortening is only supported for dynamic URLs (URLs that include a placeholder at the end).
Reporting options [#reporting]
Enable delivery reports over API pull
Enable this option to forward delivery reports to a defined endpoint.
Push delivery reports to webhook
Enable this option to get delivery reports on a specified webhook.
Data Payload [#data-payload-channel-options]
You can customize your message by adding data from stored or imported contacts. Example: first name or country.
- In the Data payload section, select one or more data that you want to include.
- In your message, add placeholders to include this data.
This data is also included in message reports.
For the Mobile push channel, the predefined data payload is phone number (MSISDN) because of the technical implementation of Mobile push and In-app messages.
Add a message to a communication
If you create the message from within a communication, the message is automatically added to the communication. Example: If you created the message from the Email element in a flow, the message is automatically added to the element.
If you create the message from Content > Messages, you need to manually add it to the communication.
For information about adding the message to a flow in Moments, refer to the Moments documentation.
Edit a message
Guidelines [#guidelines-edit-a-message]
- You can edit the message even if it is used in an active communication.
- You can edit a message that is either in Draft status or Active status.
- When you edit a message that is in Draft status, the changes are saved automatically.
- When you edit a message that is in Active status, you need to save the changes manually.
- The edited message is automatically updated in all the communications in which it is used.
Edit a message in the Message editor [#edit-a-message-in-the-message-editor-edit-a-message]
-
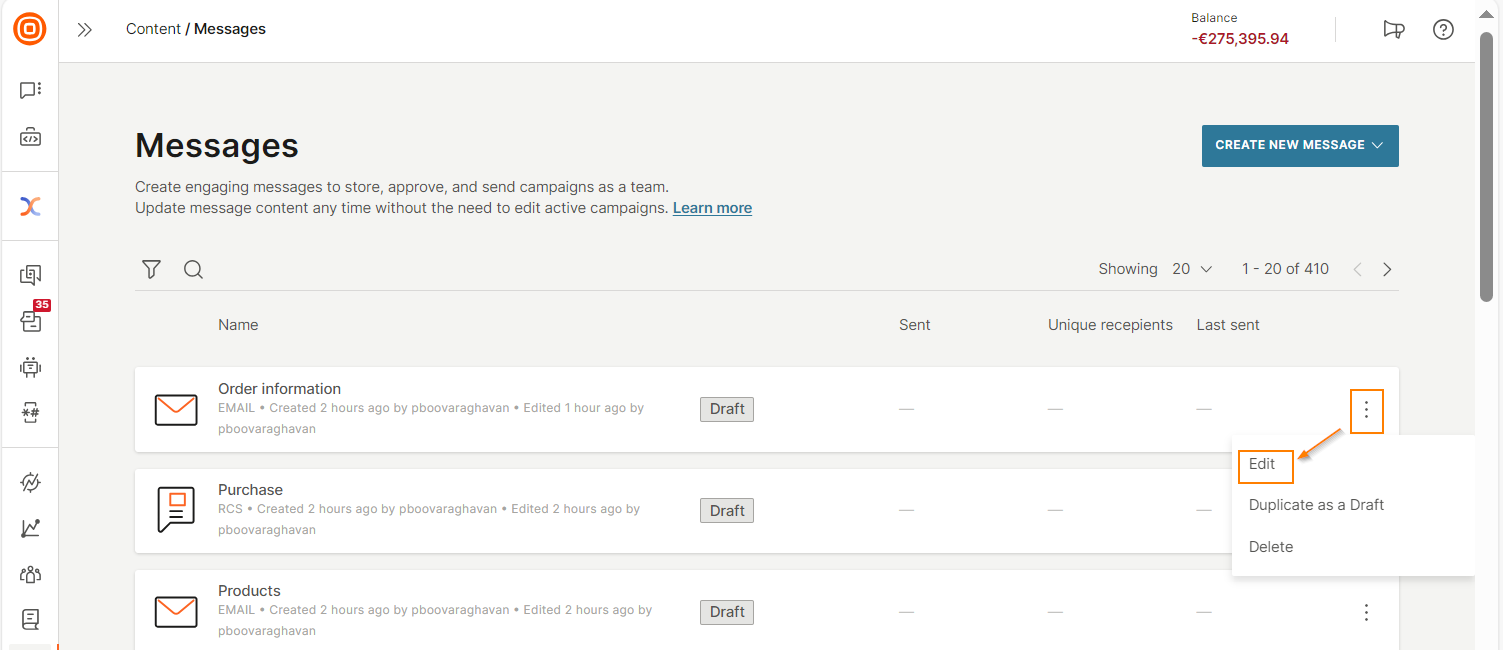
In the Content > Messages section of the web interface, do one of the following to open the message editor.
- Select the message.
- Select the three dots next to the message and select Edit.
-
In the editor, make the changes as required.
-
Select Update.
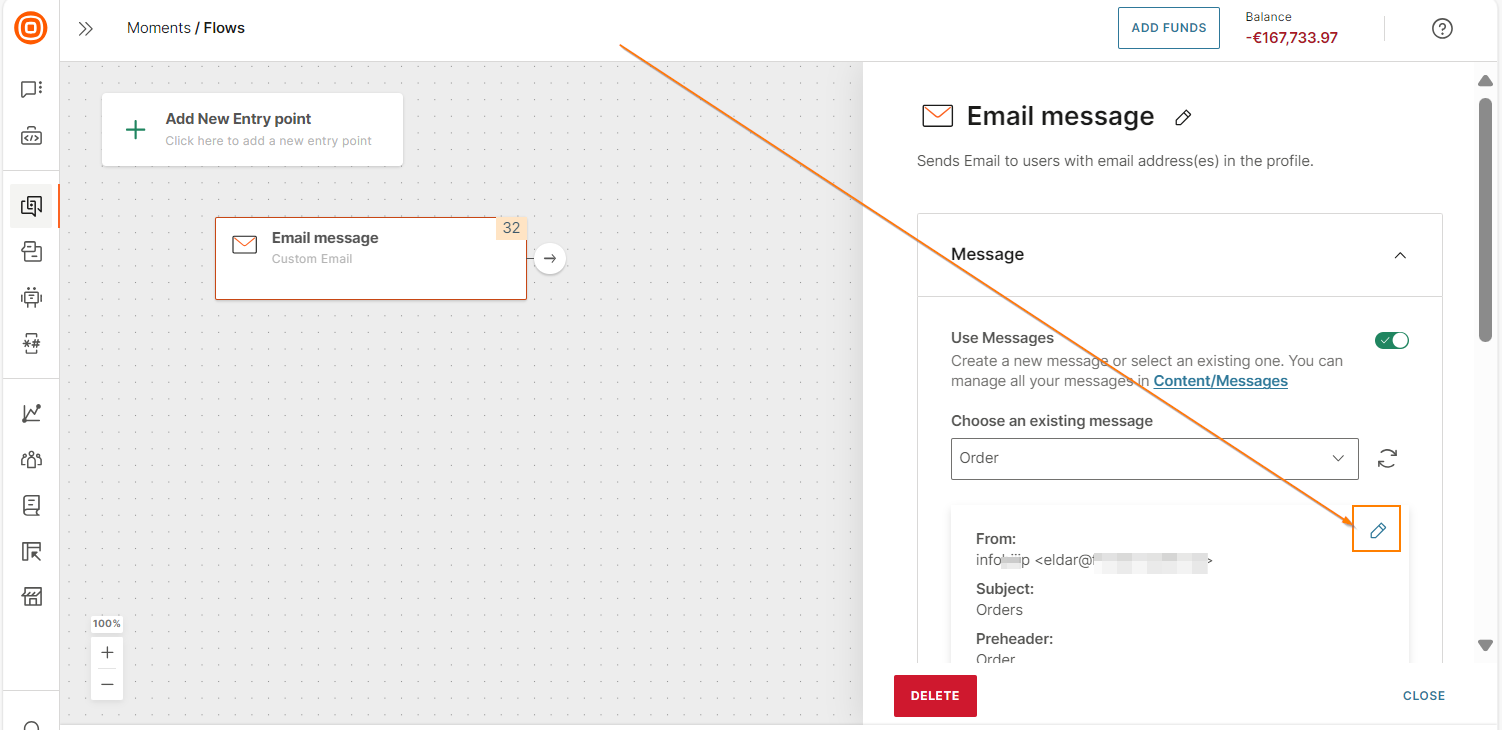
Edit a message from Moments [#edit-a-message-from-moments-edit-a-message]
- In the channel element that contains the message, select Edit to open the message editor.
- In the editor, make the changes as required.
- Select Update.
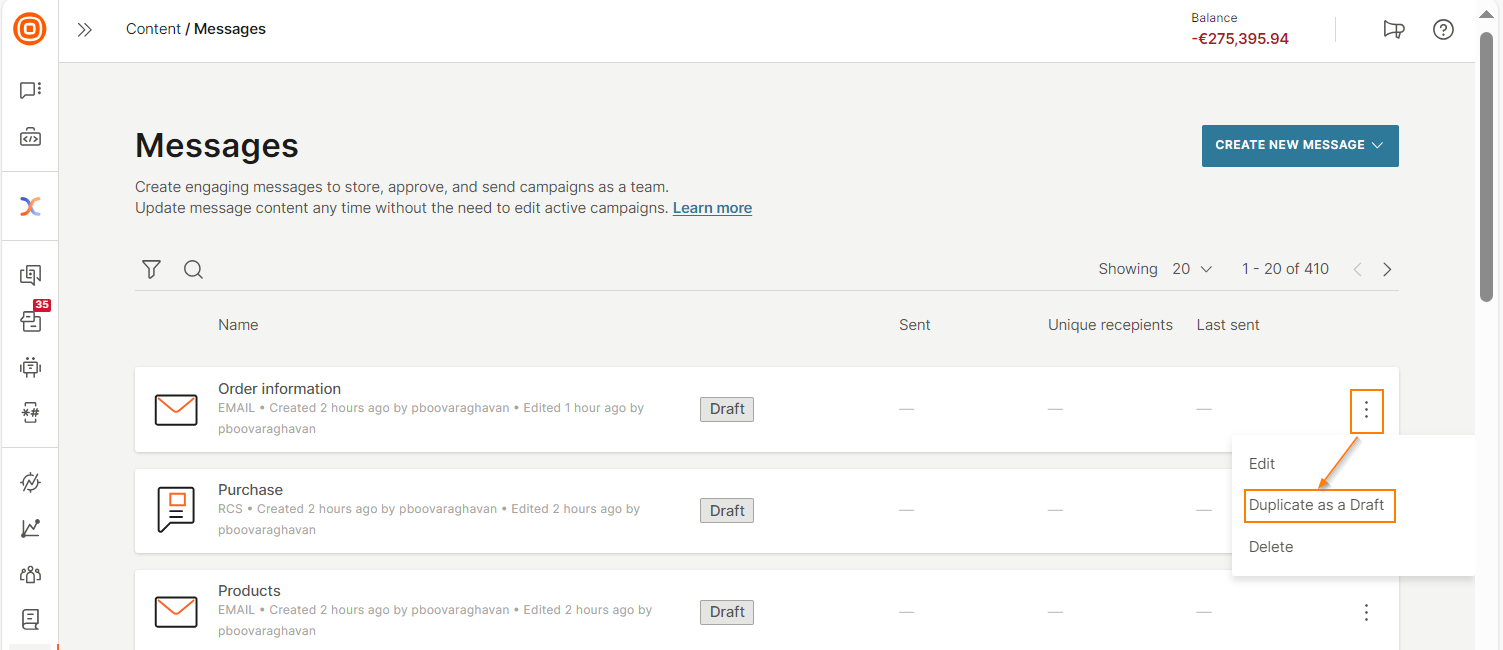
Duplicate a message
In the Content > Messages section, select the three dots next to the message and select Duplicate as a draft.
Delete a message
Guidelines [#guidelines-delete-a-message]
- You cannot delete a message if it is used in the following:
- Active communication
- Scheduled communication
- You can delete a message that is used in a draft communication. In this case, you need to either remove the message from the communication or select a different message in the communication. Example: If the message is used in the Email component in a flow in Moments, you need to manually remove or replace the deleted message from the element.
- You can delete a message that is used in a finished communication.
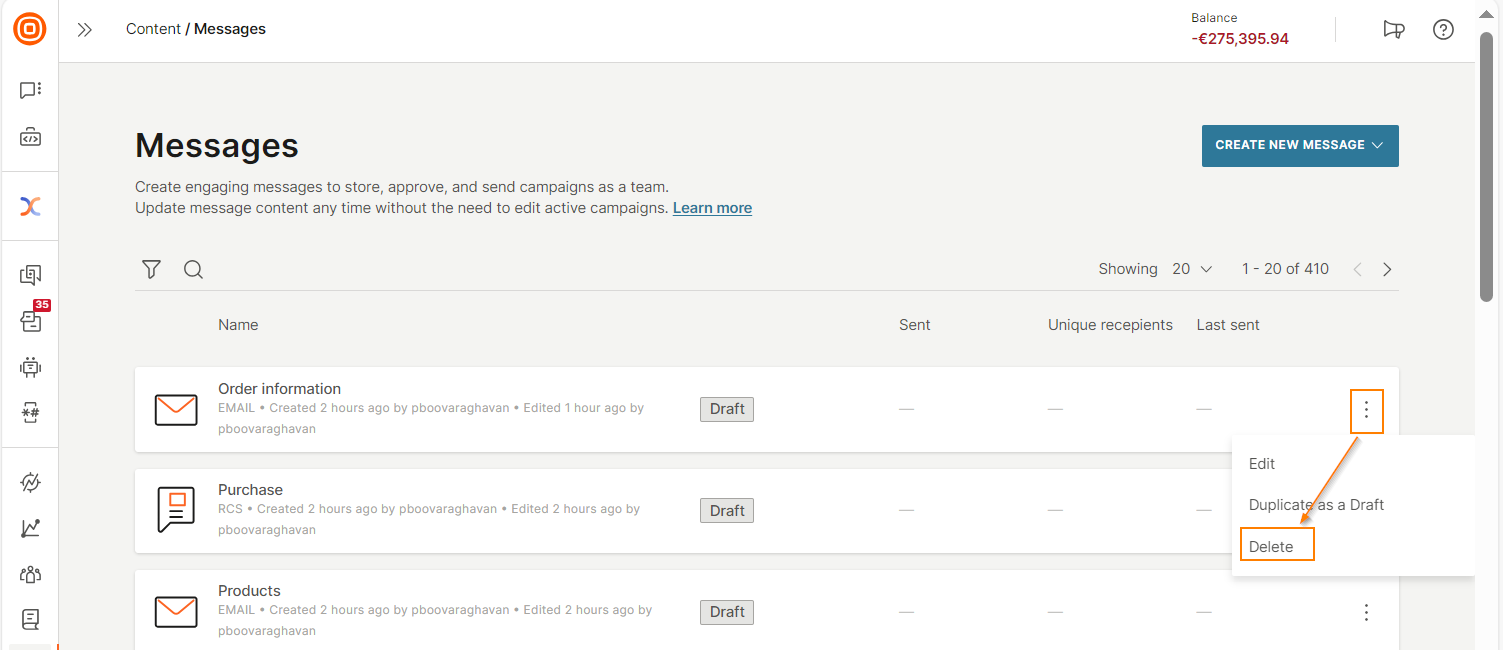
Delete a message [#delete-a-message-delete-a-message]
In the Content > Messages section, select the three dots next to the message and select Delete.
For information about what happens to the message data after the message is deleted, refer to the Data retention documentation.