Manage your event subscriptions
You can create, view and manage all aspects of your event subscriptions using either the Infobip web interface (opens in a new tab) or the Subscriptions API (opens in a new tab). Subscriptions define which events trigger notifications and how those notifications are delivered.
Each subscription must include:
- A selected category and a set of events
- A notification profile with a webhook URL
- (Optional) Filters such as application ID, entity ID, or user
- (Optional) Authentication settings and a certificate
For a comprehensive list of available events per category, refer to Event subscriptions.
To set up webhook notification system programmatically, see: Set up webhook notifications for messaging events.
Create and manage subscriptions
Use either our web interface or the API to create, manage, or delete a subscription.
Create a subscription
To create a subscription over our web interface:
-
Log in to the Infobip web interface (opens in a new tab).
-
Go to Developer Tools > Subscriptions Management.
-
Open the Subscriptions tab.
- This tab display all existing subscriptions created through the web interface or API. You can filter the list using the Search bar.

-
In the Subscriptions tab, select Create subscription.
-
On the Choose category screen, select a category. Categories are grouped as follows:
- Channels: Email, Facebook, Kakao - Alim, Kakao Brand Messaging, LINE, Mobile push, RCS, SMS, MMS, Viber, WhatsApp, Zalo, Voice and WebRTC, Open Channel, Apple Messages for Business
- Numbers and senders: Registration, Mobile identity, Number lookup
- Tools: Blocklist, AgentOS / Customer engagement
-
Enter a subscription name and subscription ID. Then, select Next.
- For subscription ID, use letters, numbers, dashes, or underscores only. No spaces or special symbols.
-
On the Select events screen, choose the events you want to subscribe to and select Next.
NOTEIf a selected event already has an inbound configuration defined at the number level, it will not follow your new subscription automatically. To ensure the subscription applies, update the number-level configuration and set Follow subscription as the forwarding action.
- The available events depend on the selected category. See Event subscriptions for the full reference.
-
On the Set filter screen (optional), filter traffic by:
- Users: Filter events generated for specific users.
- Entity: Entity ID representing a unique object, such as customer or department within your organization.
- Application: Application ID representing a specific use case or environment on the Infobip platform.
- Resources: A sender name, number, domain, or other identifier. For outbound traffic, the resource filter matches the sender. For inbound traffic, it matches the destination.
NOTEYou can use one or more of these filters together. A subscription will trigger only if all filter conditions match the event.
- If no filters are applied, the subscription will apply to all events in the selected category.
- Once you are ready, select Next.
-
Select an existing notification profile or create a new one:
- If creating a new one, enter its name and webhook URL.
- Optionally, add response body regex or response regex to validate HTTP response body and headers.
- You can also create a notification profile separately, on the Notification profile tab.
IMPORTANTA subscription must have a corresponding notification profile to function correctly.
-
(Optional) Under Security settings, select an existing authentication setting or create a new one.
- Choose Basic, HMAC, or OAuth.
- Provide the required credentials or settings for the selected type.
-
(Optional) Apply an existing certificate, if needed.
-
(Optional) Configure advanced settings:
- Max bucket size (1–2000): Maximum messages per request
- Window size (20–10000): Concurrent connections
- Connect timeout (300–30000 ms): Connection timeout
- Read timeout (1000–90000 ms): Read timeout
- Enabled SSL protocols: TLS v1.2, TLS v1.3
- Headers: Key-value pairs sent as headers
- Rate limit (1–5000): Requests per second
-
Select Next to view the summary of your subscription. Then, select Save.
- Your new subscriptions is now created.
Manage a subscription
To view or modify a subscription over the web interface, follow the steps below:
- Log in to the Infobip web interface (opens in a new tab).
- Go to Developer Tools > Subscriptions Management.
- Open the Subscriptions tab and find the subscription using the Search bar.
- Select the three-dot menu next to the subscription and select Edit.
- To view a summary of your subscription, select View.
- Make the necessary changes.
- You can change events, filters, authentication setting, notification profiles.
- You cannot change the subscription's category or channel.
- Select Save.
Delete a subscription
If you want to delete a subscription, be aware that this action may impact other configured settings. It is important to review the Subscription hierarchy to understand the deletion rules. Be cautious, as deleting a subscription could affect other components tied to it.
To delete a subscription over the web interface, follow the steps below:
-
Log in to the Infobip web interface (opens in a new tab).
-
Go to Developer Tools > Subscriptions Management.
-
Open the Subscriptions tab and find the subscription using the Search bar.
-
Select the three-dot menu next to the subscription and select Delete.
Create and manage notification profiles
A notification profile defines where notifications are sent and how they are delivered. Every subscription must include a valid notification profile to function correctly. You can create, update, or delete notification profiles using the Infobip web interface or the Subscriptions API - Profile (opens in a new tab). A profile typically contains a webhook URL and may include advanced delivery and authentication settings.
Depending on your use case, you may create a notification profile when setting up a new subscription. In this case, the notification profile will appear in the Notifications tab of the Subscriptions Management area once the subscription is created.
You can create a standalone notification profile for scenarios where you want to use a single notification profile across multiple subscriptions.
Create a notification profile
To create a notification over our web interface:
- Log in to the Infobip web interface (opens in a new tab).
- Go to Developer Tools > Subscriptions Management.
- Open the Notification profiles tab.
- Select Create notification profile.
- Enter the profile info:
- Notification profile name: Use letters, dashes, or underscores. No spacings or special symbols allowed.
- Webhook URL: The destination URL that will receive the event notifications.
- (Optional) Add expert parameters:
- Response body regex: Text pattern that must appear in the response body
- Response regex: Expected HTTP status codes
- (Optional) Under Security settings, select an existing authentication setting or create a new one.
- Choose Basic, HMAC, or OAuth.
- Provide the required credentials or settings for the selected type.
NOTEWe recommend using at least basic authentication to protect your webhook endpoint. Refer to the Create authentication settings section for more information.
- (Optional) Apply an existing certificate, if needed.
- (Optional) Configure advanced settings:
- Max bucket size (1–2000): Maximum messages per request
- Window size (20–10000): Concurrent connections
- Connect timeout (300–30000 ms): Connection timeout
- Read timeout (1000–90000 ms): Read timeout
- Enabled SSL protocols: TLS v1.2, TLS v1.3
- Headers: Key-value pairs sent as headers
- Rate limit (1–5000): Requests per second
- Select Save to save your notification profile.
Manage a notification profile
To view a summary of or modify a notification profile over the web interface, follow the steps below:
- Log in to the Infobip web interface (opens in a new tab).
- Go to Developer Tools > Subscriptions Management.
- Open the Notification profiles tab and find the notification profile using the Search bar.
- Select the three-dot menu next to the notification profile and select Edit.
- To see a summary of your notification profile, select View.
- Make the necessary changes.
- Select Update.
Delete a notification profile
If you plan to delete a notification profile, be aware that this action may impact other configured settings. It is important to review the Subscription hierarchy to understand the deletion rules. Be cautious, as deleting a notification profile could affect other components tied to it.
To delete a notification profile over the web interface, follow the steps below:
-
Log in to the Infobip web interface (opens in a new tab).
-
Go to Developer Tools > Subscriptions Management.
-
Open the Notification profiles tab and find the notification profile using the Search bar.
-
Select the three-dot menu next to the notification profile and select Delete.
Standalone notification profile
A standalone notification profile is a notification profile that operates independently and is not linked to any subscription. Standalone profiles are used to manage notification behavior when a URL is provided directly in the API requests or webhook parameters.
There are two types of standalone notification profiles:
| Type | Description | Limitations | Priority |
|---|---|---|---|
NULL profile | Standalone notification profile without an URL defined. | Only one per account. | Used only if no URL profile matches. |
| URL profile | Standalone notification profile with an URL defined. Matches notification traffic where the provided notifyURL or webhook URL exactly matches the profile URL. | Multiple allowed per account. | Takes priority over the NULL profile when a match is found. |
Standalone notification profiles are triggered when traffic is sent over the API with parameters such as notifyURL or webhook URLs. These values specify where events, such as delivery reports (DLRs) should be sent.
When an API request includes a URL, the system uses standalone notification profiles to determine how to handle and forward these events, applying any advanced settings, certificates or security configurations defined in the matched profile.
Example use case
A client uses the SMS v3 API (opens in a new tab) and includes the following webhook configuration in their API request to specify where DLRs should be sent:
"webhooks": {
    "delivery": {
        "url": "https://www.example.com/sms/advanced"
    },
    "contentType": "application/json",
    "callbackData": "DLR callback data"
}
Processing logic for standalone notification profiles
| Scenario | System behavior |
|---|---|
| No standalone notification profile exists | The system forwards the DLR to https://www.example.com/sms/advanced without applying any additional settings. |
Standalone notification profile exists (NULL or URL-matched) | If there is a NULL profile or a profile with the exact URL https://www.example.com/sms/advanced, the system forwards the DLR to that URL and applies any advanced settings, security configurations, or certificates defined in the profile. |
| Multiple standalone notification profiles exist | The system checks in the following order: 1. Look for a profile with an exact URL match. 2. If no match is found, use the NULL profile if it exists.3. If neither is found, forward the DLR without applying additional settings. |
Create and manage authentication settings
Authentication settings define how Infobip authenticates when sending notifications to your webhook endpoint. You can use basic authentication, HMAC signing, or OAuth, depending on your system requirements.
You can create, reuse, or delete authentication settings using Infobip web interface or the Subscriptions API - Security (opens in a new tab). Authentication settings are applied through notification profiles.
Depending on your use case, you may choose to create an authentication setting when setting up a new notification profile. In this case, the authentication setting will appear in the Authentication settings tab of the Subscriptions Management area once the authentication setting is created.
For scenarios where you want to use a single authentication setting across multiple notification profiles, you can create a standalone authentication setting.
A notification profile must include either no authentication, or a valid authentication setting.
Create authentication settings
To create authentication settings over our web interface:
- Log in to the Infobip web interface (opens in a new tab).
- Go to Developer Tools > Subscriptions Management.
- Open the Authentication settings tab.
- Select Create authentication settings.
- Enter the security settings name:
- Use letters, dashes, or underscores. No spacings or special symbols allowed.
- Select an authentication type:
- Basic: Enter username and password.
- HMAC: Provide the secret key used to compute the HMAC signature and the HMAC algorithm. When HMAC is configured, Infobip sends the computed signature in the
X-Hub-SignatureHTTP header with each notification request. - OAuth: Add the token URL to retrieve the access token and grant type (a method to retrieve the access token). Optionally, add the client ID, client secret, client scope, and resource. You can also add custom headers as required by your system.
HMAC verificationWhen verifying the HMAC signature on your side, use the entire raw JSON body exactly as received. Do not strip whitespace, newline characters, or reformat the JSON before computing the hash, as any modification will cause the signature to not match.
- Select Save to save your authentication settings.
Manage authentication settings
To view a summary of or modify authentication settings over the web interface, follow the steps below:
- Log in to the Infobip web interface (opens in a new tab).
- Go to Developer Tools > Subscriptions Management.
- Open the Authentication settings tab and find the settings using the Search bar.
- Select the three-dot menu next to the authentication setting and select Edit.
- To see a summary of your authentication setting, select View.
- Make the necessary changes.
- Select Update.
Delete authentication settings
If you plan to delete the authentication settings, be aware that this action may impact other configured settings. It is important to review the Subscription hierarchy to understand the deletion rules. Be cautious, as deleting an authentication setting could affect other components tied to it.
To delete authentication settings over the web interface, follow the steps below:
-
Log in to the Infobip web interface (opens in a new tab).
-
Go to Developer Tools > Subscriptions Management.
-
Open the Authentication settings tab and find the setting using the Search bar.
-
Select the three-dot menu next to the authentication setting and select Delete.
Create and manage certificates
Certificates allow you to secure webhook communication through Mutual Transport Layer Security (mTLS). When enabled, both Infobip and your system authenticate each other using digital certificates. This ensures that event notifications are exchanged only with trusted endpoints.
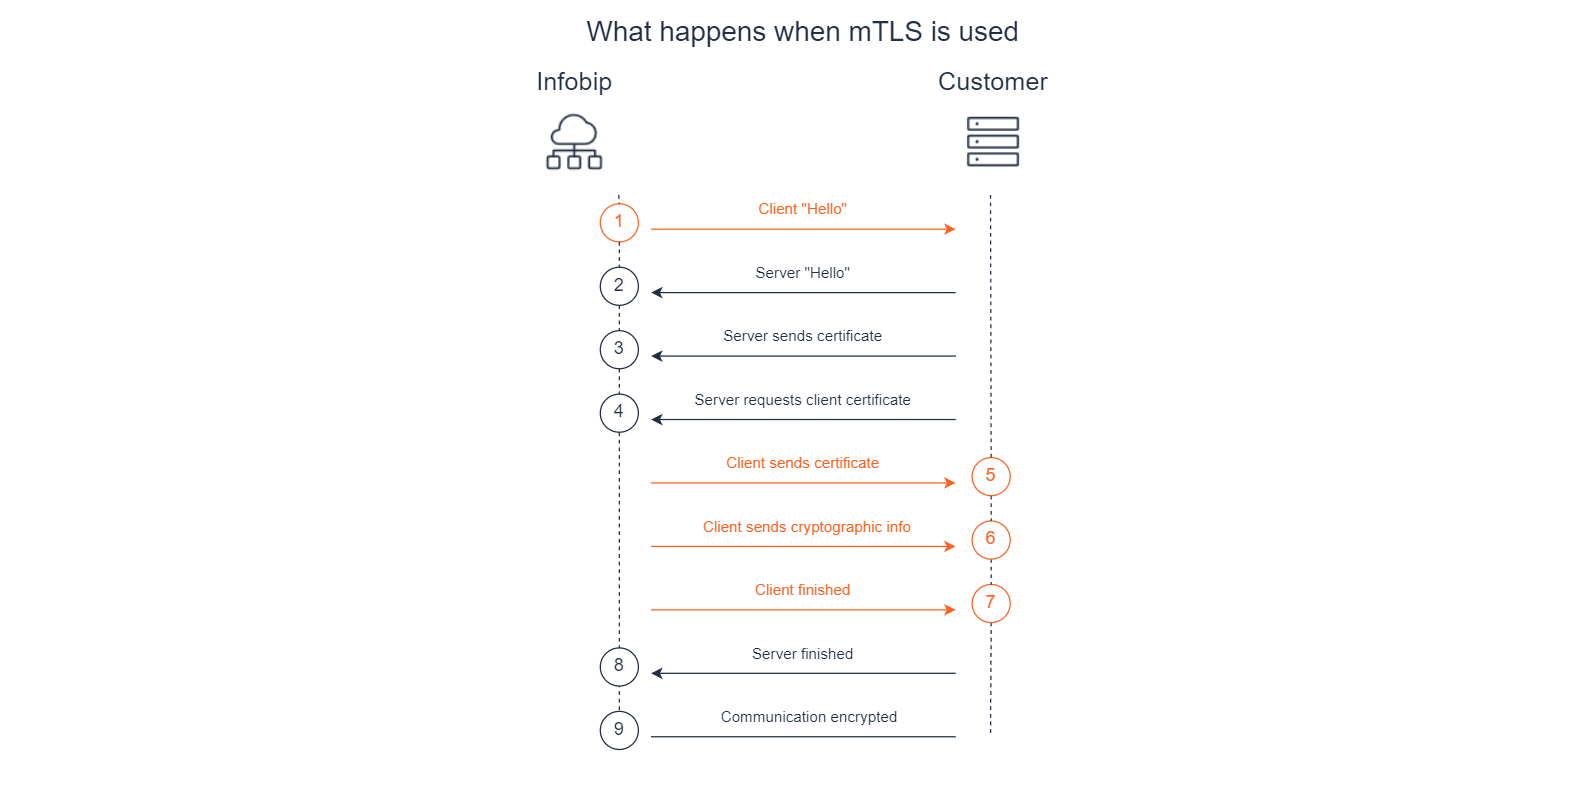
Mutual TLS (mTLS) allows both parties to authenticate each other during the initial SSL/TLS handshake. In standard TLS, only the client authenticates the server by verifying the server's certificate, but the server does not verify the client. This means the server trusts any client that connects, even though additional authentication mechanisms like username/password may be in place. With mTLS, both the server and the client exchange certificates, allowing each to verify the other's authenticity.
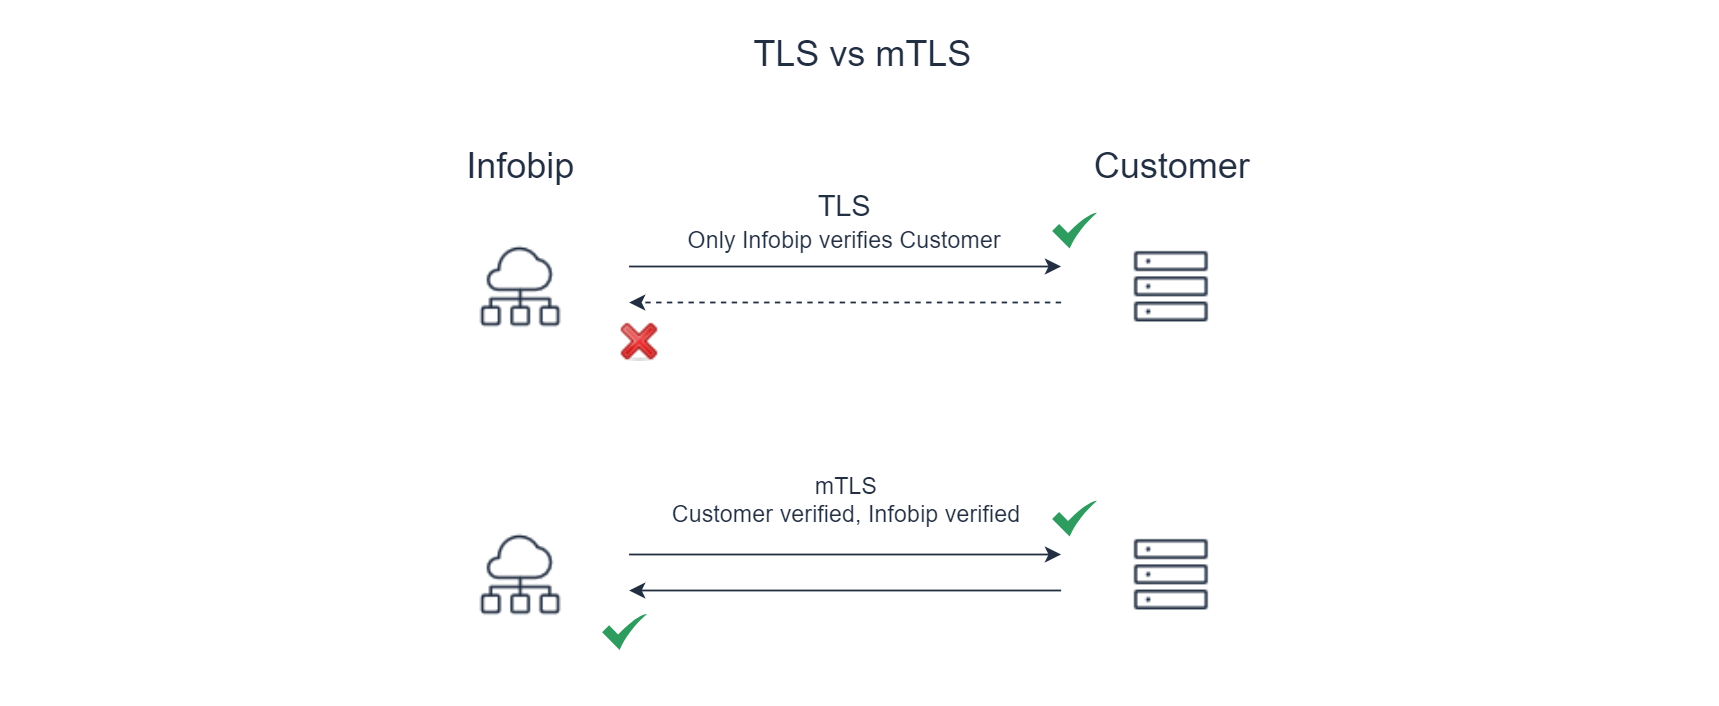
In a typical subscription, Infobip sends event notifications to your webhook URL using standard HTTPS. When mTLS is enabled:
- Infobip acts as the client.
- Your system acts as the server.
- Your system validates Infobip's certificate, and Infobip validates yours.
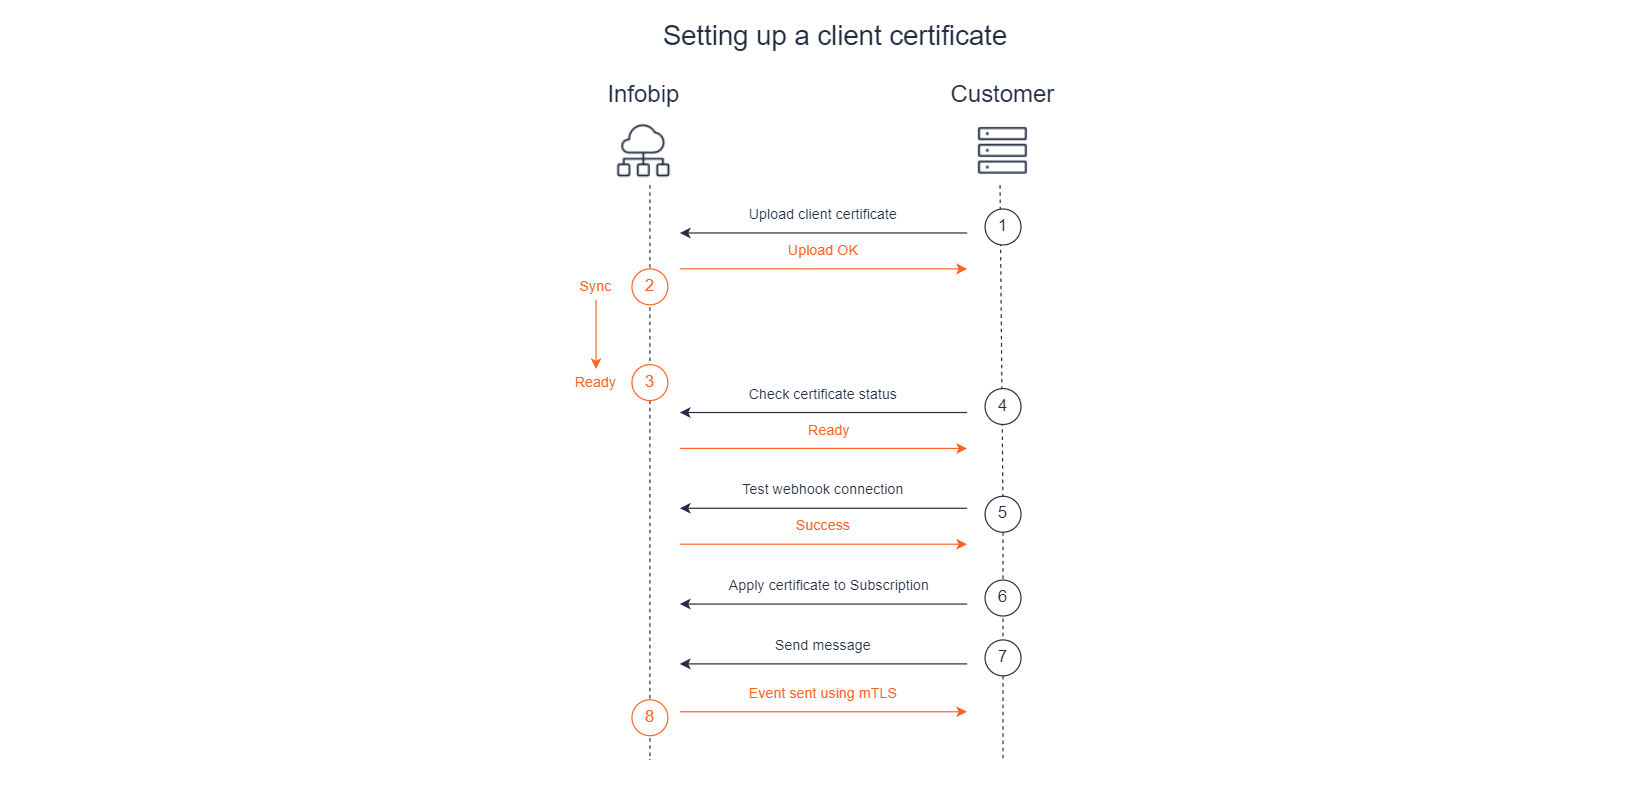
To do this, you must upload your client certificate to Infobip and attach it to a notification profile.
Certificates are attached to notification profiles and can be managed through the Subscriptions Management interface or the Subscriptions API - Certificate (opens in a new tab).
mTLS operates at the connection level between Infobip and your webhook endpoint. This is separate from application-level authentication such as basic authentication, HMAC, or OAuth.
Create a certificate
To create a certificate over our web interface:
- Log in to the Infobip web interface (opens in a new tab).
- Go to Developer Tools > Subscriptions Management.
- Open the Certificates tab.
- Select Create certificate.
- Enter the certificate info.
- Enter the certificate name. Use letters, numbers, dashes, or underscores. No spacings or special symbols.
- Paste in the certificate content. The certificate payload must contain both the certificate chain and the private key data.
- Add your passphrase.
IMPORTANTThe certificate content must include the private key. Without it, the mTLS handshake will fail because Infobip cannot authenticate as a client to your endpoint.
- Select Save to save your certificate.
Once the certificate has synced with the Infobip platform (you can verify this using the Get certificate status (opens in a new tab) API request), apply it to a subscription notification profile where a webhook is configured.
Any events sent to that webhook will now use the uploaded certificate to establish the mTLS connection.
Manage and delete certificates
To view certificates on our web interface:
- Log in to the Infobip web interface (opens in a new tab).
- Go to Developer Tools > Subscriptions Management.
- Open the Certificates tab.
- You will see a list of all created or uploaded certificates.
- To delete a certificate, select the three-dot menu next to the certificate and then select Delete.
Be careful when deleting certificates. You cannot delete a certificate that is linked to a notification profile, so ensure that you update the notification profile before proceeding with deletion.