Journey settings
Configure journey behavior through the Journey settings panel. To open, select the Settings gear icon in the journey editor header.
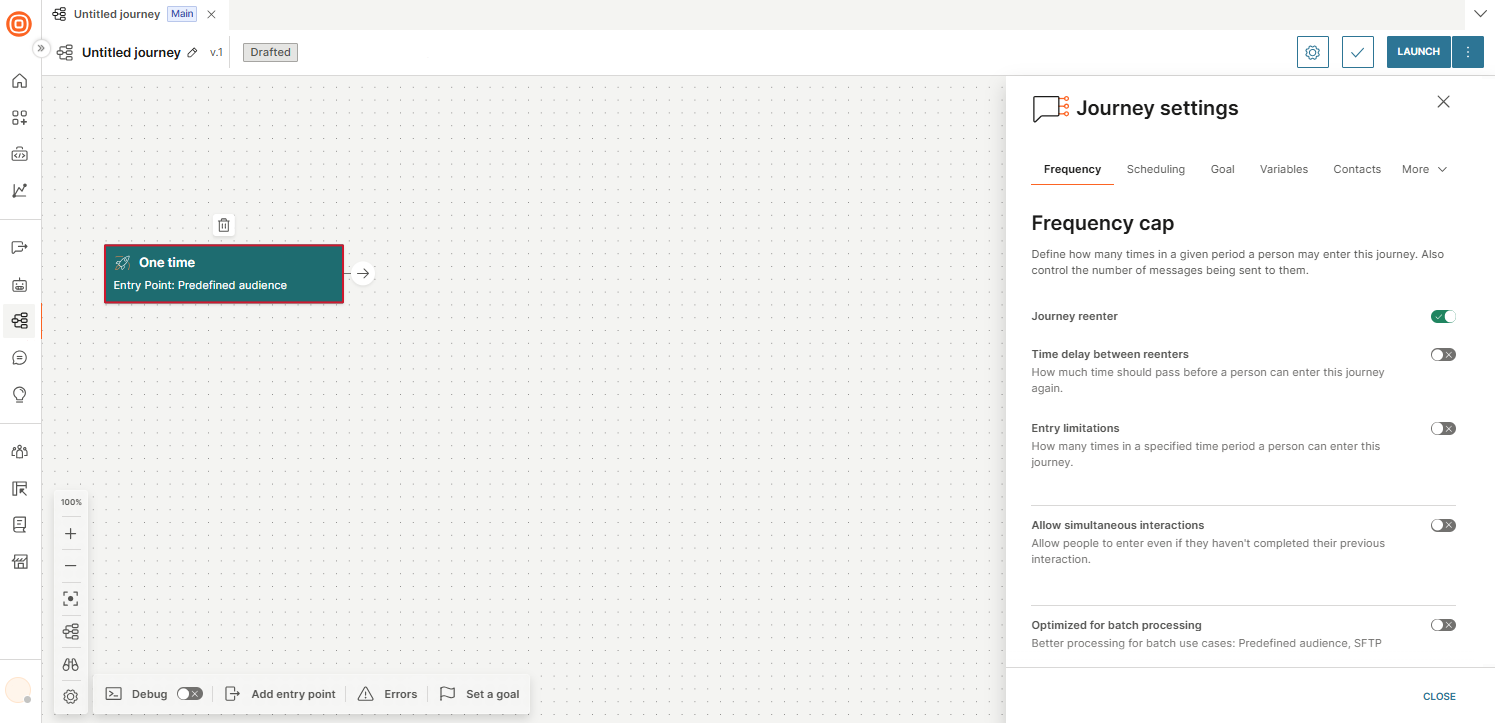
The panel has the following tabs: Frequency, Scheduling, Goal, Variables, and More (Shared message history, Tags).
Frequency [#frequency-settings]
Use Frequency cap to control how often the same person can enter a journey. This helps prevent repeated enrollment caused by repeated triggers or data changes. Example: A welcome journey should run only once per person. If a registration event is triggered more than once, Frequency cap prevents unintended re-entry.
Frequency cap includes:
- Journey reenter: Controls whether people can enter more than once. Enabled by default.
- Time delay between reenters: Minimum time required before a person becomes eligible to re-enter after exiting. Only one delay can be set.
- Entry limitations: Limits how many times a person can re-enter during a time period (for example, 2 times per week). You can configure multiple limitations.
- Allow simultaneous interactions: Allow people to enter the journey even if they have not completed their previous interaction.
- Optimized for batch processing: Enables better processing for batch use cases such as Predefined audience and SFTP.
If a person matches the entry trigger but the configured time delay or entry limitations prevent re-entry, the person does not enter the journey.
With re-entry enabled, but without any time delay and entry limitations, a person is eligible to return to the journey right after exiting if they match the conditions.
Scheduling [#scheduling-settings]
Use Scheduling to configure journey start and stop behavior.
Schedule journey start
Set a specific date and time for the journey to launch. For more information, see Launch > Launch the communication later.
If you do not set a start date and time, the journey starts when you select Launch now. For more information, see Launch > Launch the communication immediately.
Journey stop
Set the date and time when the journey stops automatically. By default, the stop date is 90 days after the journey is created. When the journey stops, its status becomes Finished.
If you do not set a stop date:
- If there is no activity for 1 year, the journey stops automatically.
- If there is activity, the journey can run indefinitely.
Journeys with the One-time entry point cannot run indefinitely because all audience enters at the same time and cannot be added later.
Allow journeys to complete after journey is stopped
When enabled, participants already in the journey continue until completion after the stop time. During this period, the journey status is Finishing and no new participants can enter.
Time zone
Set the time zone used for scheduling and time-based evaluation.
Goals [#goals-settings]
A goal is a tracked event used to measure whether a journey achieves its intended outcome (for example, purchases). Goal performance shows how many people reached the goal event and the related conversion rate. This helps you track the campaign and identify how close you are to achieving your goal.
Set a goal
You can set a goal before or after launch:
-
Do one of the following:
- Select Set a goal.
- Go to Journey settings > Goal tab.
-
Enable Set a goal for the journey.
-
In the When a person performs an event dropdown, select an event. The event selector organizes events into the following categories:
Category Examples All/Search Search across all event categories. Custom Events Events you defined (for example, addtocart, CompletedPurchase). People Events Profile changes (for example, Contact Information Changed, Email Address Added). Channel Events Channel-specific events (for example, App Launch, Install, Uninstall). Product Events Product events (for example, Answers Session Ended, Conversation Closed). Template Events Predefined template events (for example, Added To Cart, Item Purchased, Item Viewed).
View the goal performance
Select View journey performance in the journey to view goal metrics.
Journey variables [#flow-variables-settings]
Journey variables store temporary values during a journey run.
- Pass values between elements.
- Personalize messages.
- Store values from events or external integrations for later steps.
Example: For an online booking scenario, you use appointment time as a journey variable. When you initiate the journey, this variable has temporary information. If the appointment time changes, this variable is updated. Use the variable when you send the end user confirmations and reminders of the journey.
Types of journey variables
| Type | Description |
|---|---|
| True/False | Properties with one of two values: True or False. |
| Text | Text format properties. Example: productName, productDescription. |
| Decimal Number | Decimal number format. Example: productPrice. |
| Whole Number | Whole number format. Example: productQuantity. |
| Date | Date values. Checked once at the beginning of each day. For time-specific triggers, use Date Time instead. |
| Date Time | Date and time values. Checked every few minutes. |
| List of objects | A structured list. Example: cartItems with item name, ID, quantity, and price. You can create only one List of objects property per event. Available only when mapping event properties in the People real-time event trigger and the Wait for an event element. |
| File | A file upload. Maximum size: 20 MB. |
Create a journey variable from the journey settings
- In a draft journey, select Journey settings > Variables tab > + Variable.
- In the Create new variable dialog, enter the Variable name.
- Select the Variable type from the dropdown. For more information, see the Types of journey variables documentation.
- (Optional) In Set default variable value, choose between a static value or a formula, and enter the value.
- Select Save Variable.
You can now use this variable in journey elements that support variables.
Create a journey variable when mapping an event property
In elements that support variables, you can create a new journey variable when you map an event property to the journey variable. See the Map journey variables to event properties documentation.
Map event properties to journey variables
You can save the value of an event property in a journey variable.
In an element that supports variables, do the following.
-
In the Variable sets section of the element, select Variable.
-
In the Event property field, select a field in the event. You can select Event name, Event time, Event date, Event ID, and all properties in the event.
-
In the Variable field, select a corresponding journey variable.
To create a new journey variable, follow these steps.
-
In the Variable field, select Create new variable.
-
Enter the Variable name.
-
Select the Variable type. For more information, see the Types of journey variables section of the documentation.
NOTE- You can select only the same data type as the event property.
- You can select List data type for a journey variable only in the People real-time event trigger and the Wait for an event element.
-
(Optional) Specify the default value of the variable. You can either use a static value or enter a formula.
-
Select Save variable.
-
Assign values to variables [#assign-values-for-variables-settings]
You can assign values to variables in many ways. The following table shows examples of how to save information in variables.
| Example | Journey element |
|---|---|
| Store sender, receiver, and message content from inbound messages as variables. | Evaluate Inbound Message |
| Call responses from third-party systems then use them in later steps. | Call API |
| Receive data from third-party systems as variables using Journey API. | Journey API |
| Collect IVR responses as variables. | Collect |
| Set variable values from a catalog item. | Catalog Lookup |
| Save information from Standard and Custom events as variables. | Wait for an Event, People real-time event trigger |
How to use variables in the journey [#use-variables-settings]
You can use journey variables in all elements that support placeholders.
| Scenario | Description | Journey element |
|---|---|---|
| Audience segmentation | Split your audience based on attributes and behavior. | Segment audience |
| Personalization | Personalize messages in Send, IVR, and Call API elements. | Send elements, Play (IVR), Call API |
| Save to Customer Profiles | Save a variable value in a Customer Profiles profile. | Update person profile |
| Store recipient information | Define dynamic recipient information (for example, store manager phone number). | Notify internal recipients |
For more information, see the Personalize using placeholders documentation.
Update a variable [#update-variable-settings]
To update a variable to reflect a change in the journey, use the Update variable element.
Example: The Order Status variable changes from ordered to dispatched.
Use formulae and expressions in variables [#expressions-in-variables-settings]
Use expressions to do the following:
-
Specify default values for variables. You can do this in the Journey settings.
-
Update variables in an element.
-
For advanced scenarios, use expression language with variables. Some benefits of using expression language are as follows.
- Make calculations. Example: Count how many times an end user received a voucher.
- Calculate time difference. Example: Check delayed orders and escalate the issue automatically.
NOTEBy default, the function now() returns DateTime in UTC. All other time functions use the time zone of your account.
-
Concatenate unique URLs from variables and attributes. You can use these URLs in reporting or sending a feedback request URL to an end user.
Transfer variables [#transfer-variables-settings]
When you want to send end users from one journey to another, you can transfer variables between these journeys. For more information, see the Transfer to journey documentation.
Shared message history [#shared-message-history-settings]
Enable Shared message history to share the message history from the current journey with agents in Inbox. This allows agents to see the context of messages sent during the journey.
To configure, go to Journey settings > More > Shared Message History and toggle the setting on or off.
Tags [#tags-settings]
Use journey tags to help manage, find, and reference your journeys. Tags assigned here are the same campaign tags used across the Journeys page.
To add tags, go to Journey settings > More > Tags. Search for existing tags or select Create New Tag to create a new one.