Send email
There are several ways that you can send email from the Infobip web interface:
- Broadcast
- Flow
- Omnichannel flow
- Conversations
Send email in Broadcast
Use Broadcast to build one-time communications and ensure delivery by adding a failover option.
Follow these steps to send an email over Broadcast:
-
Log in (opens in a new tab) to Infobip.
-
Navigate to Broadcast (opens in a new tab) and select Create broadcast.
-
Choose Email as the preferred channel.
-
Add or select your recipients. You can add recipients from People, upload a file containing your audience, or use an existing file. If you are uploading a file, be sure to follow the file requirements.
-
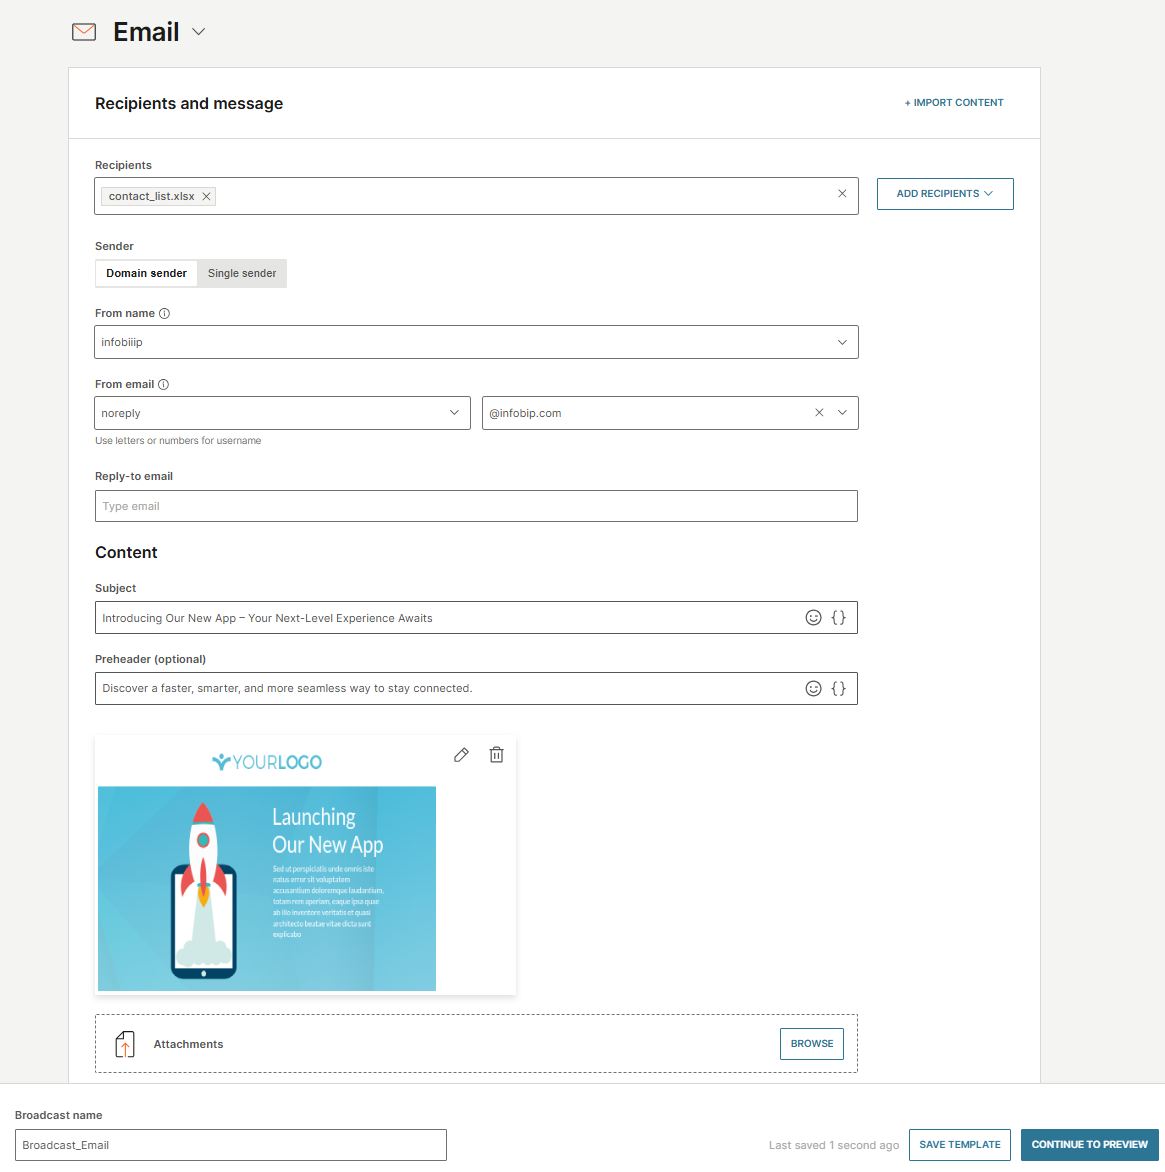
Enter sender information:
NOTETo use Email in Infobip, you need to onboard your official company domain by registering a new domain or setting up a single sender for testing purposes.
- For testing: Choose Single sender to test your message. This option is limited to 100 emails for a single sender.
- For broadcasting: Choose Domain sender when you are ready to send your email broadcast.
- Enter or select additional sender info, such as From name and From email, which will appear in the recipient’s inbox.
- To set a separate reply-to address, use the Reply-to email field.
-
Compose your email content:
- Add a Subject for your email message. You can also add a Preheader, a small line of text that follows the subject line, if required.
- Select how to create your email message:
- Create custom email: Design your email message using the Email editor.
- Choose a template: Use predefined templates or your existing email templates in the template library.
- Upload HTML file: Build your email message in any HTML editor and upload it to the Infobip web interface.
- (Optional) Add attachments to your message.
- Select an Opt-out page, which users will see when unsubscribing.
- To send only text, select the Send a plain text email option.
NOTETo streamline your workflow, you can also import content by selecting Import content. This allows you to upload files or use Broadcast templates to avoid repetitive work.
-
Adjust any additional settings, such as Message scheduling, Tracking and reporting, and Advanced settings to optimize your broadcast.
-
Select Continue to preview to see how your message will appear to recipients. Review the broadcast summary, including recipient information, approximate cost, delivery time window, sender details, and any warnings.
-
If you need to change something, select Back to settings. Otherwise, select Launch to send your broadcast.
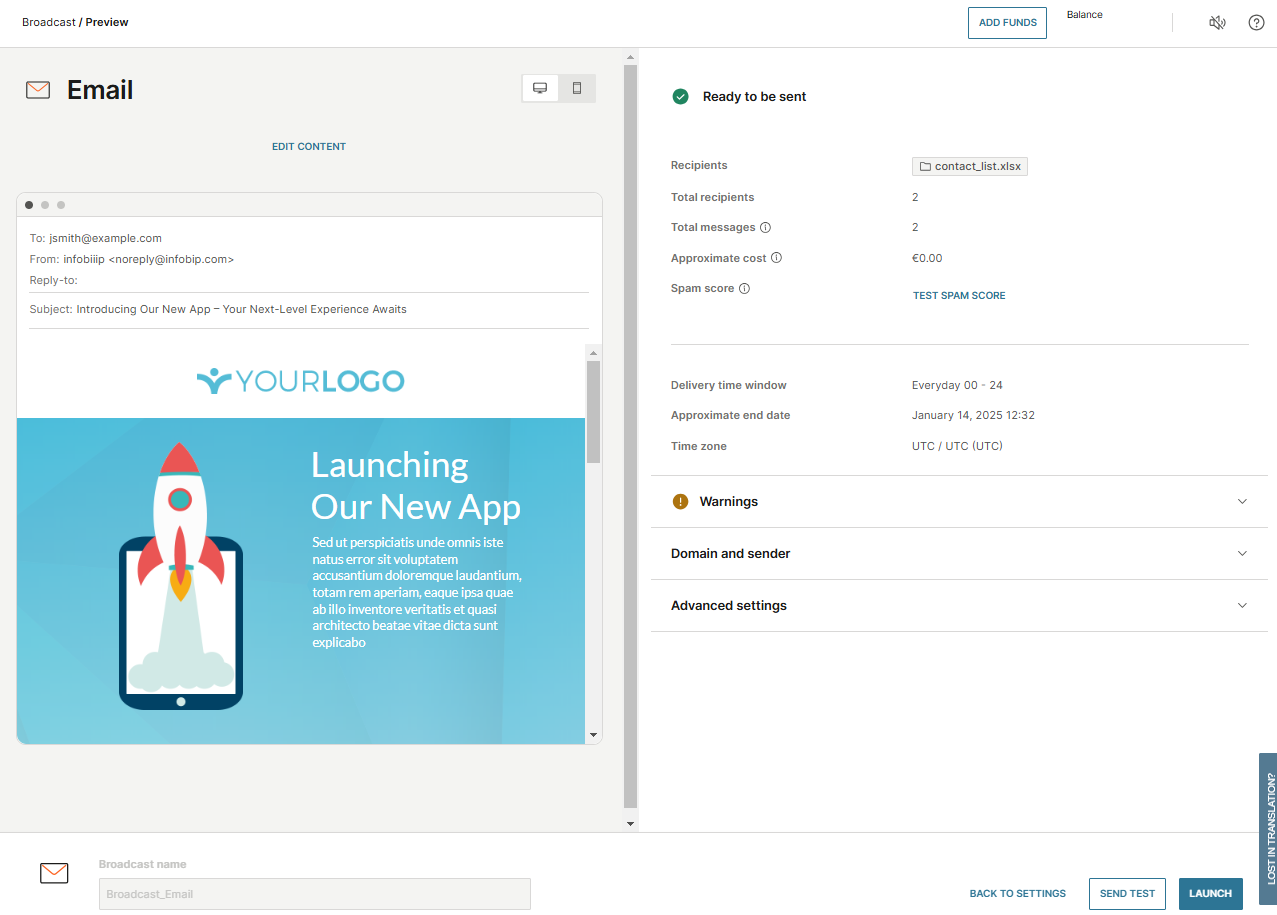
Infobip email spam filter
Before sending, Infobip's email spam filter checks your content against predefined rules and algorithms to determine if it might be flagged as spam.
- To evaluate your message, select Test spam score.
- If the spam value is high, the spam score provides actionable insights to reduce the likelihood of being marked as spam.
- If no issues are detected, it is safe to launch the campaign.
Send email in Flow
To interact with your customers or automate your user's journey, you can use Flow. Use Flow to send an email message to your customers or use email in your omnichannel strategy.
To send an email in Flow:
- Log in to the web interface, and go to Moments > Flows.
- Click Create Flow.
- Select Start from Scratch, and then select Predefined audience.
- Choose the campaign type, from:
- One-time - appropriate for single, one-off campaigns
- Continuous - appropriate for ongoing, targeted campaigns
- On the right-side panel, add the tags that define your audience.
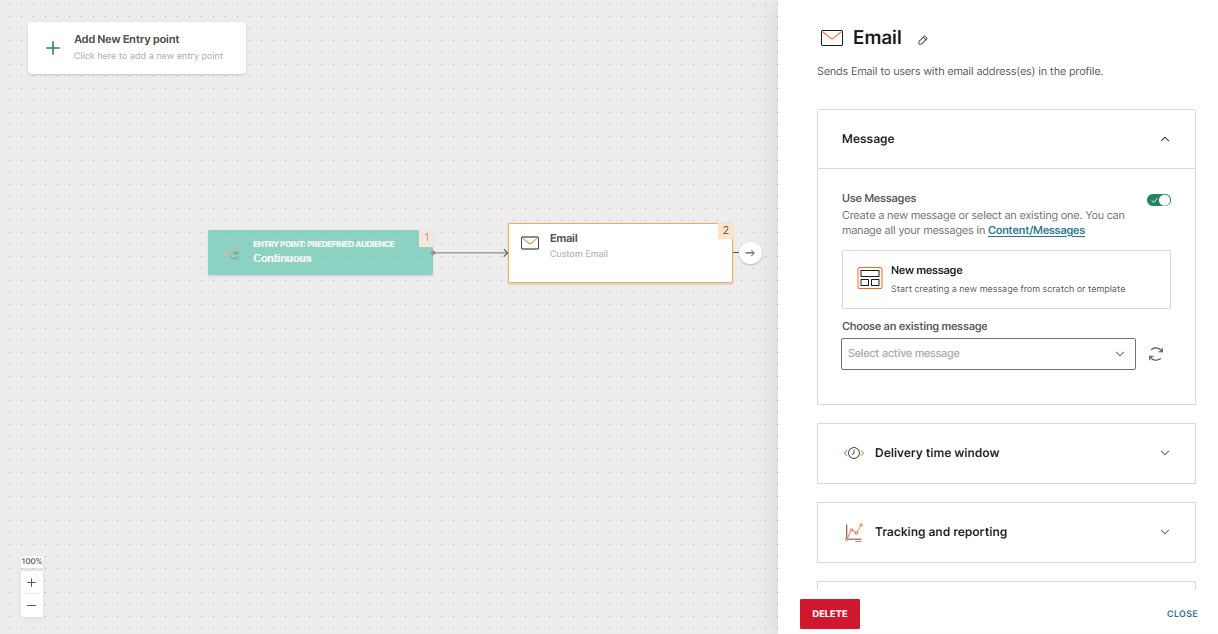
- Add the Send Email element. Fill out the necessary fields.
- Create a new message or select an existing one. For more information about managing your messages, see Messages.
- Select the Delivery time window options for message scheduling:
- Time zone
- Start time and Send time
- Days
- Set the Data payload and store additional data which can then be connected to stored or imported contacts. Use this data to send useful information to your customers, but it also provides you with additional information regarding your customers.
- Click Advanced settings for additional options. Define the validity period (Optional. Choose a specific period for messages during which the system tries to deliver them).
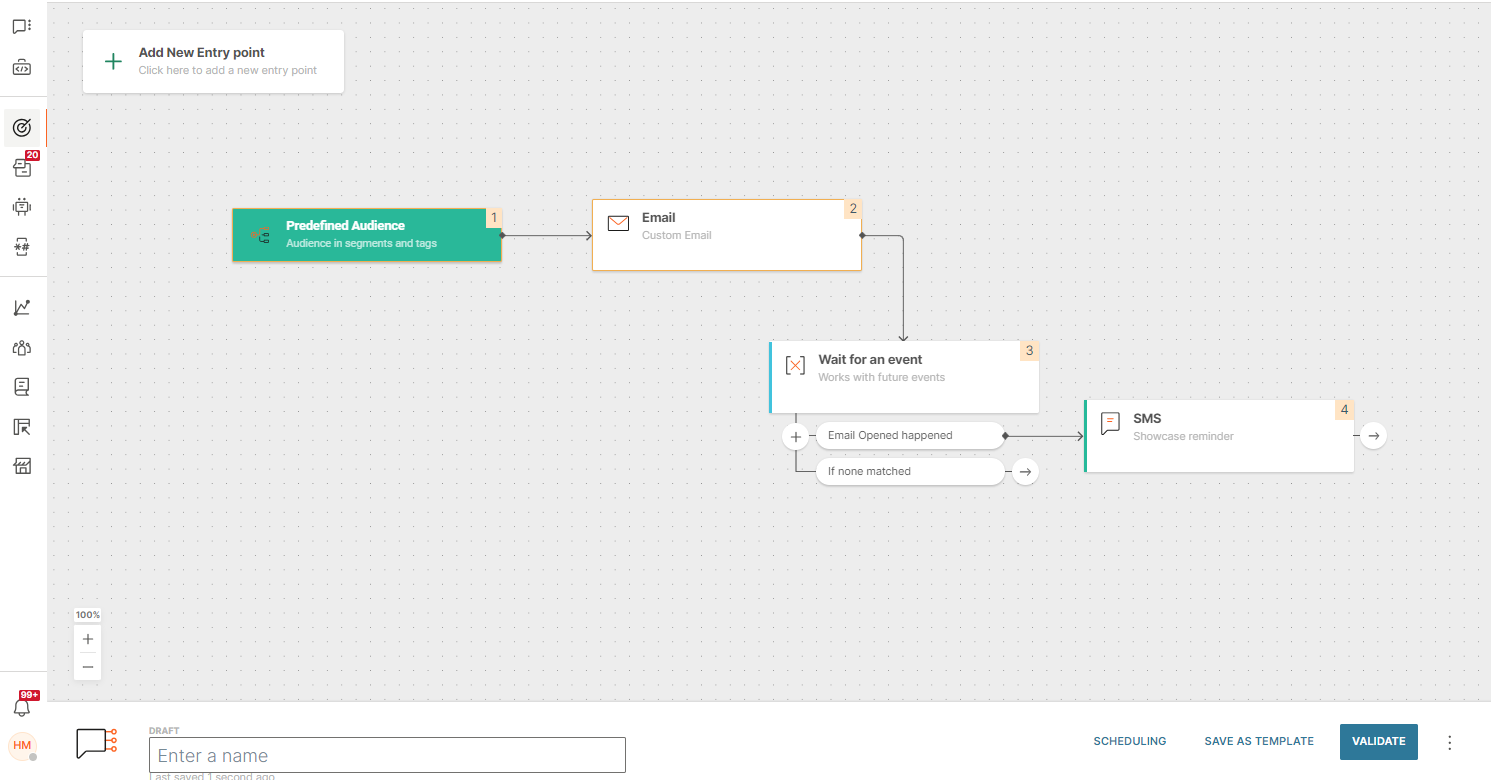
Wait for an Event
Add the Wait for an Event element and define the conditions.
Let say you are sending a newsletter and you want to send another message to the people who opened the email. Branch the flow for users who have clicked on the email and the ones that did not.
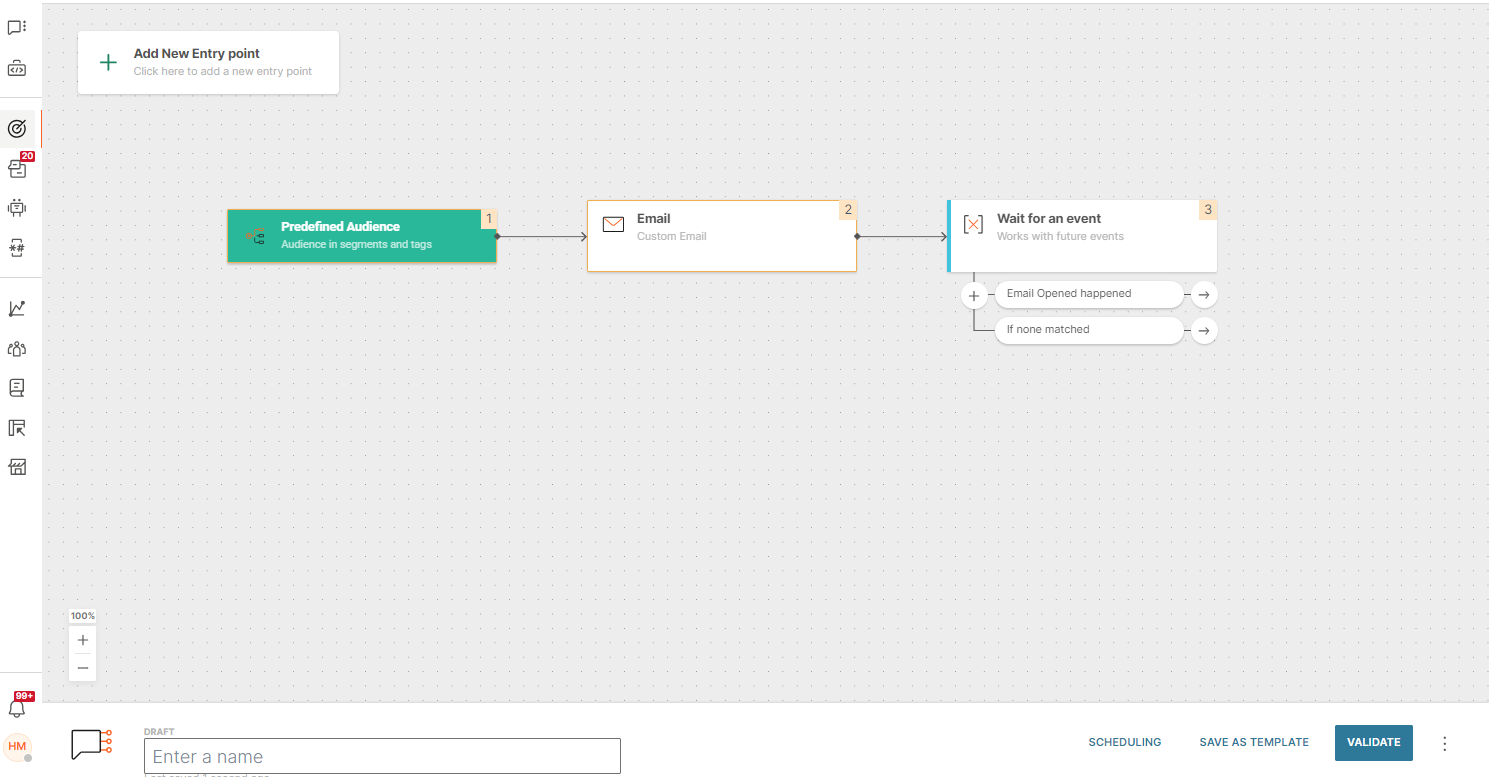
Omnichannel flow
Use email in omnichannel communication. Send an SMS (or any other channel) to those who engage with your email.
In the Wait for an Event element, define the condition that if the customer engages with your email, they receive an SMS. Add the Send SMS element.
Once you have finishing building and editing your flow, click Validate to confirm that the message is ready, and then schedule or launch the email communication.
To better understand and optimize your email performance, use the Analyze module to gather details about customer engagements, service quality, track email delivery, bounce rates, spam reports, link clicks, opens, and unsubscribes.
Send email in Conversations
Use Conversations to build two-way email communications with your customers. Your customer and agents can initiate an email conversation.
For more information about sending email in Conversations, see Email.