HubSpot messaging
 SMS
SMS
The Infobip Messaging app connects your HubSpot customer engagement with Infobip SMS, WhatsApp, Viber, and RCS channels, enabling you to send messages directly from HubSpot.
With this integration, you can:
- Manage two-way conversations in the HubSpot Inbox
- Track message delivery and read status in the contact’s activity log
In HubSpot Automation, you can:
- Send SMS messages using a Workflow action that includes sender selection, a text field for message content, and options for URL shortening and regional settings (for example, India, Türkiye)
- Send WhatsApp messages using a Workflow action that includes sender and template selection, fields for message content (placeholders, media URLs), and URL shortening
- Send Viber messages using a Workflow action that includes sender and template selection, fields for message content (placeholders, media URLs), and URL shortening
- Send RCS messages using a Workflow action that includes sender and template selection, fields for message content (placeholders, media URLs), and URL shortening
- Trigger automations based on SMS delivery reports
- Trigger automations based on WhatsApp delivery and read reports
- Trigger automations when a user sends a WhatsApp message
- Trigger automations from inbound messages
What you will need
- An Infobip account. If you do not have one you can create one. See Create an Account for more information on Infobip accounts.
- A HubSpot account with Admin permissions
- An SMS sender. For more information, see Senders and numbers.
- A WhatsApp sender. To get a dedicated sender, use the instructions for request sender registration.
Install the app
To install the Infobip Messaging app:
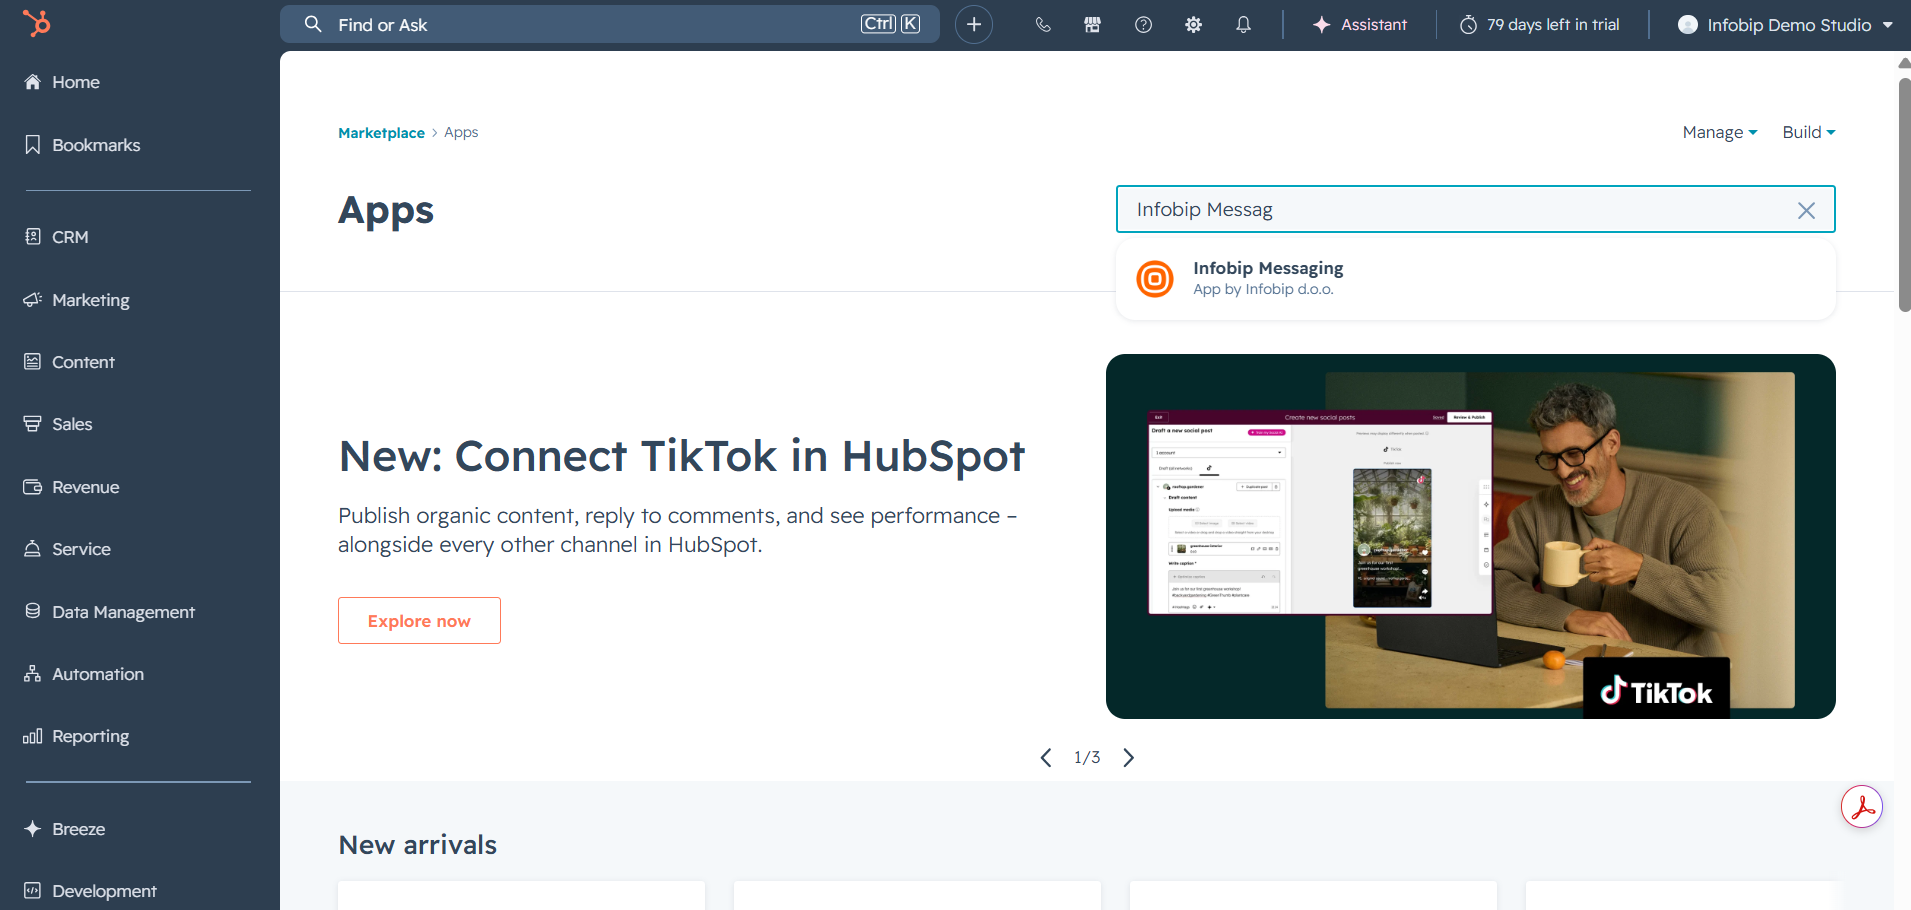
- Go to the HubSpot App Marketplace and sign in with your Admin account credentials.
- Open the HubSpot Marketplace.
- Search for the Infobip Messaging app.
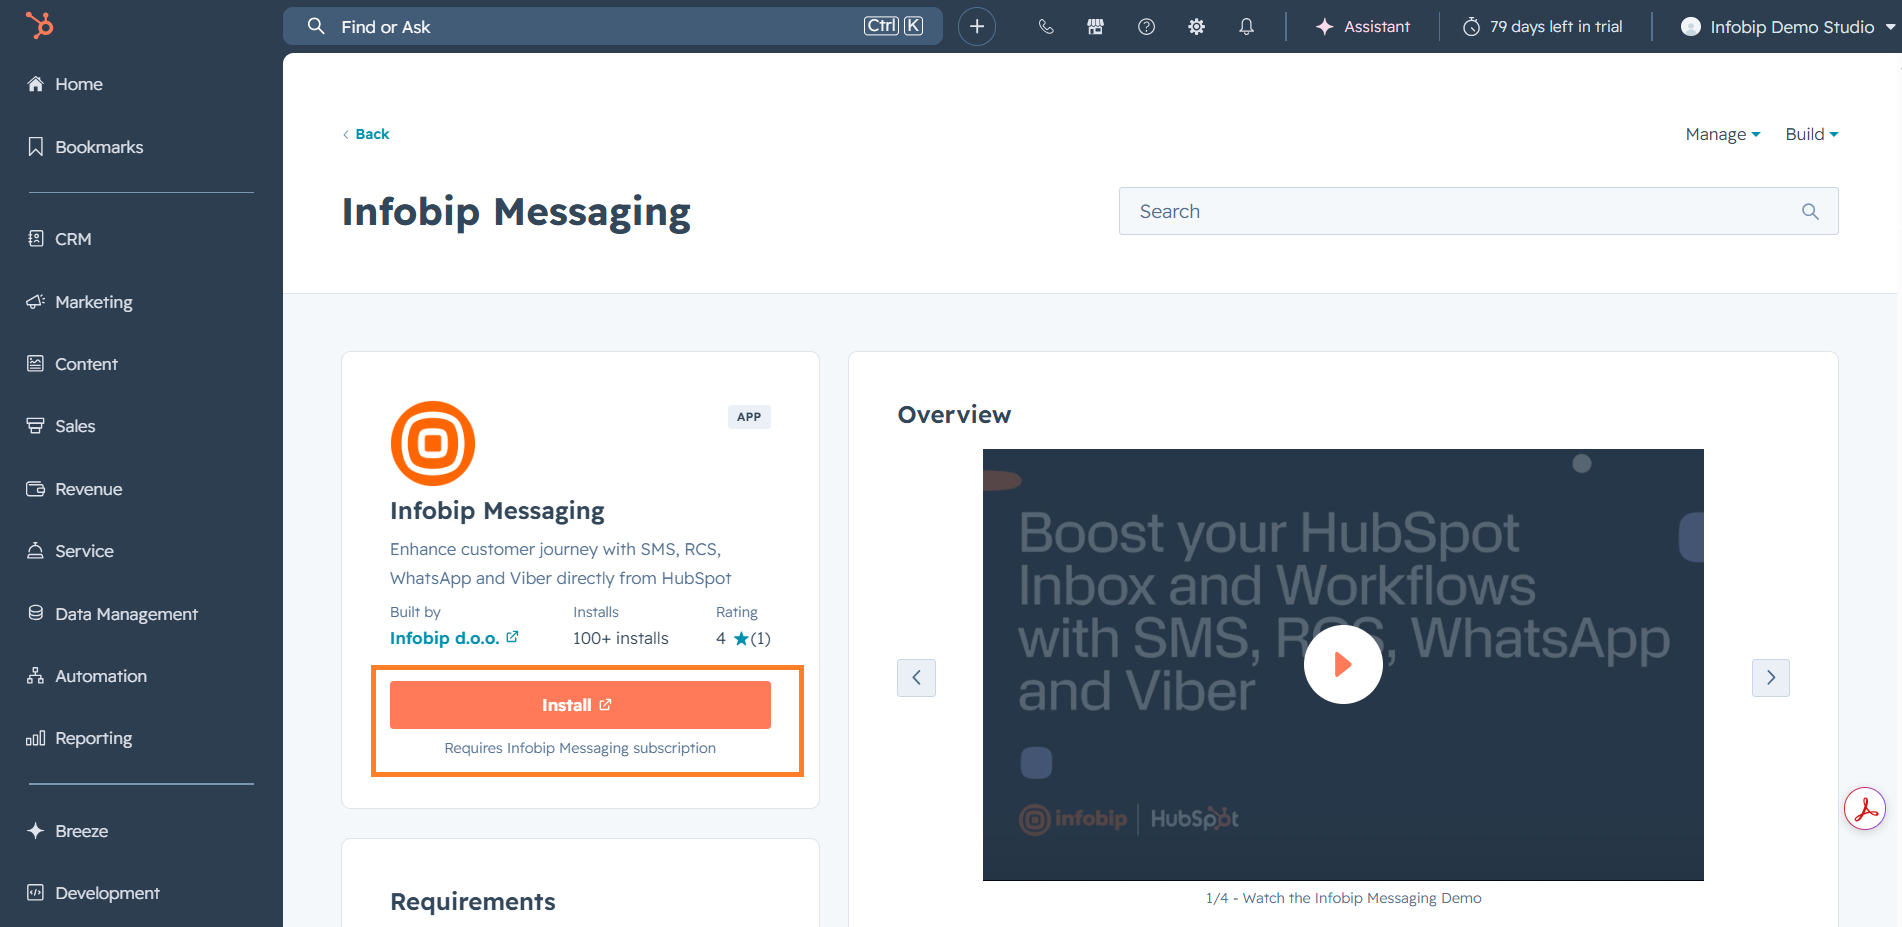
- Select Install. To use the Infobip Messaging app, you need an Infobip account. If you do not have one, you can sign up for free.
- On the Authorize screen, select Authorize Infobip app to grant access to the HubSpot account.

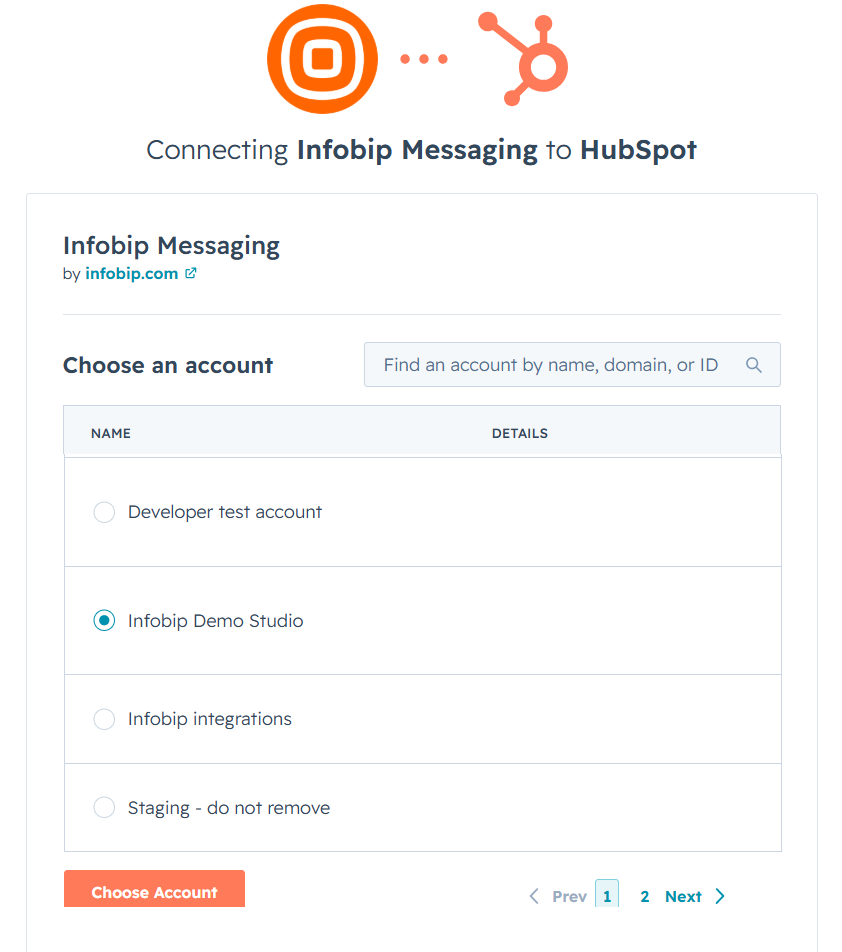
- On HubSpot OAuth, choose the HubSpot account to which you want to give access.
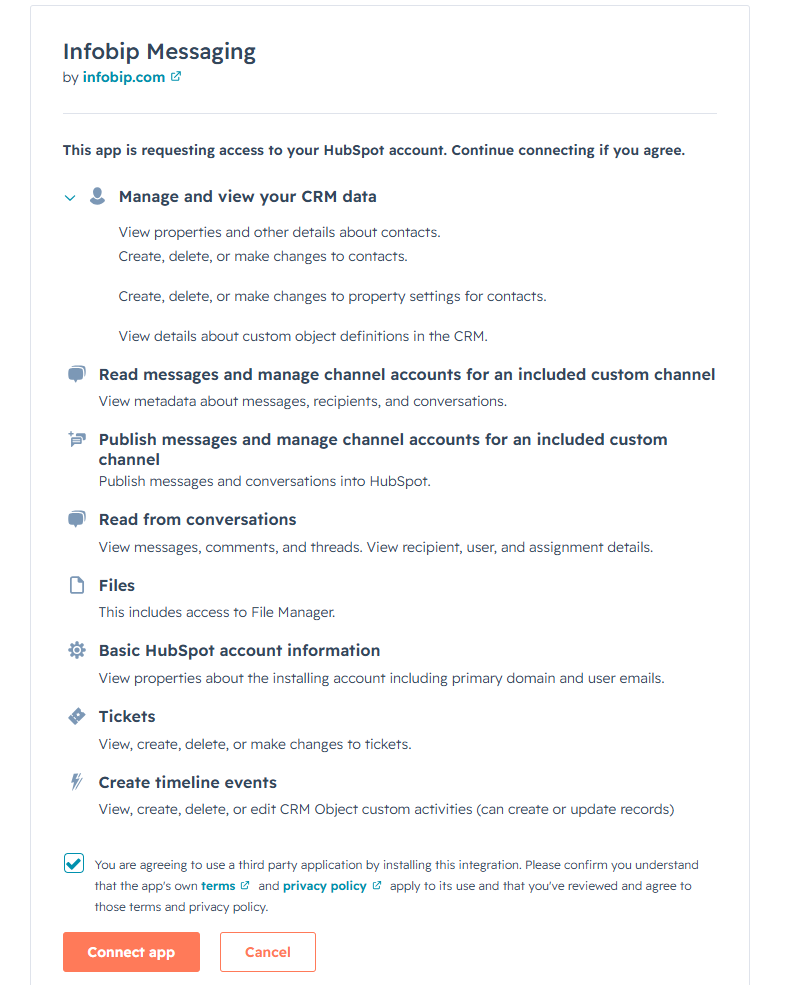
- Grant permissions to the Infobip app.
- After connecting accounts, a Thank-you message appears, and then select Go to settings.
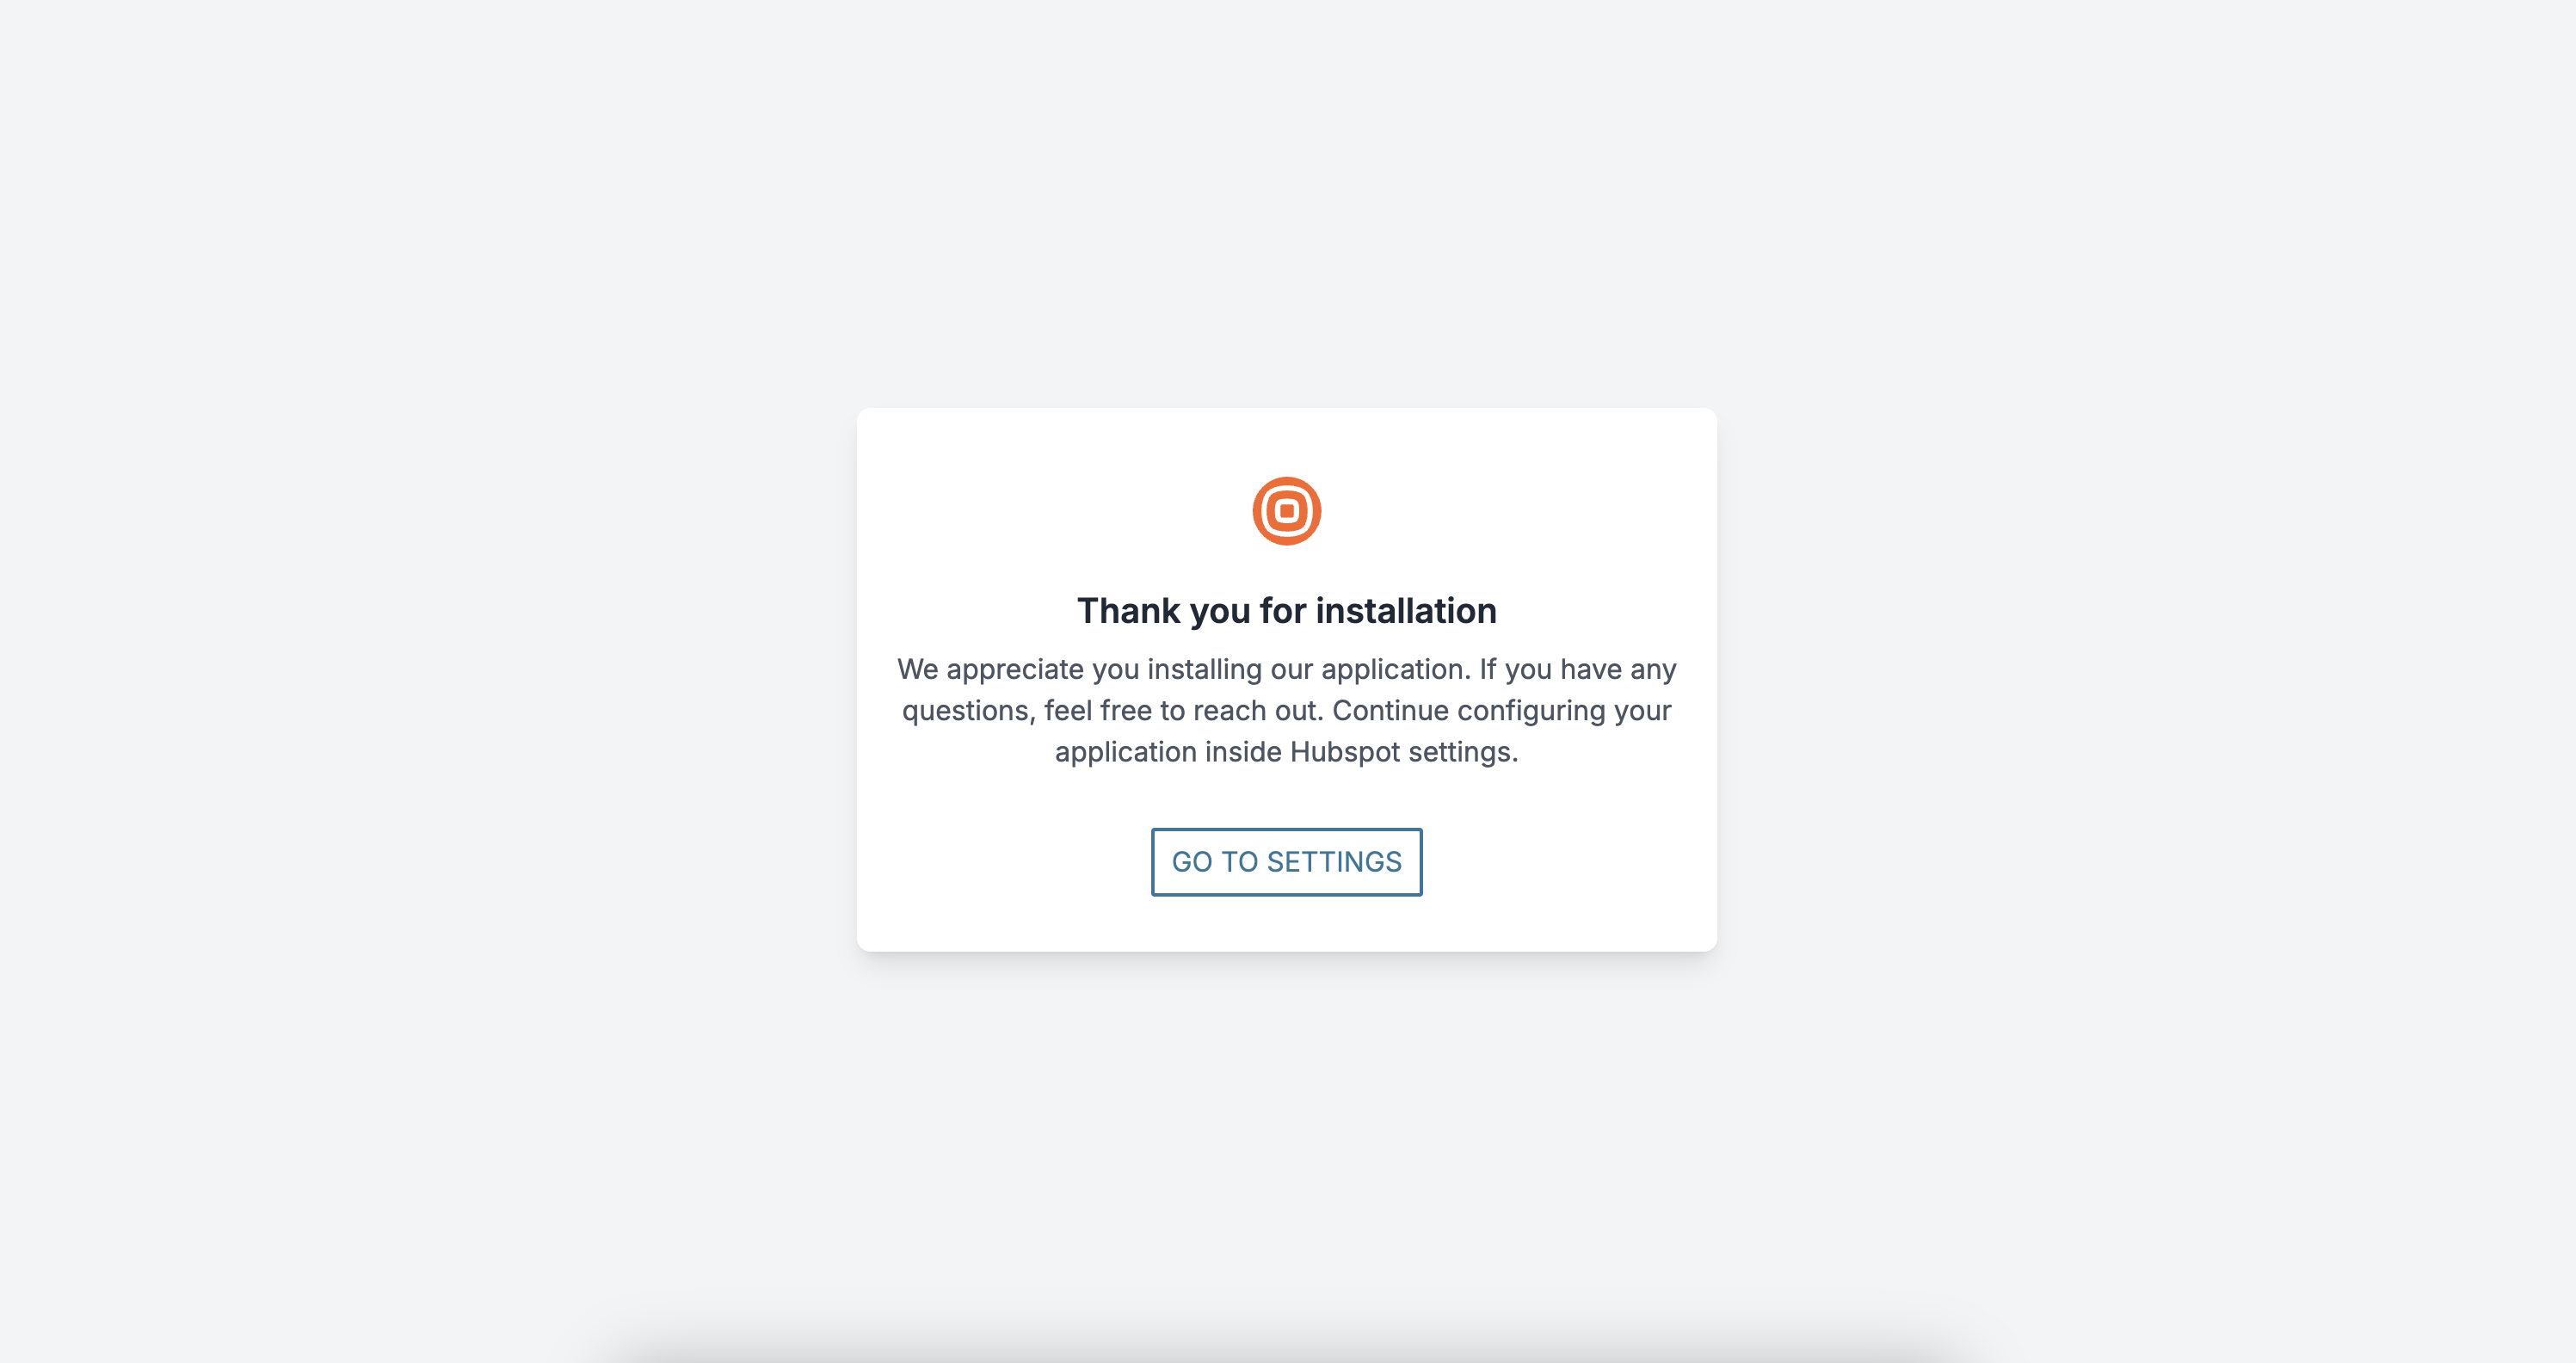
- On the HubSpot Settings page, continue with configuration.
Configure the app
Once you have installed the app, and you have your Infobip account, you can configure the general settings.
Configure the general settings
Use the general settings to configure the accounts, channels, and numbers.
-
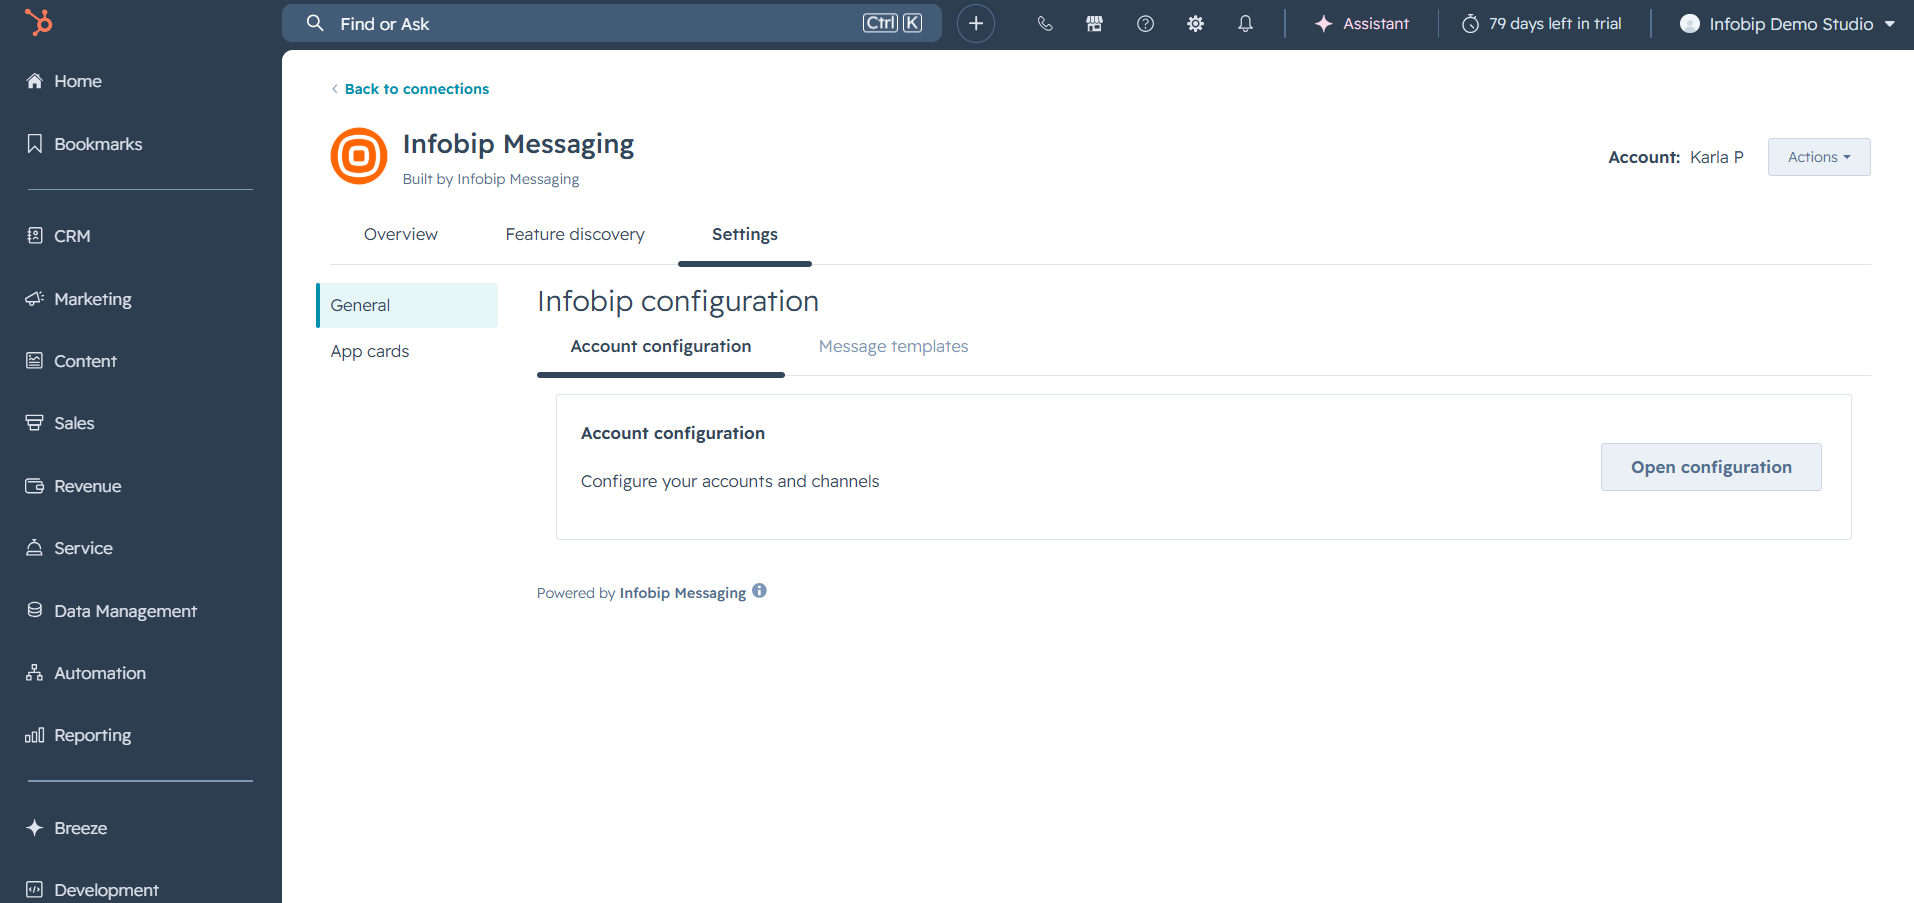
On the Settings page, go to Integrations > Connected Apps.
 The tabs display: General settings and Feature discovery.
 -
On General Settings, select Open configuration to start the process.
-
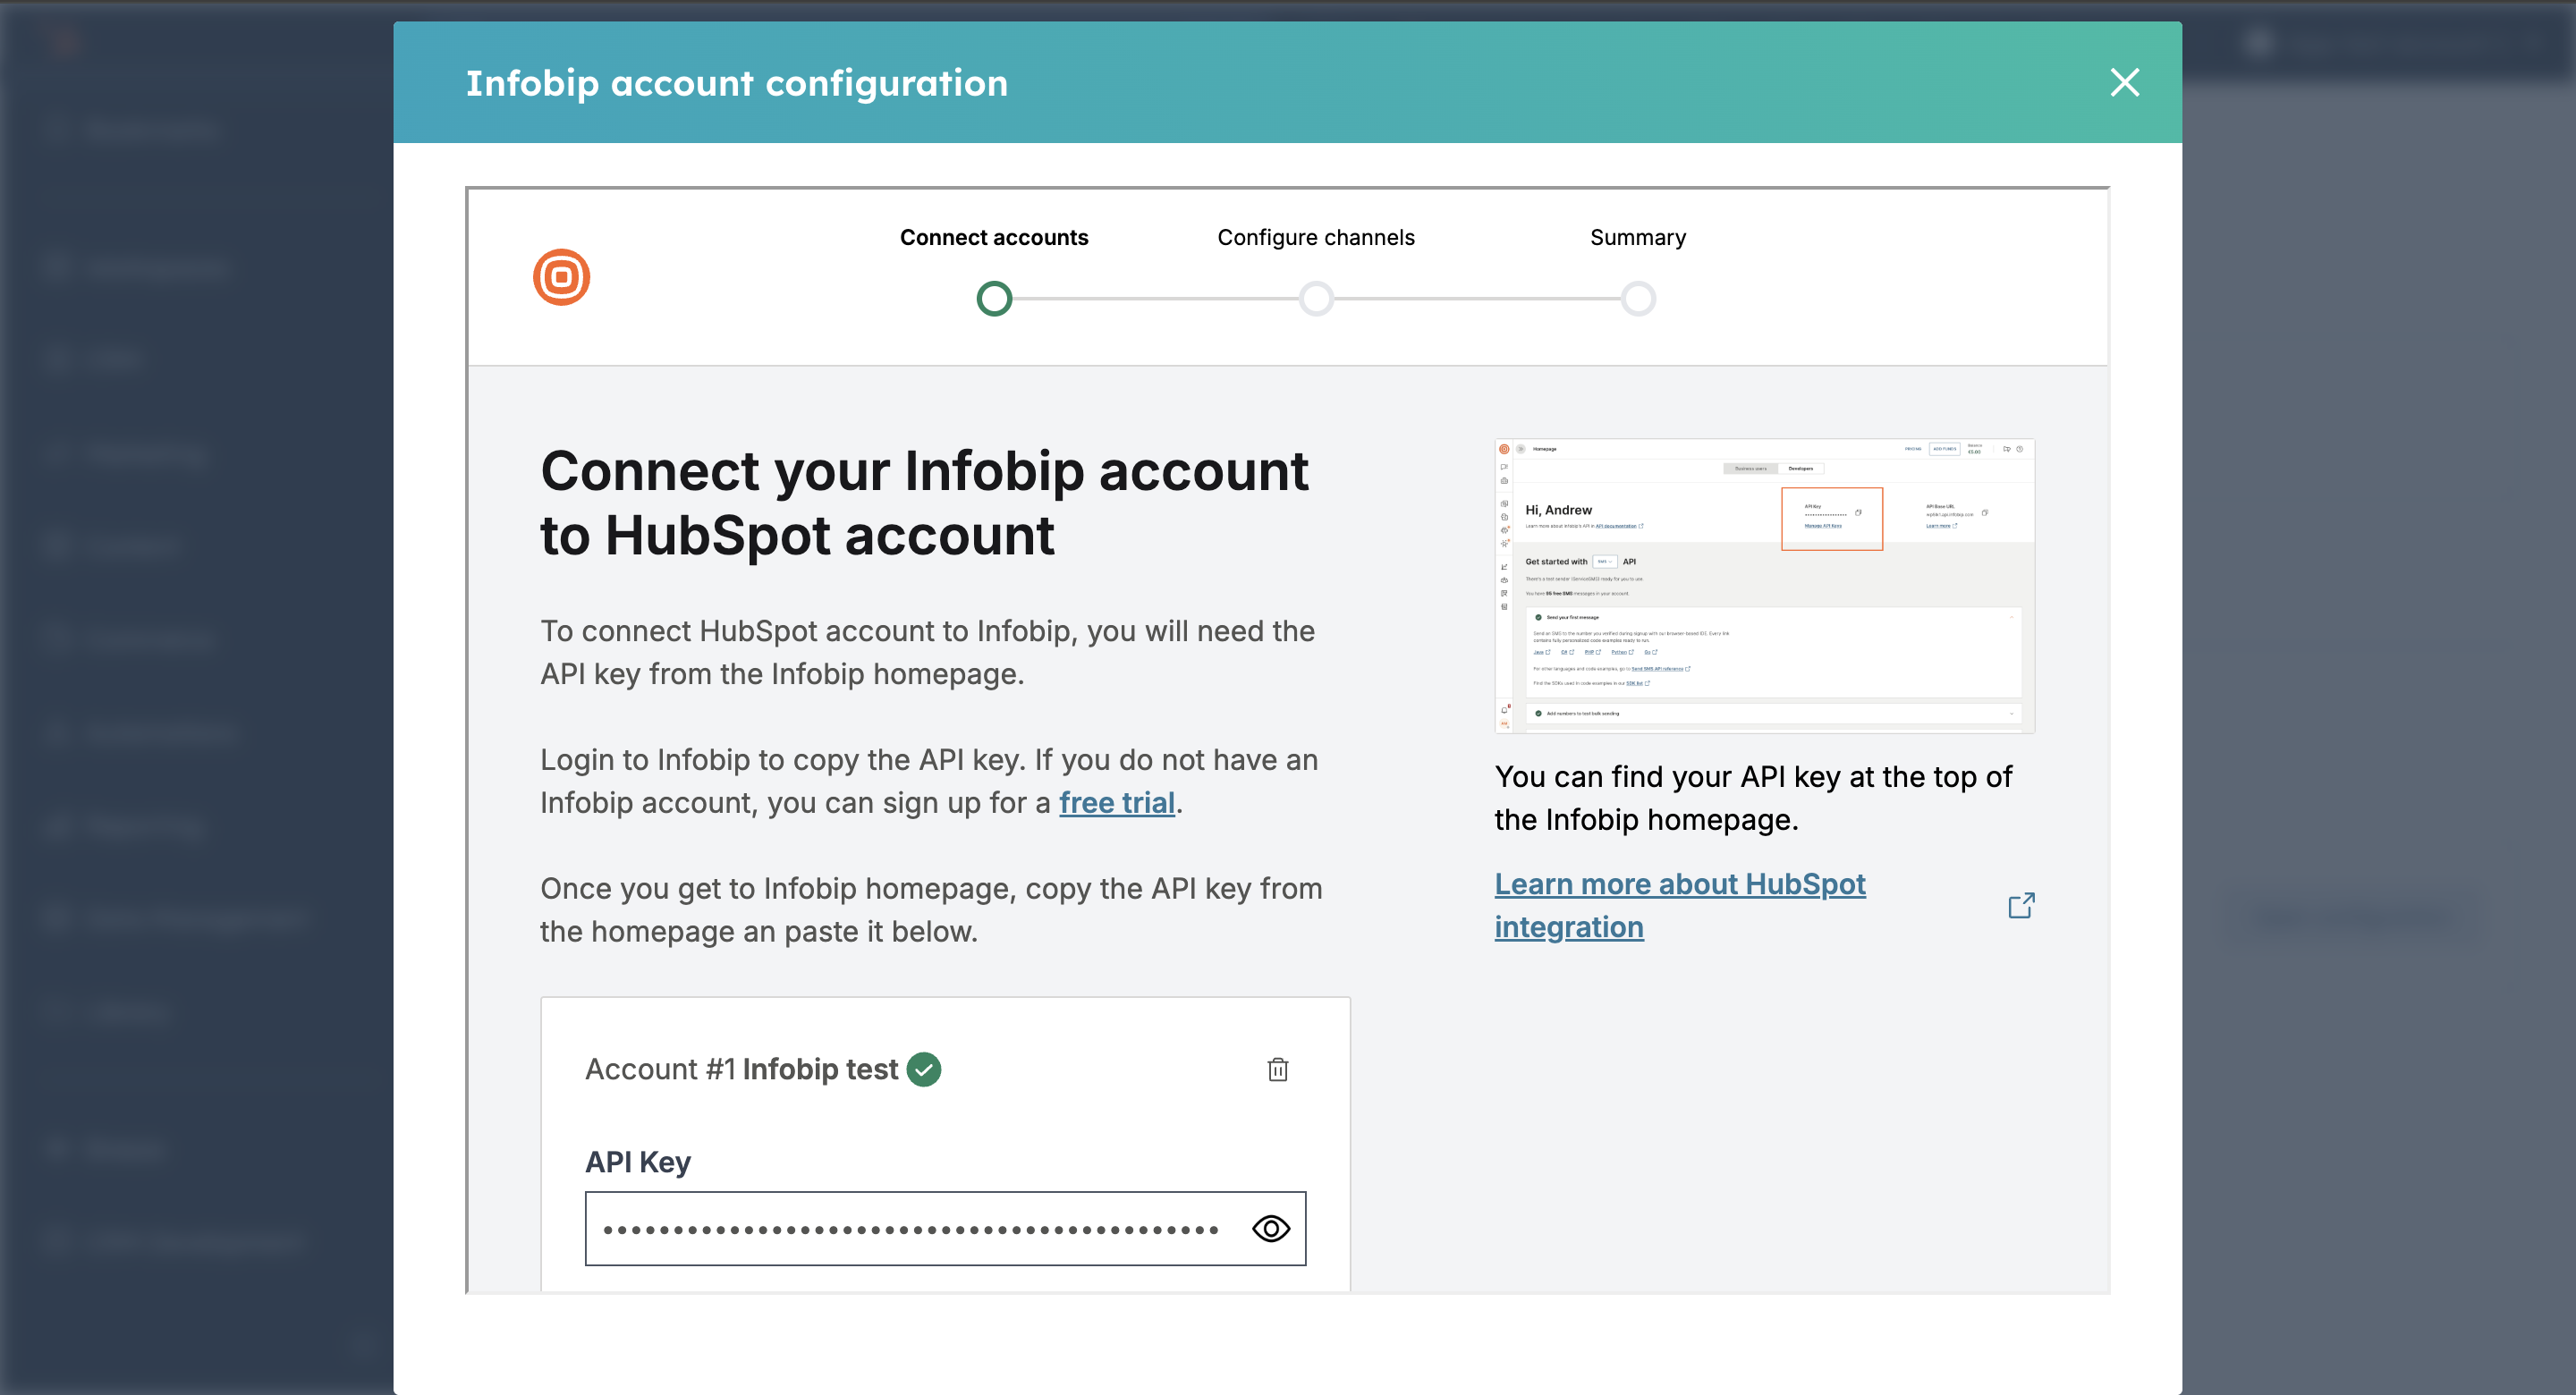
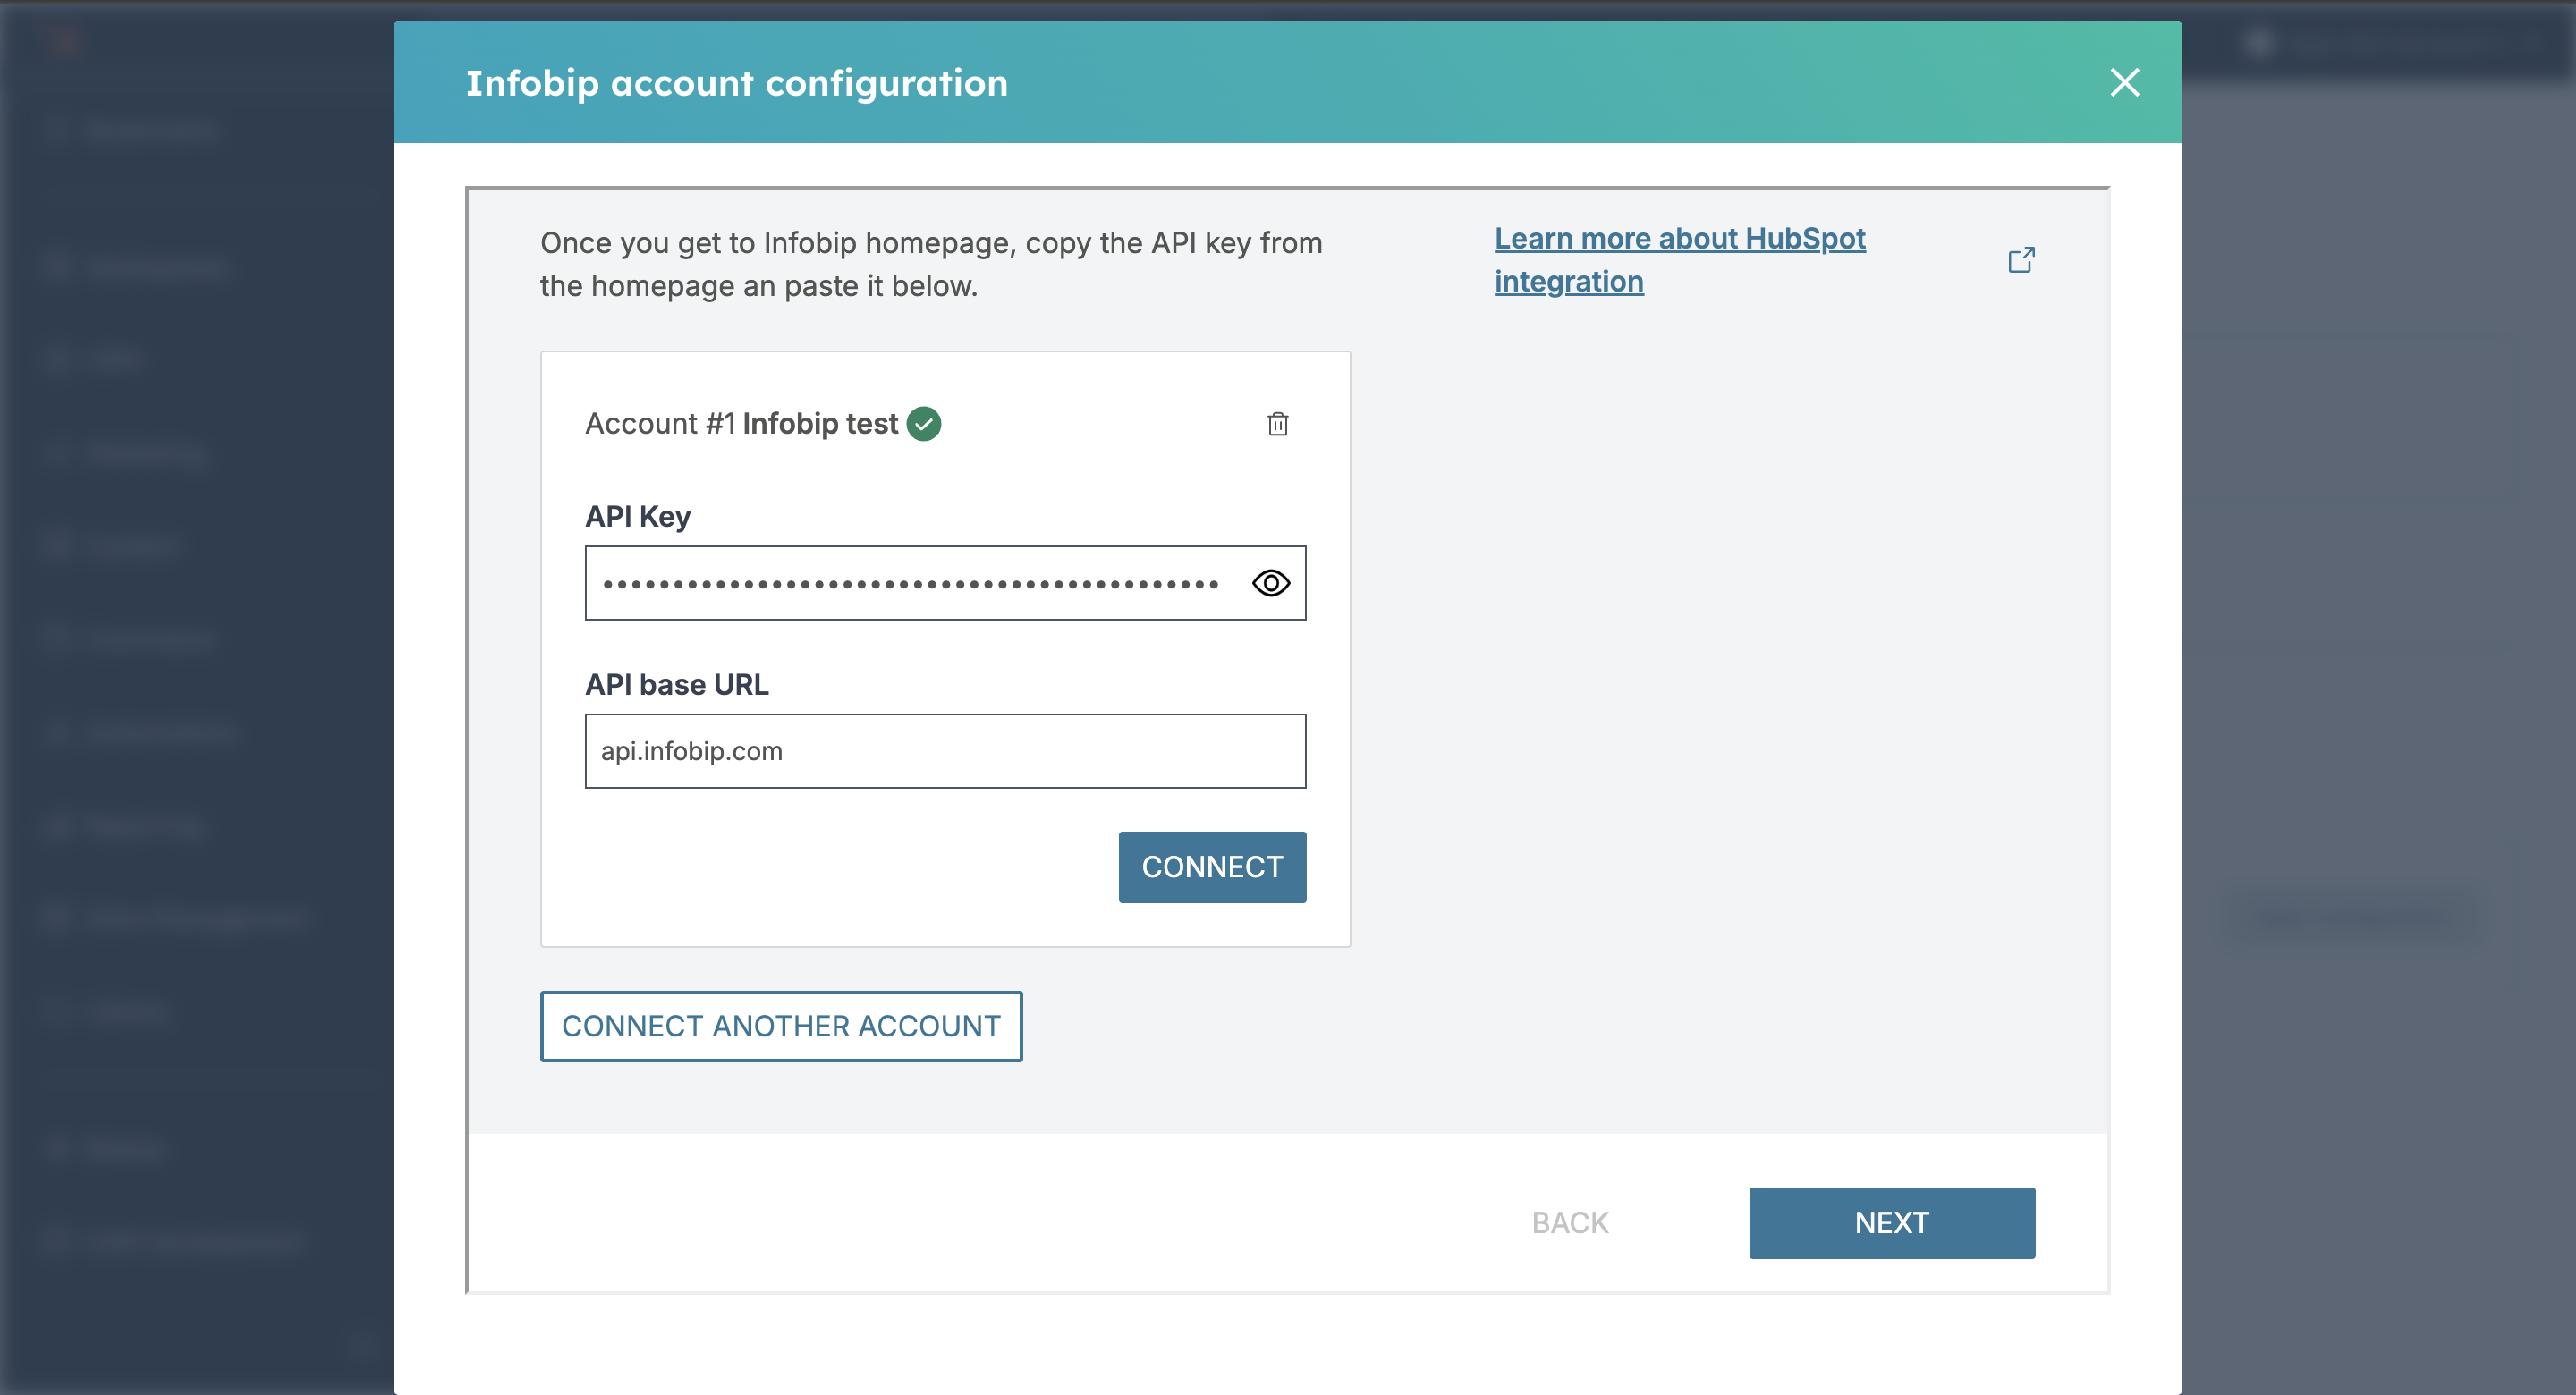
On the Connect accounts step, add multiple accounts with your API key and API base URL. To remove an account, select the bin icon.
-
Ensure that your API key has the following API scopes enabled:
json1 inbound-message:read2 message:send3 account-management:manage4 numbers:manage5 whatsapp:manage6 subscriptions:manage7 application-entity:manage -
Select Next to continue to the next step.
-
On the Connect channels step, see the available numbers on each channel.
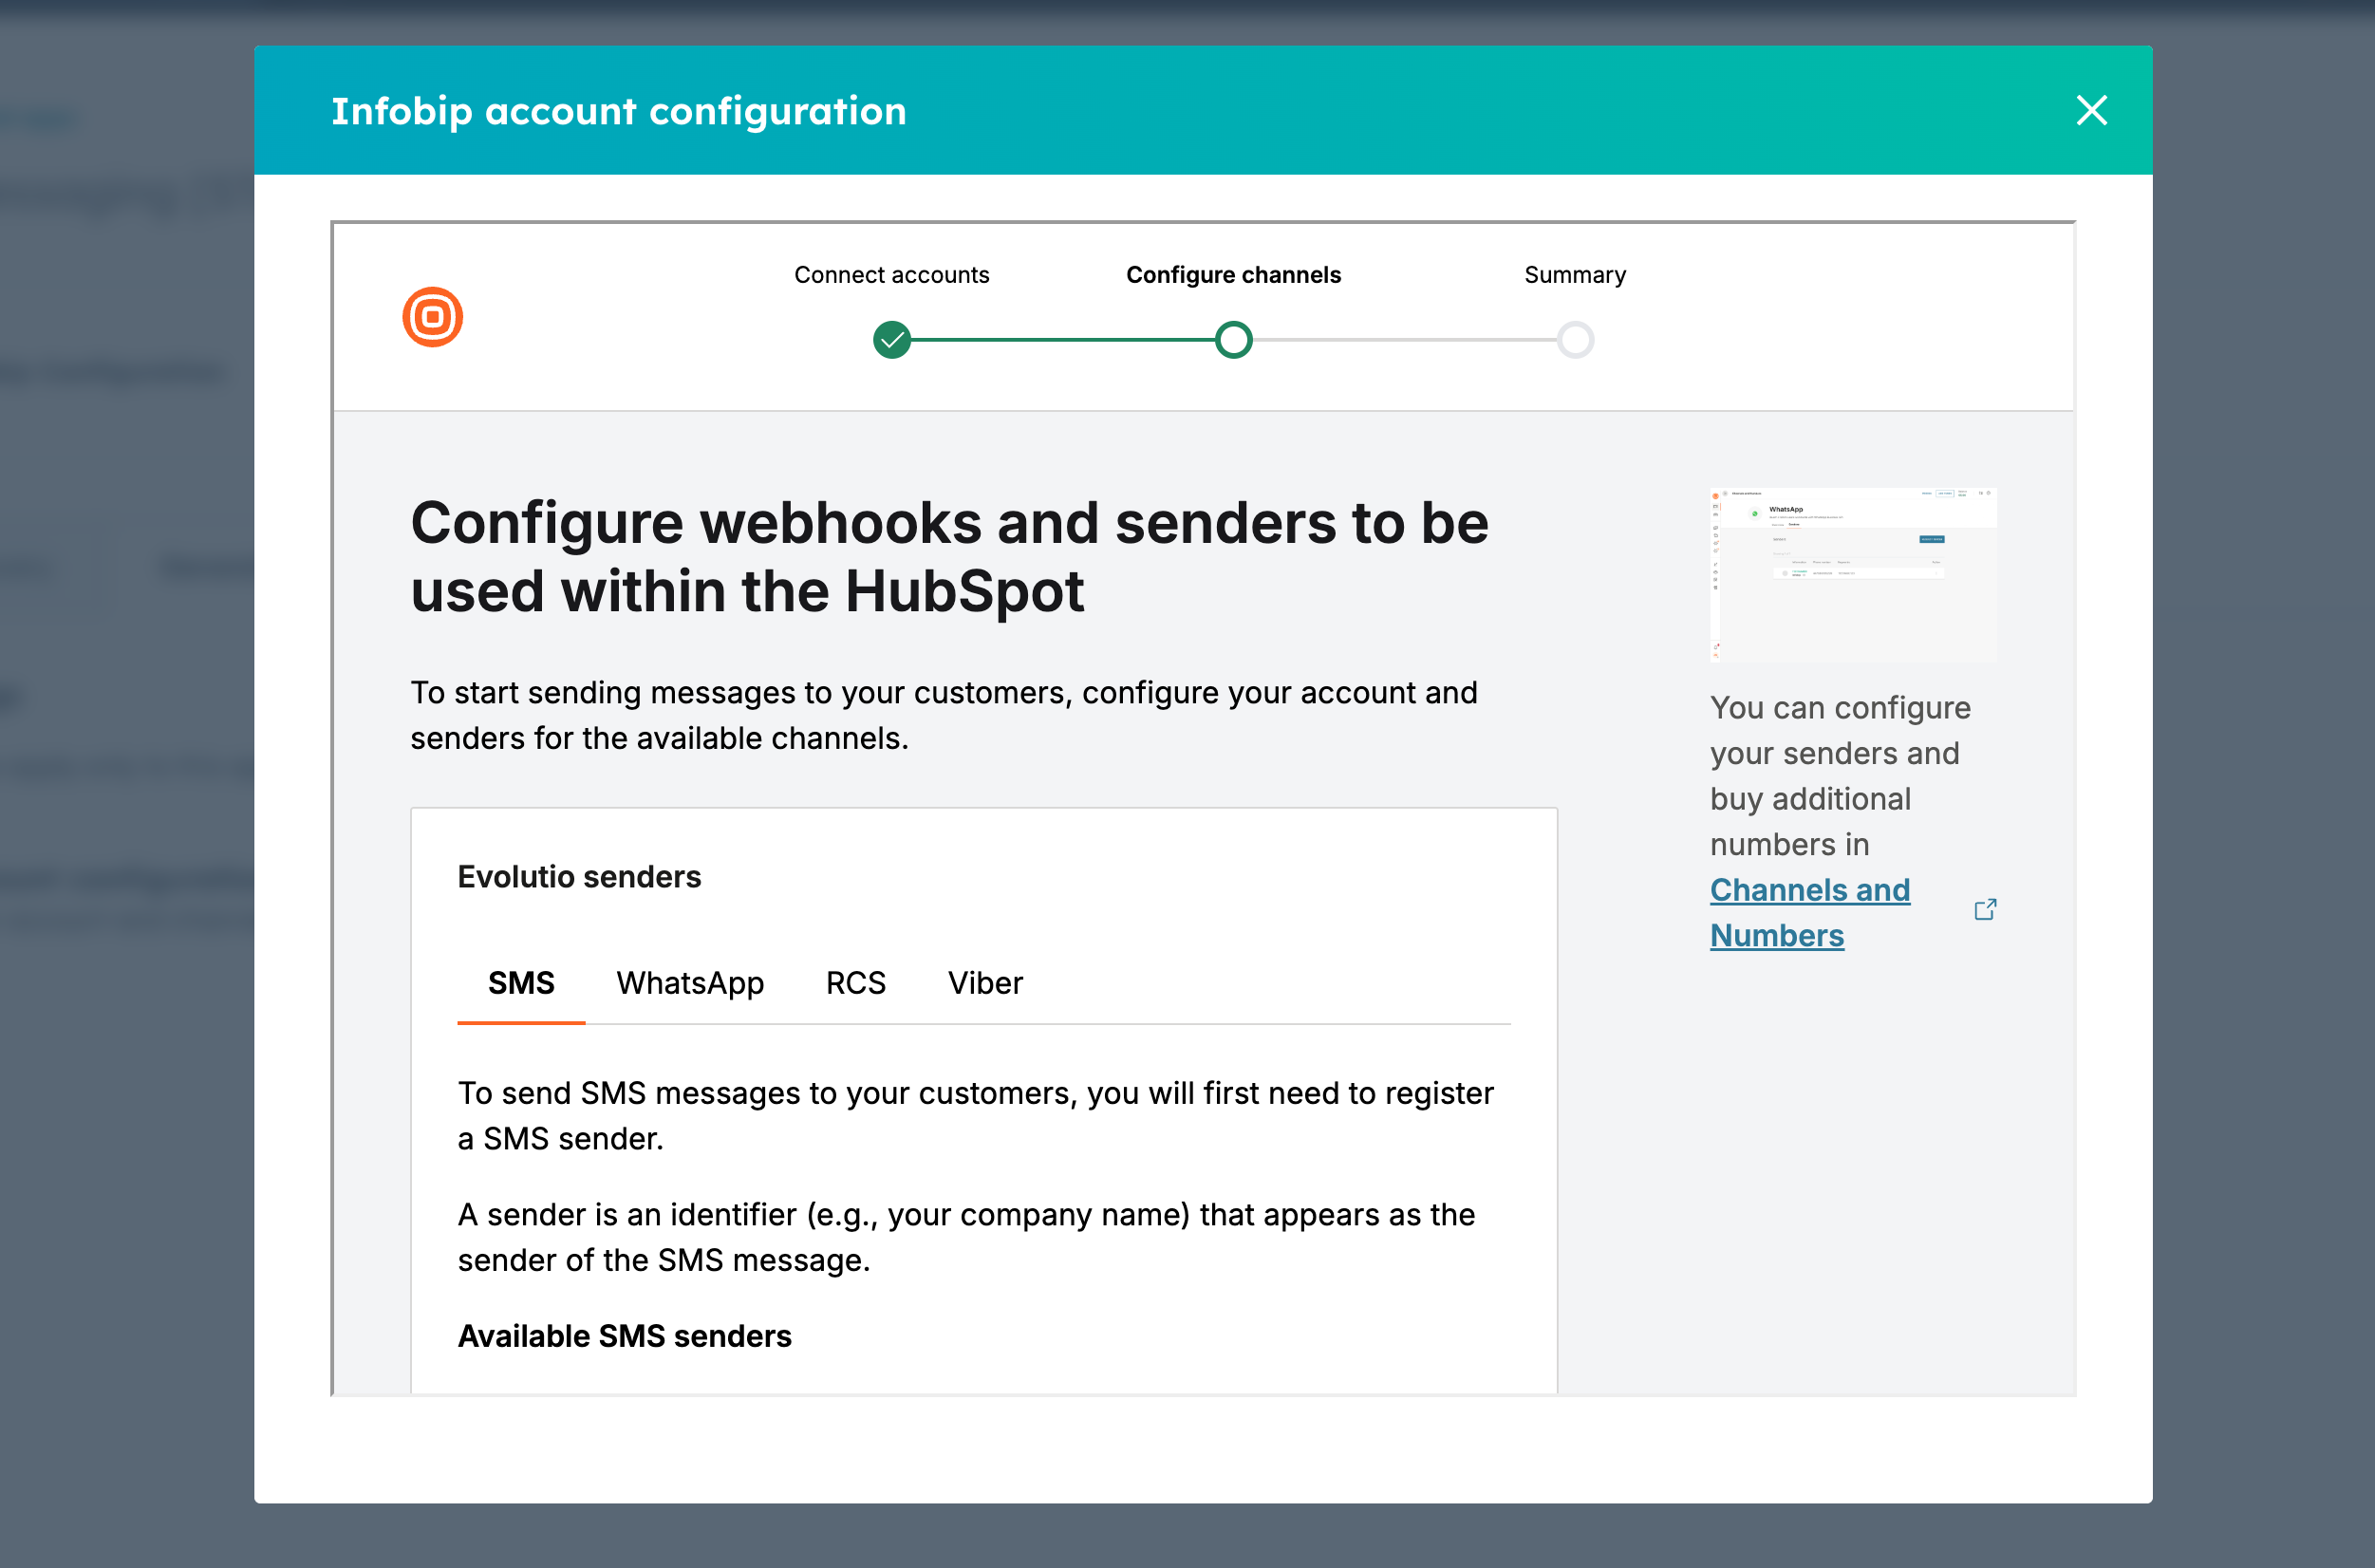
-
Select a sender number to open the Status section. The status can be:
- Sender not connected to an inbox
- Sender not eligible for two-way communication
- Sender is connected and eligible - it then shows the Inbound message URL

-
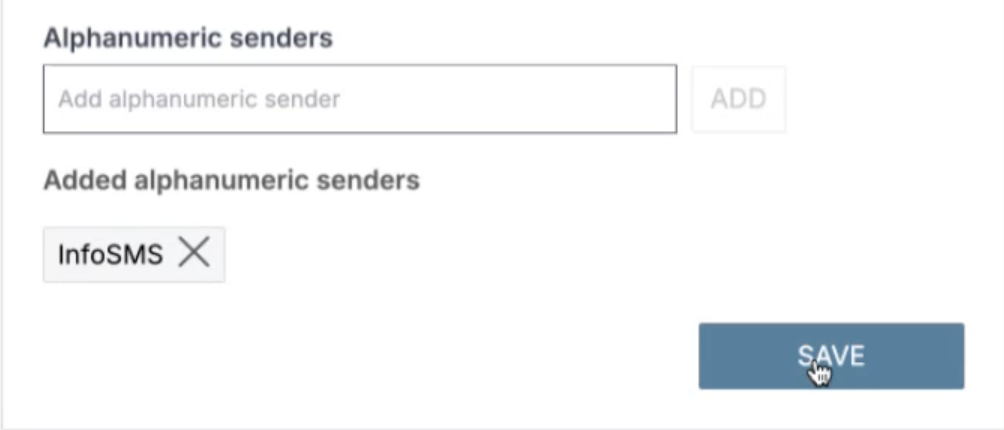
Add Alphanumeric senders, where available. Alphanumeric senders are available in all channels but only on some numbers.
-
When you have finished, select Save, and then select Next.
-
On Summary, review the summary of your configurations.
-
Select Finish to end the configuration.
Configure inbound messaging
To trigger a workflow from an incoming message, you must set up the inbound configuration for your sender.
Configure the inbound connection from the Account configuration page in the Numbers section.
- From Account configuration, select Open configuration.
 You see the Connect your Infobip account to HubSpot account page, which starts the configuration of your accounts and channels.
 - Select Next to go to the Configure channels step.
- Locate a sender in the Available senders section for the channel.
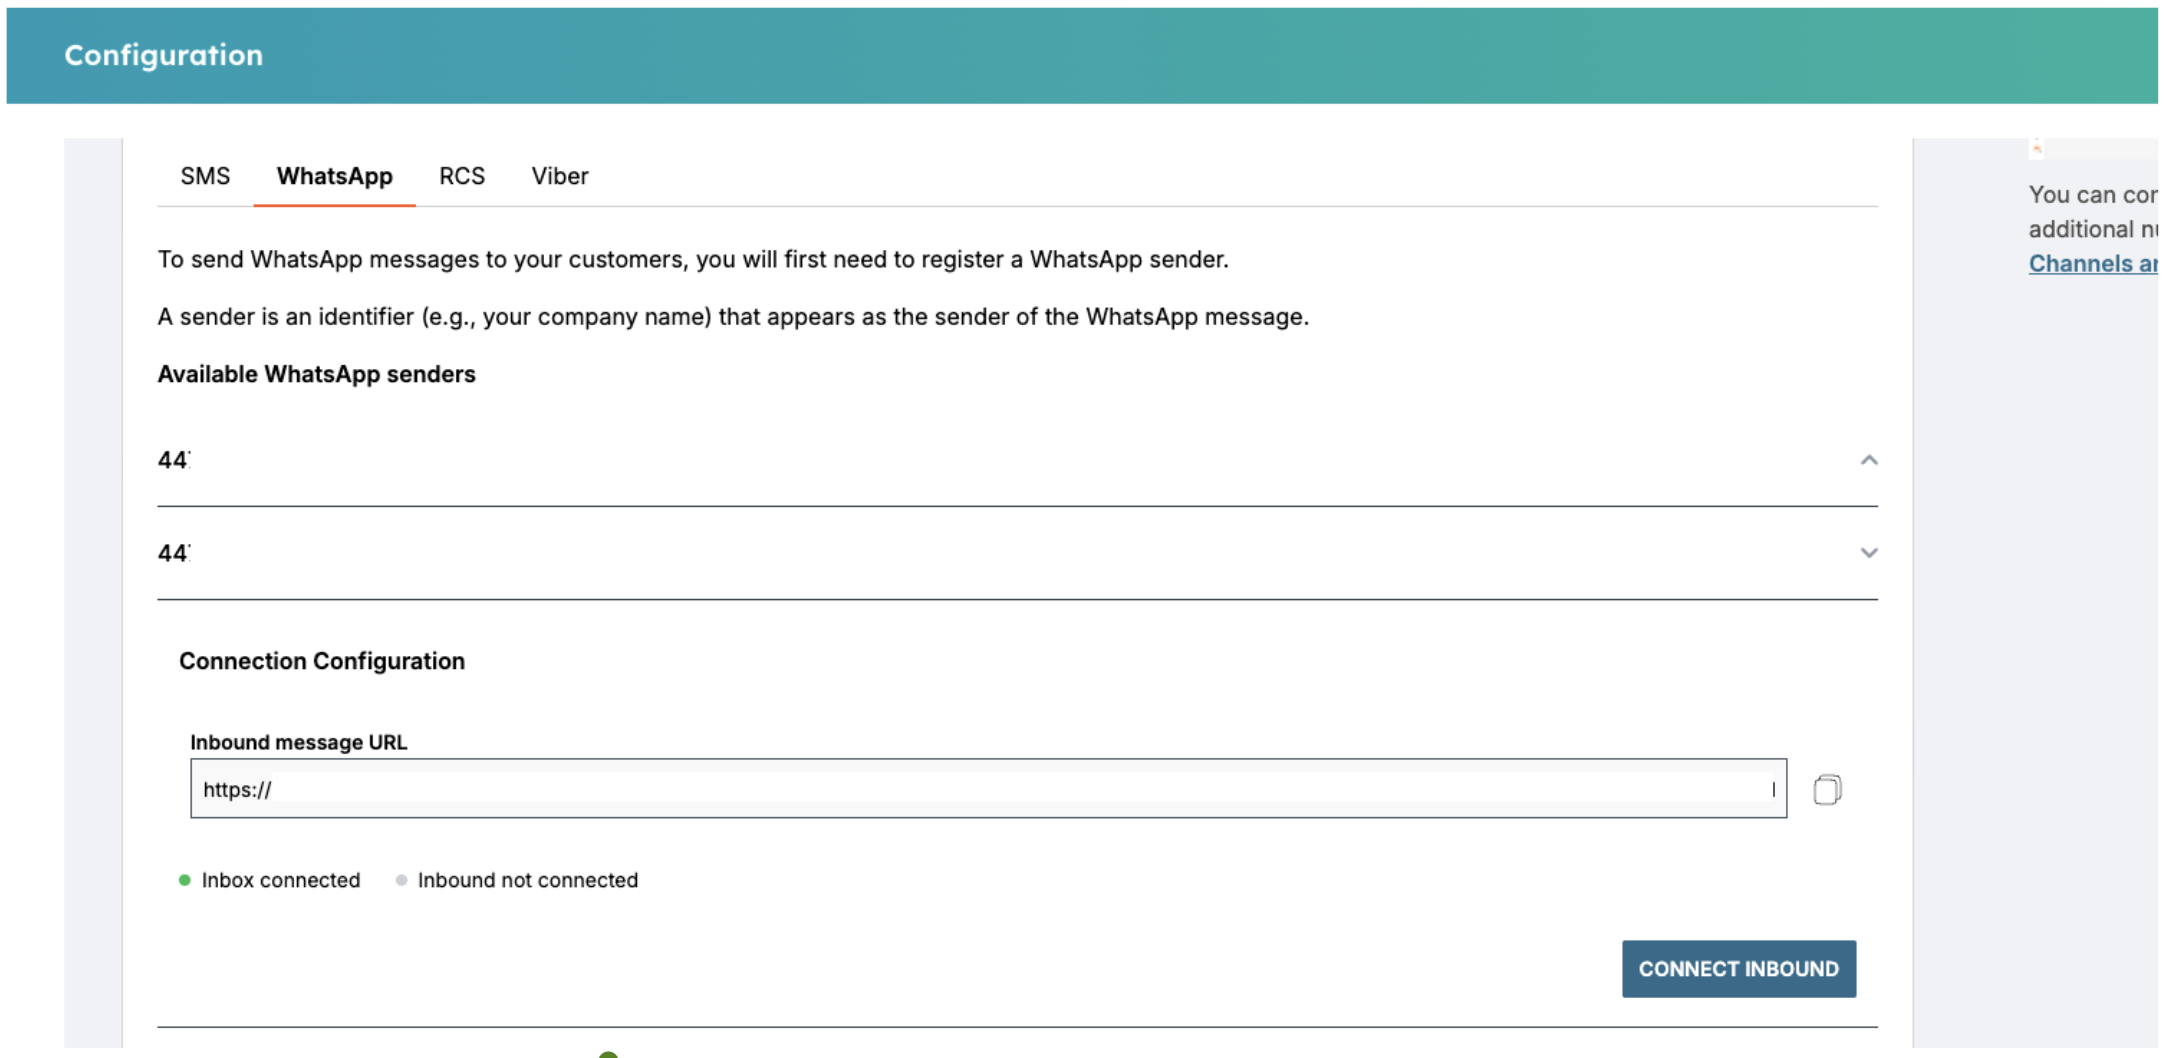
- In the Connection Configuration section, check the inbox connection status:
- A green light shows that an inbox connection already exists.
- To add an inbound connection for timeline events for workflow triggers, select Connect inbound.
- When the inbound configuration is complete, the button changes to Disconnect inbound.
- Select this only if you want to remove the inbound workflow trigger functionality.
- Inbox events continue if an inbox connection remains in place.
- If you need to add the inbound URL manually in the Infobip web interface, select the copy icon next to the inbound URL.
Configure feature discovery
Use the Feature Discovery tab for guidance on using the Infobip messaging features with HubSpot tools, such as:
Workflows
The Workflows feature lets you create automation workflows and send SMS, WhatsApp, RCS, and other messages.
The following record types are supported:
- Contact
- Deal
- Company
Set up new workflow
- Select Go to workflows. The workflows dashboard opens.
- In the dashboard, select Create Workflow and select from scratch.
- On the next screen, select a record type for your workflow. The default type is contact-based.
- Select Next.
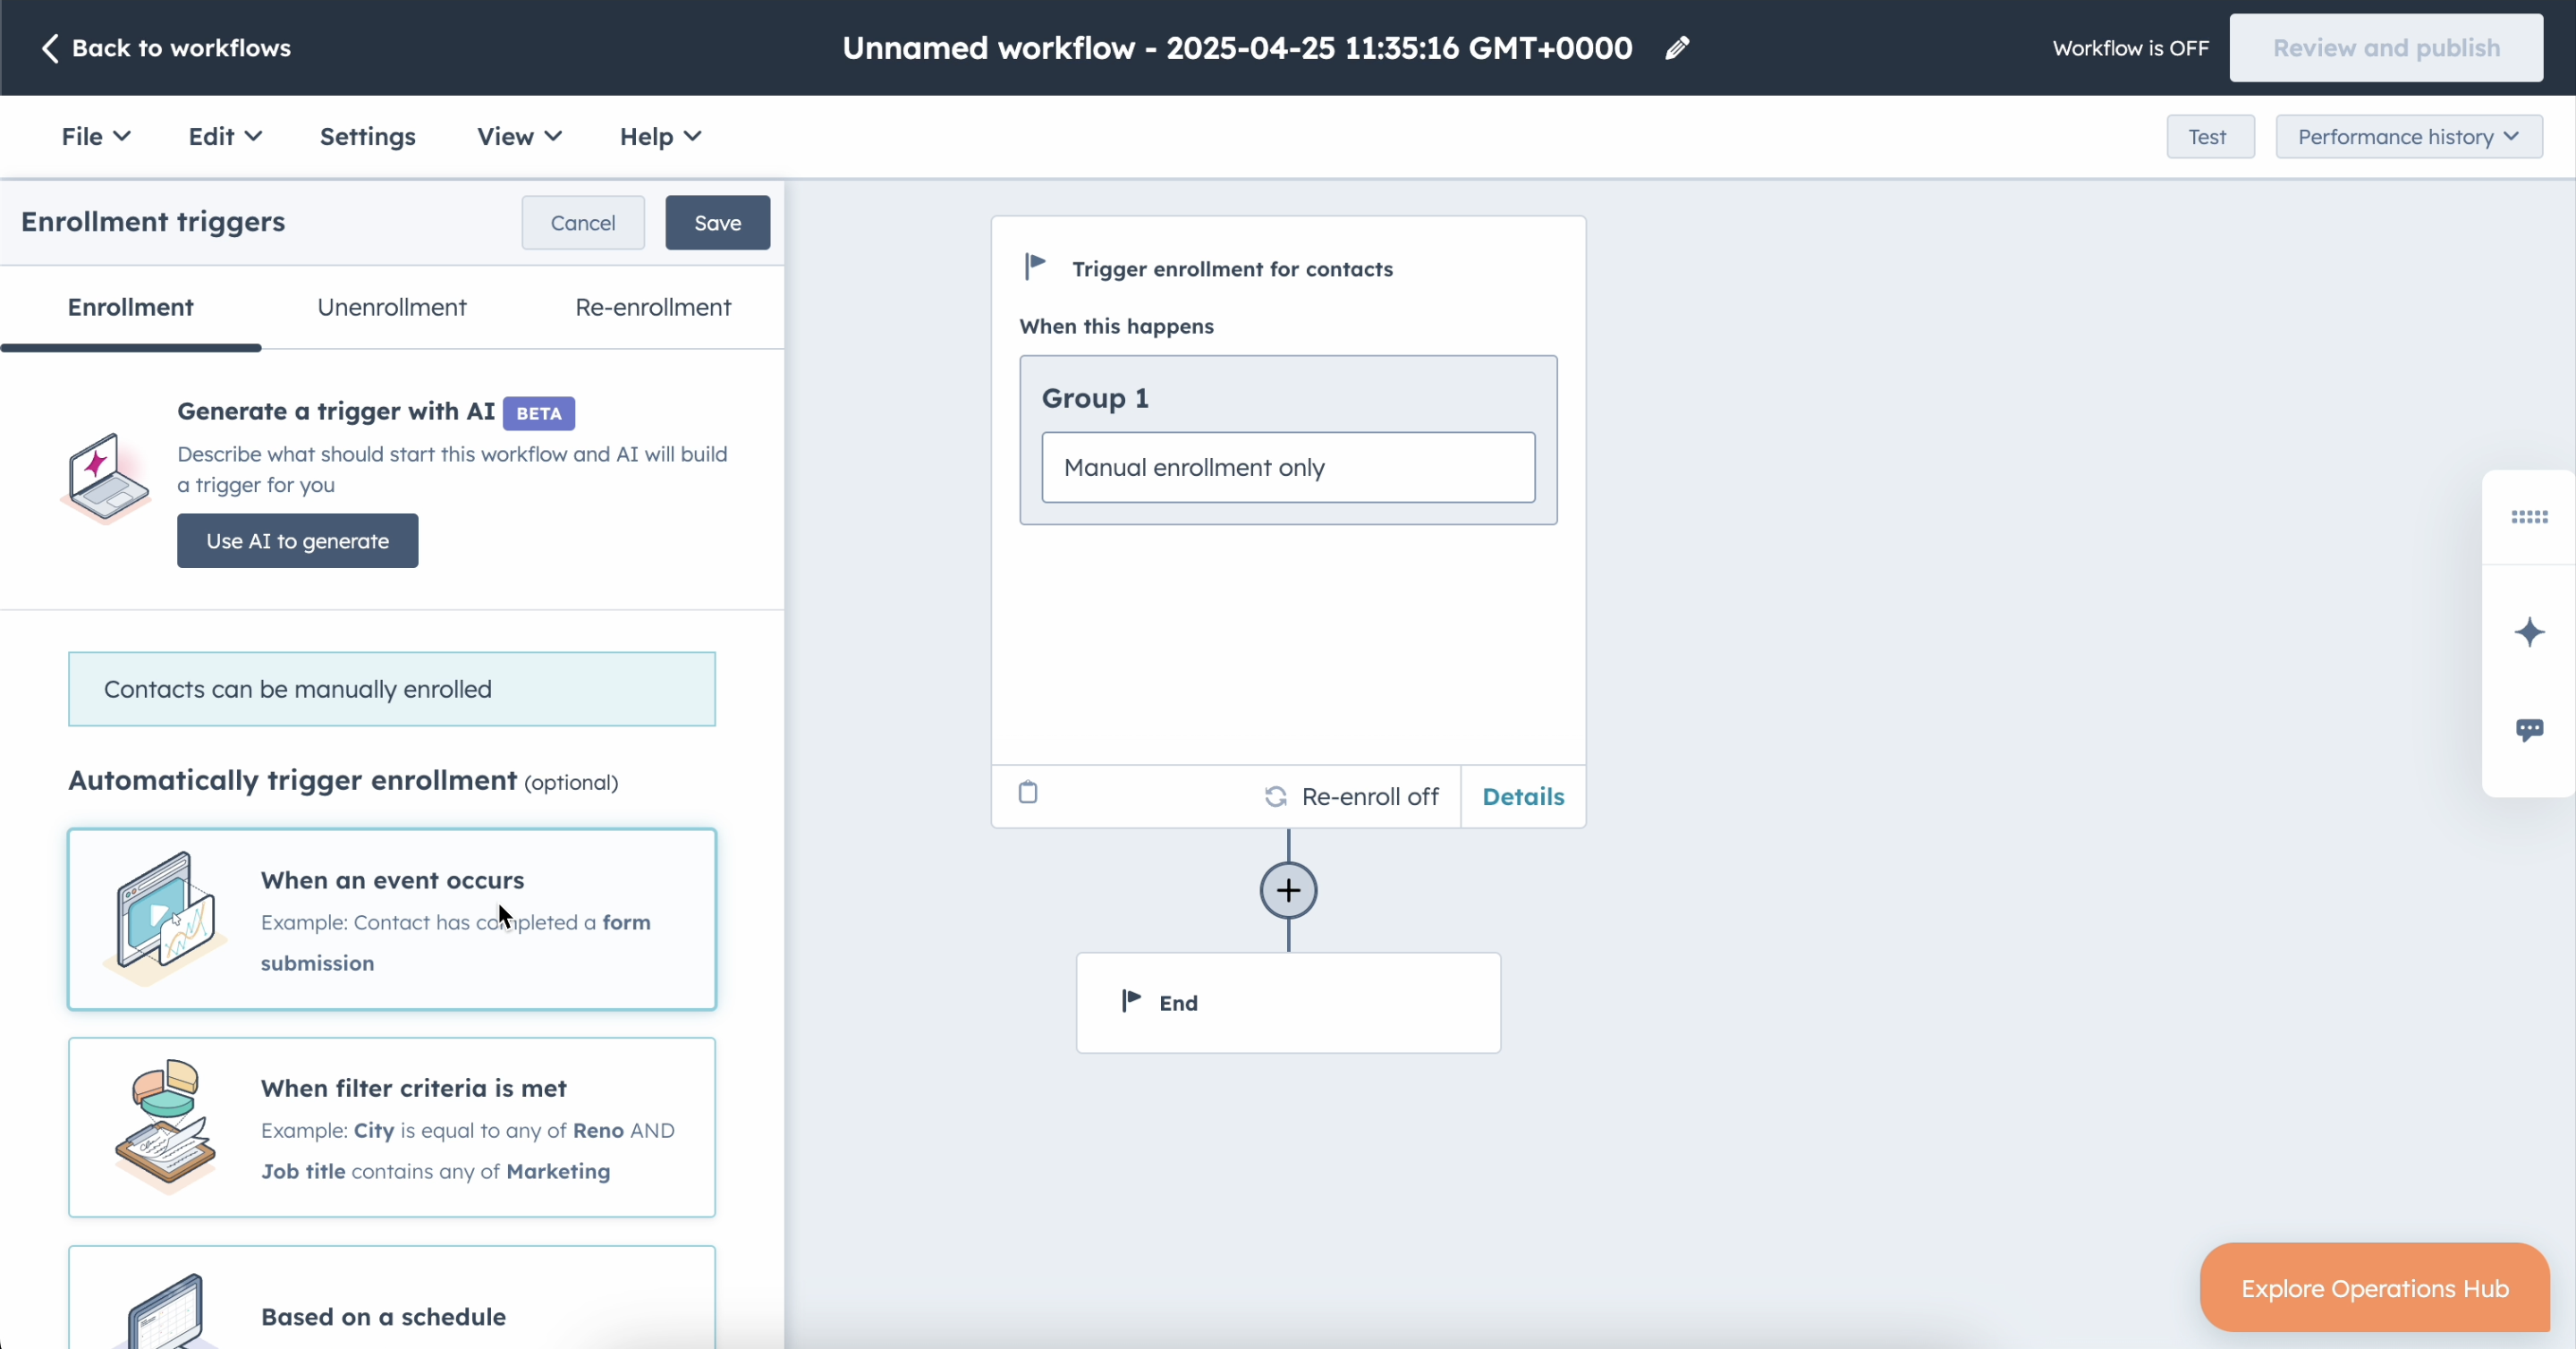
- On workflow creation, select Edit > Edit enrollment trigger to set up triggers.
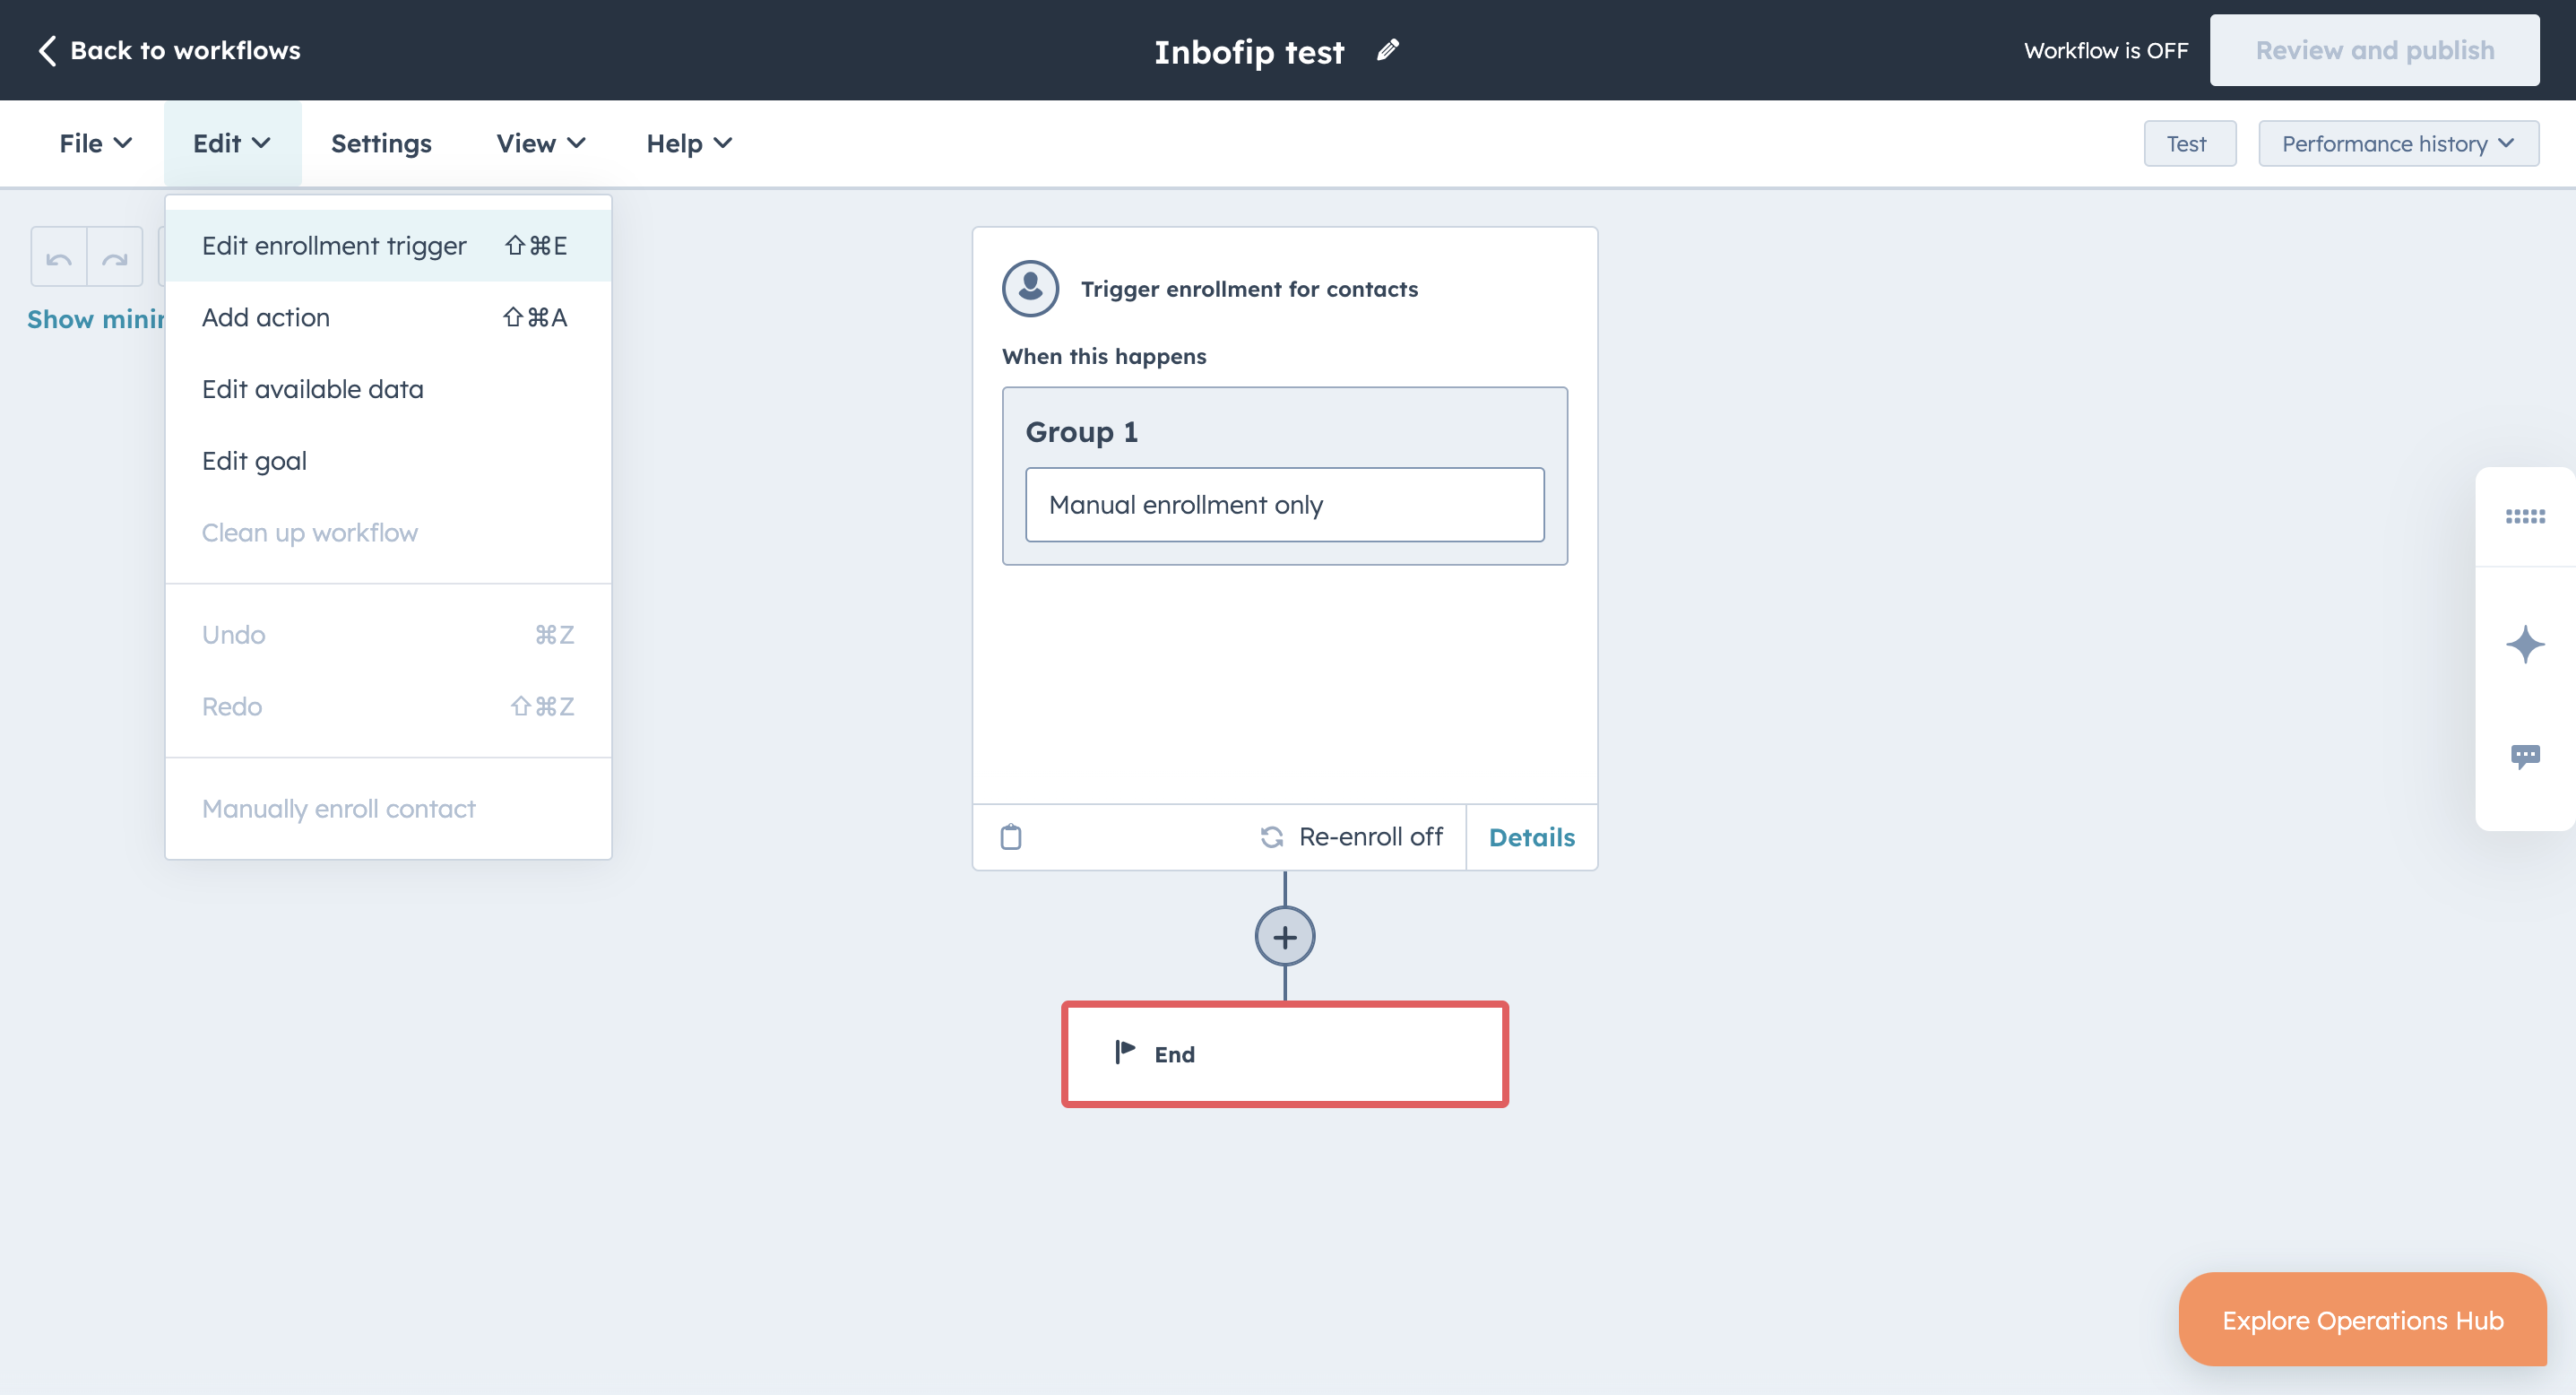
- On the Re-enrollment tab, select the toggle switch to ON to allow records to re-enroll after completing the setup.
- Select Save.
- Close the sidebar panel, and then select the plus sign below the trigger setup box. The Choose an action panel opens at the side, where you can scroll down to the Integrated apps section.
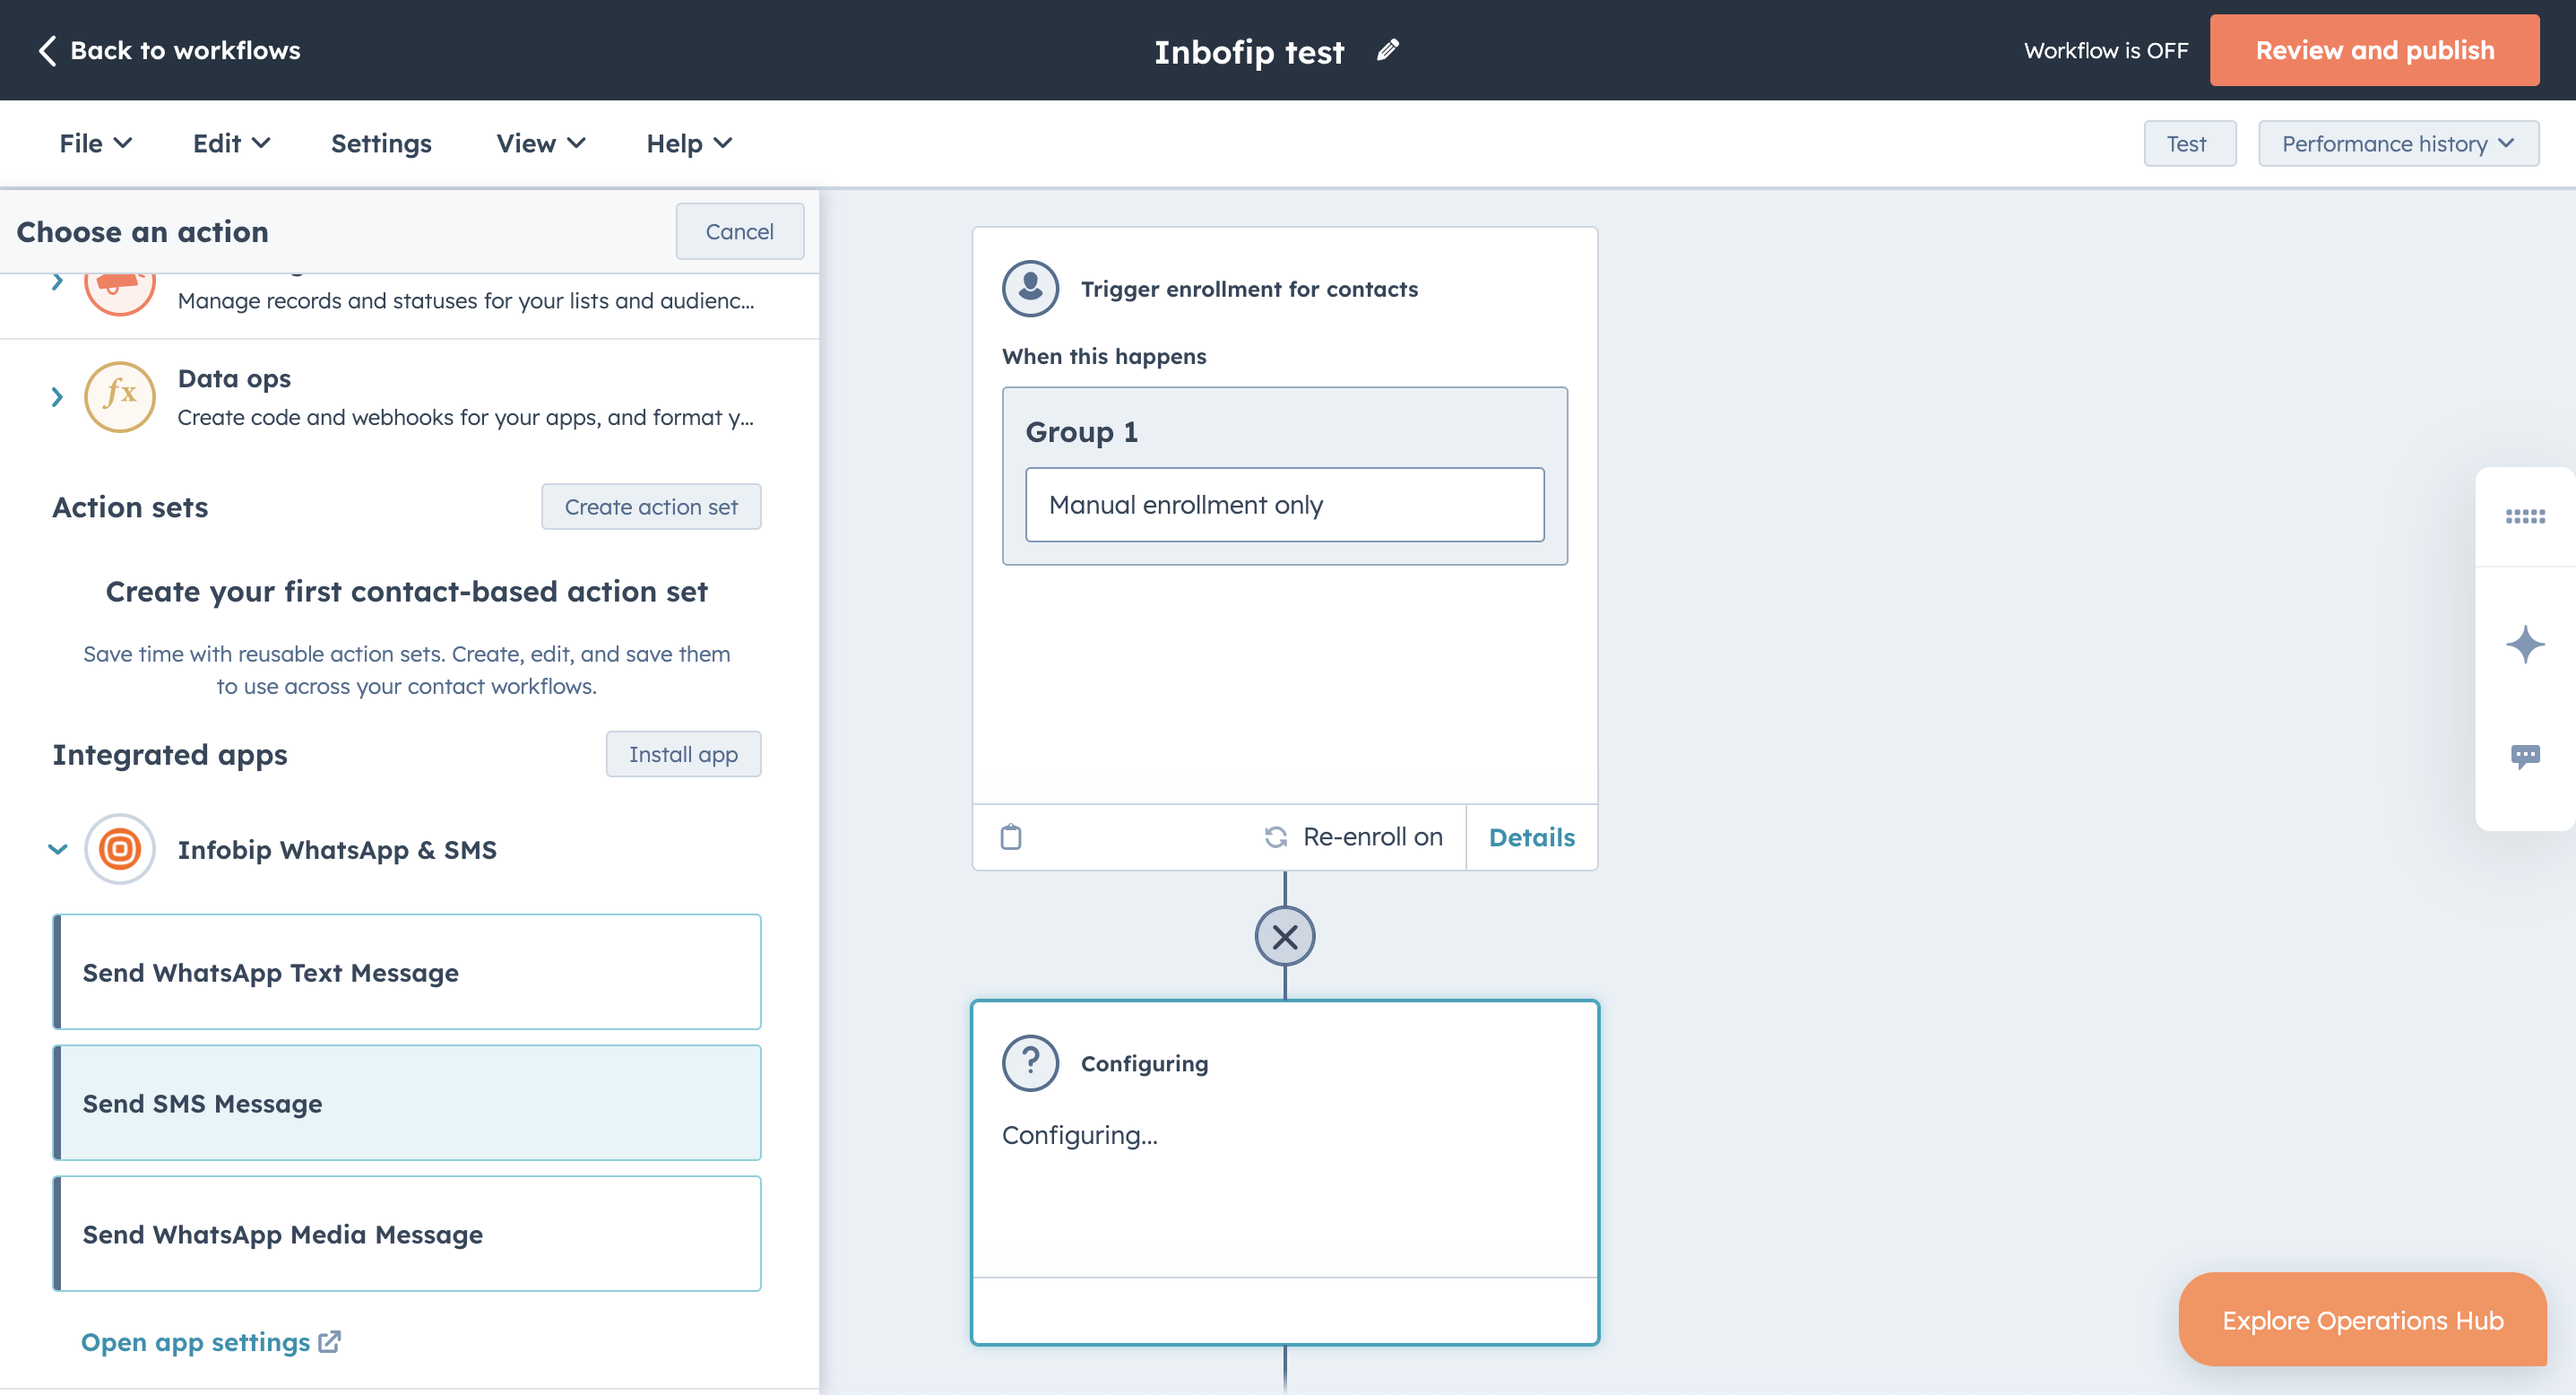
The following actions are available:
- Send SMS message
- Send WhatsApp Text Message
- Send WhatsApp Media Message
- Send Viber Media Message
- Send RCS Media Message
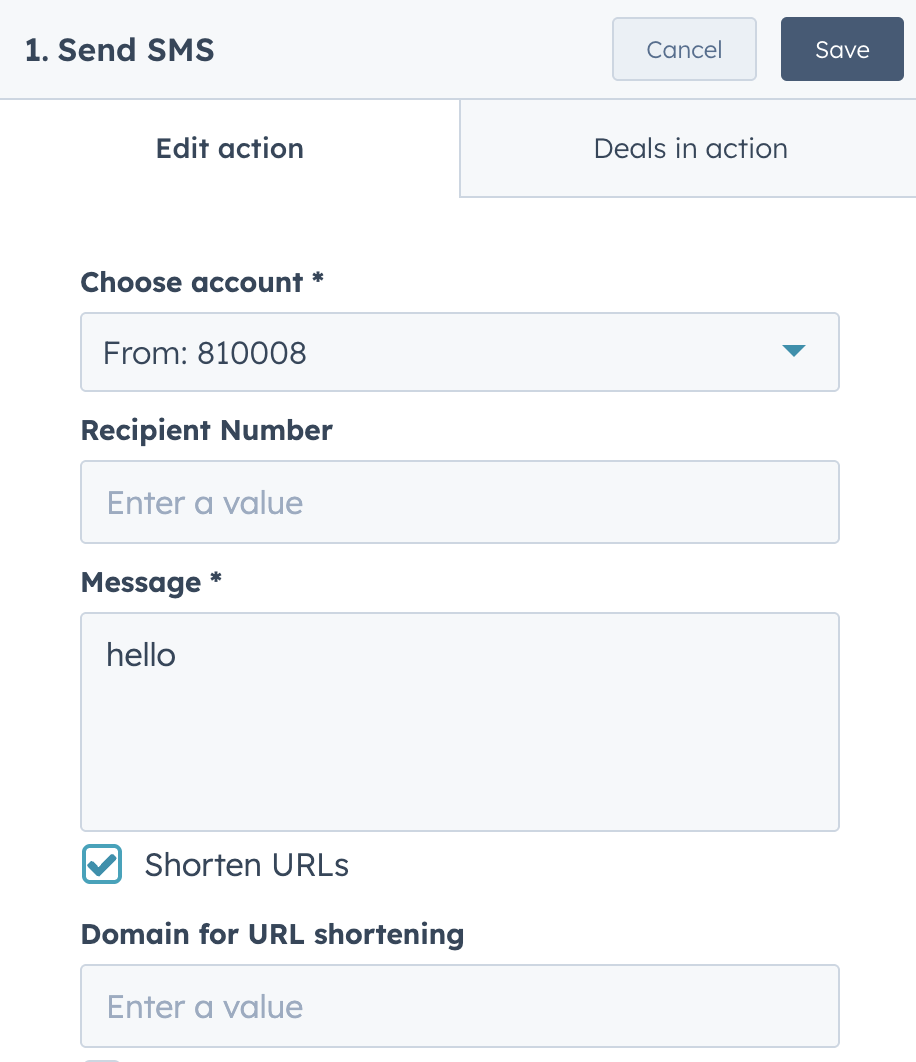
Send SMS message action
Send SMS message action is the simplest option that you can use. You need only to define the number you want to use for sending messages and the content that you want to send to your users. Every message can be personalized with customer data by adding record tokens to the message.
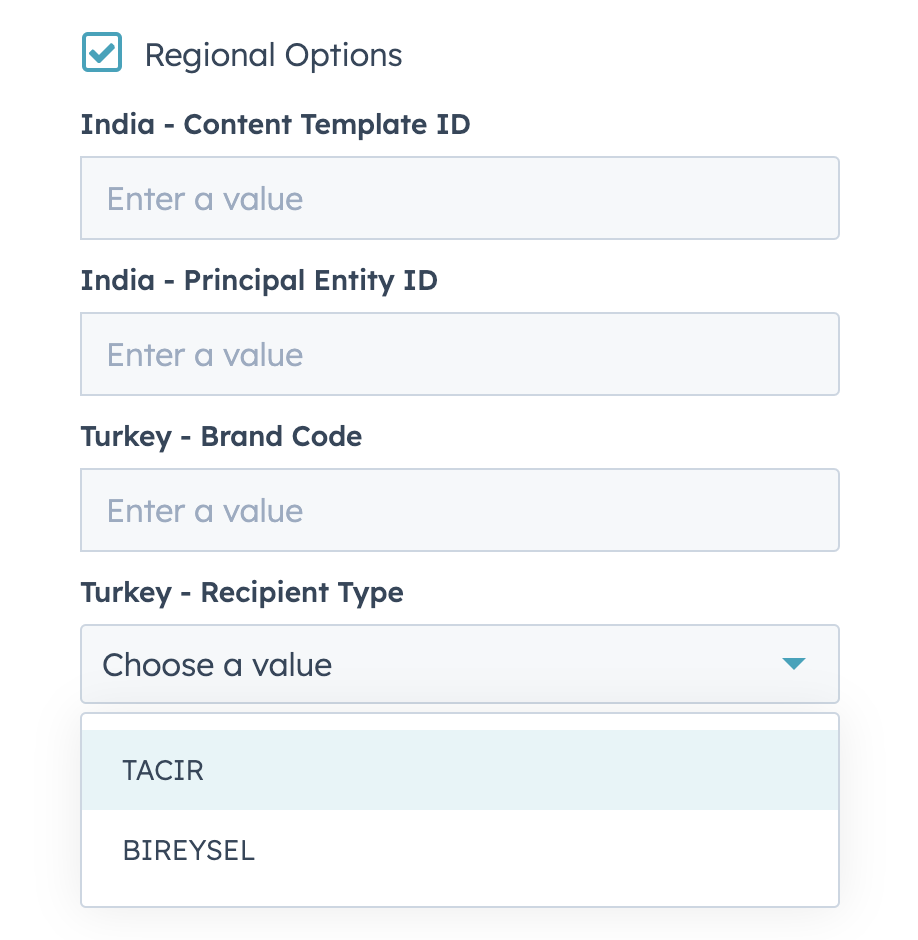
To include regional options for India and/or Türkiye, select the Regional Options checkbox and add the values from your Infobip account.
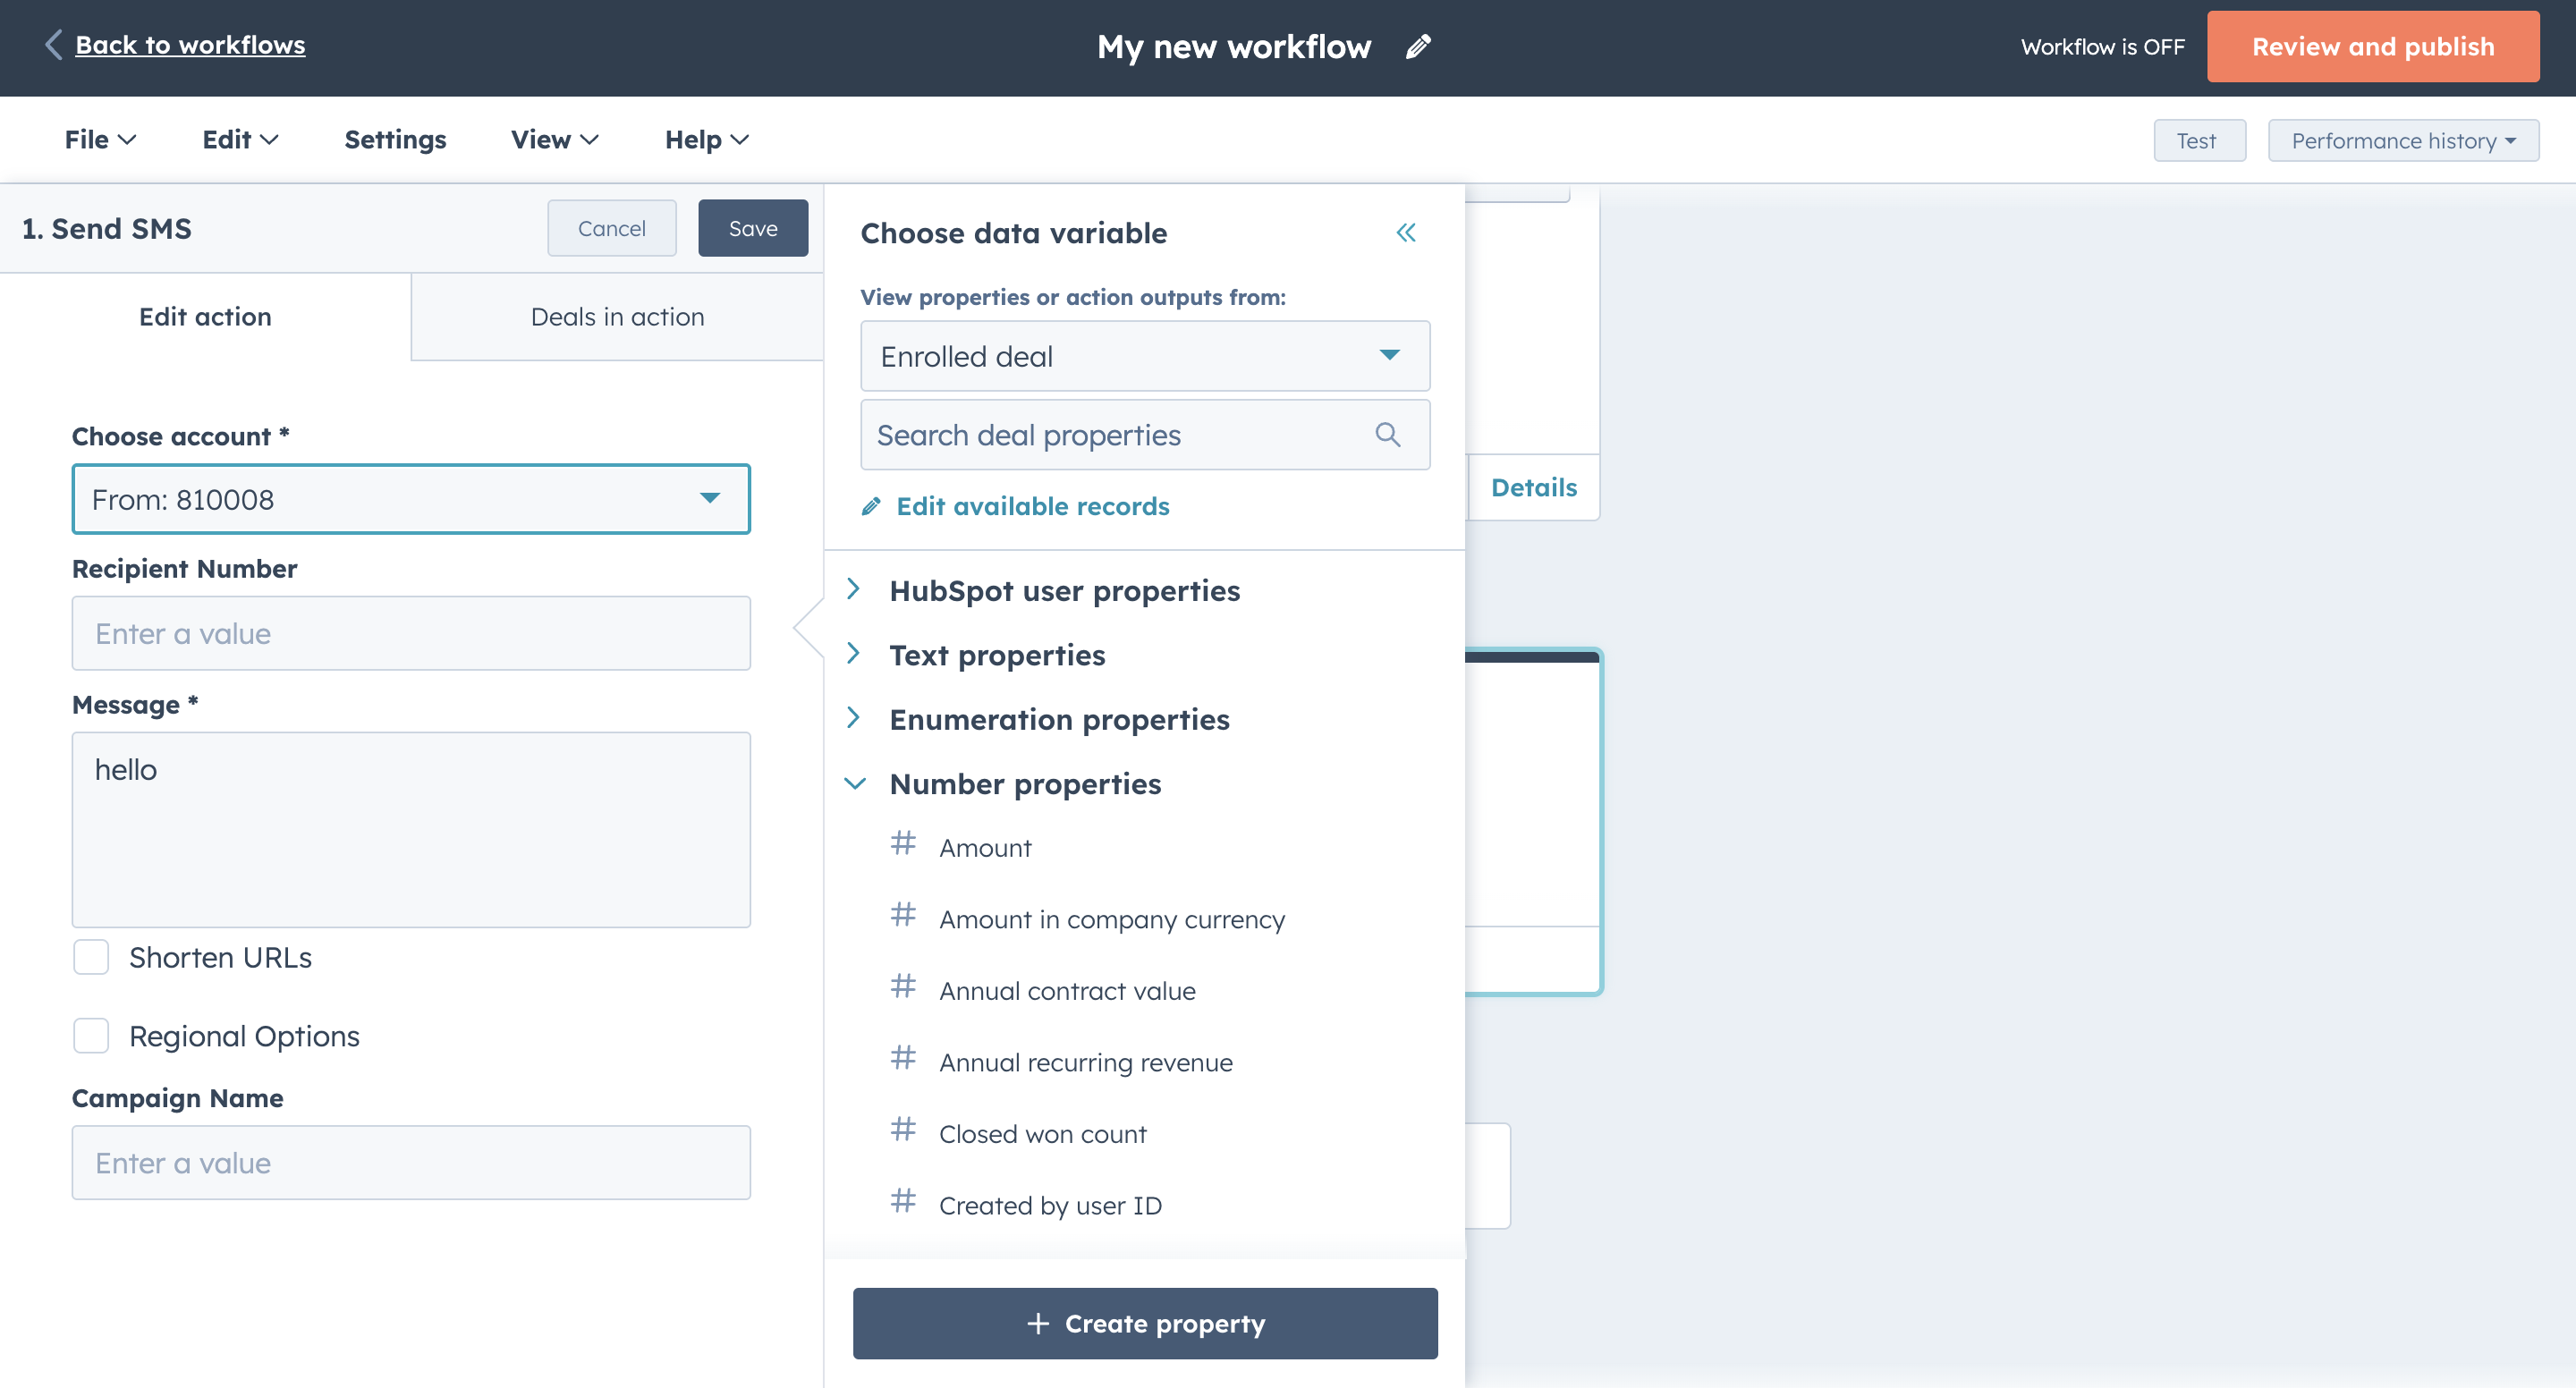
Add a name to your campaign for easier tracking.
After completing the fields and creating a workflow, select Review and publish in the top right corner. On the panel on the right, you see workflow step. To go to the next step, select Next. When you get to the last step, select Turn on workflow to publish your workflow.
When the workflow is activated, you can check whether your records have received your messages from the profile timeline.
Send WhatsApp Text message action
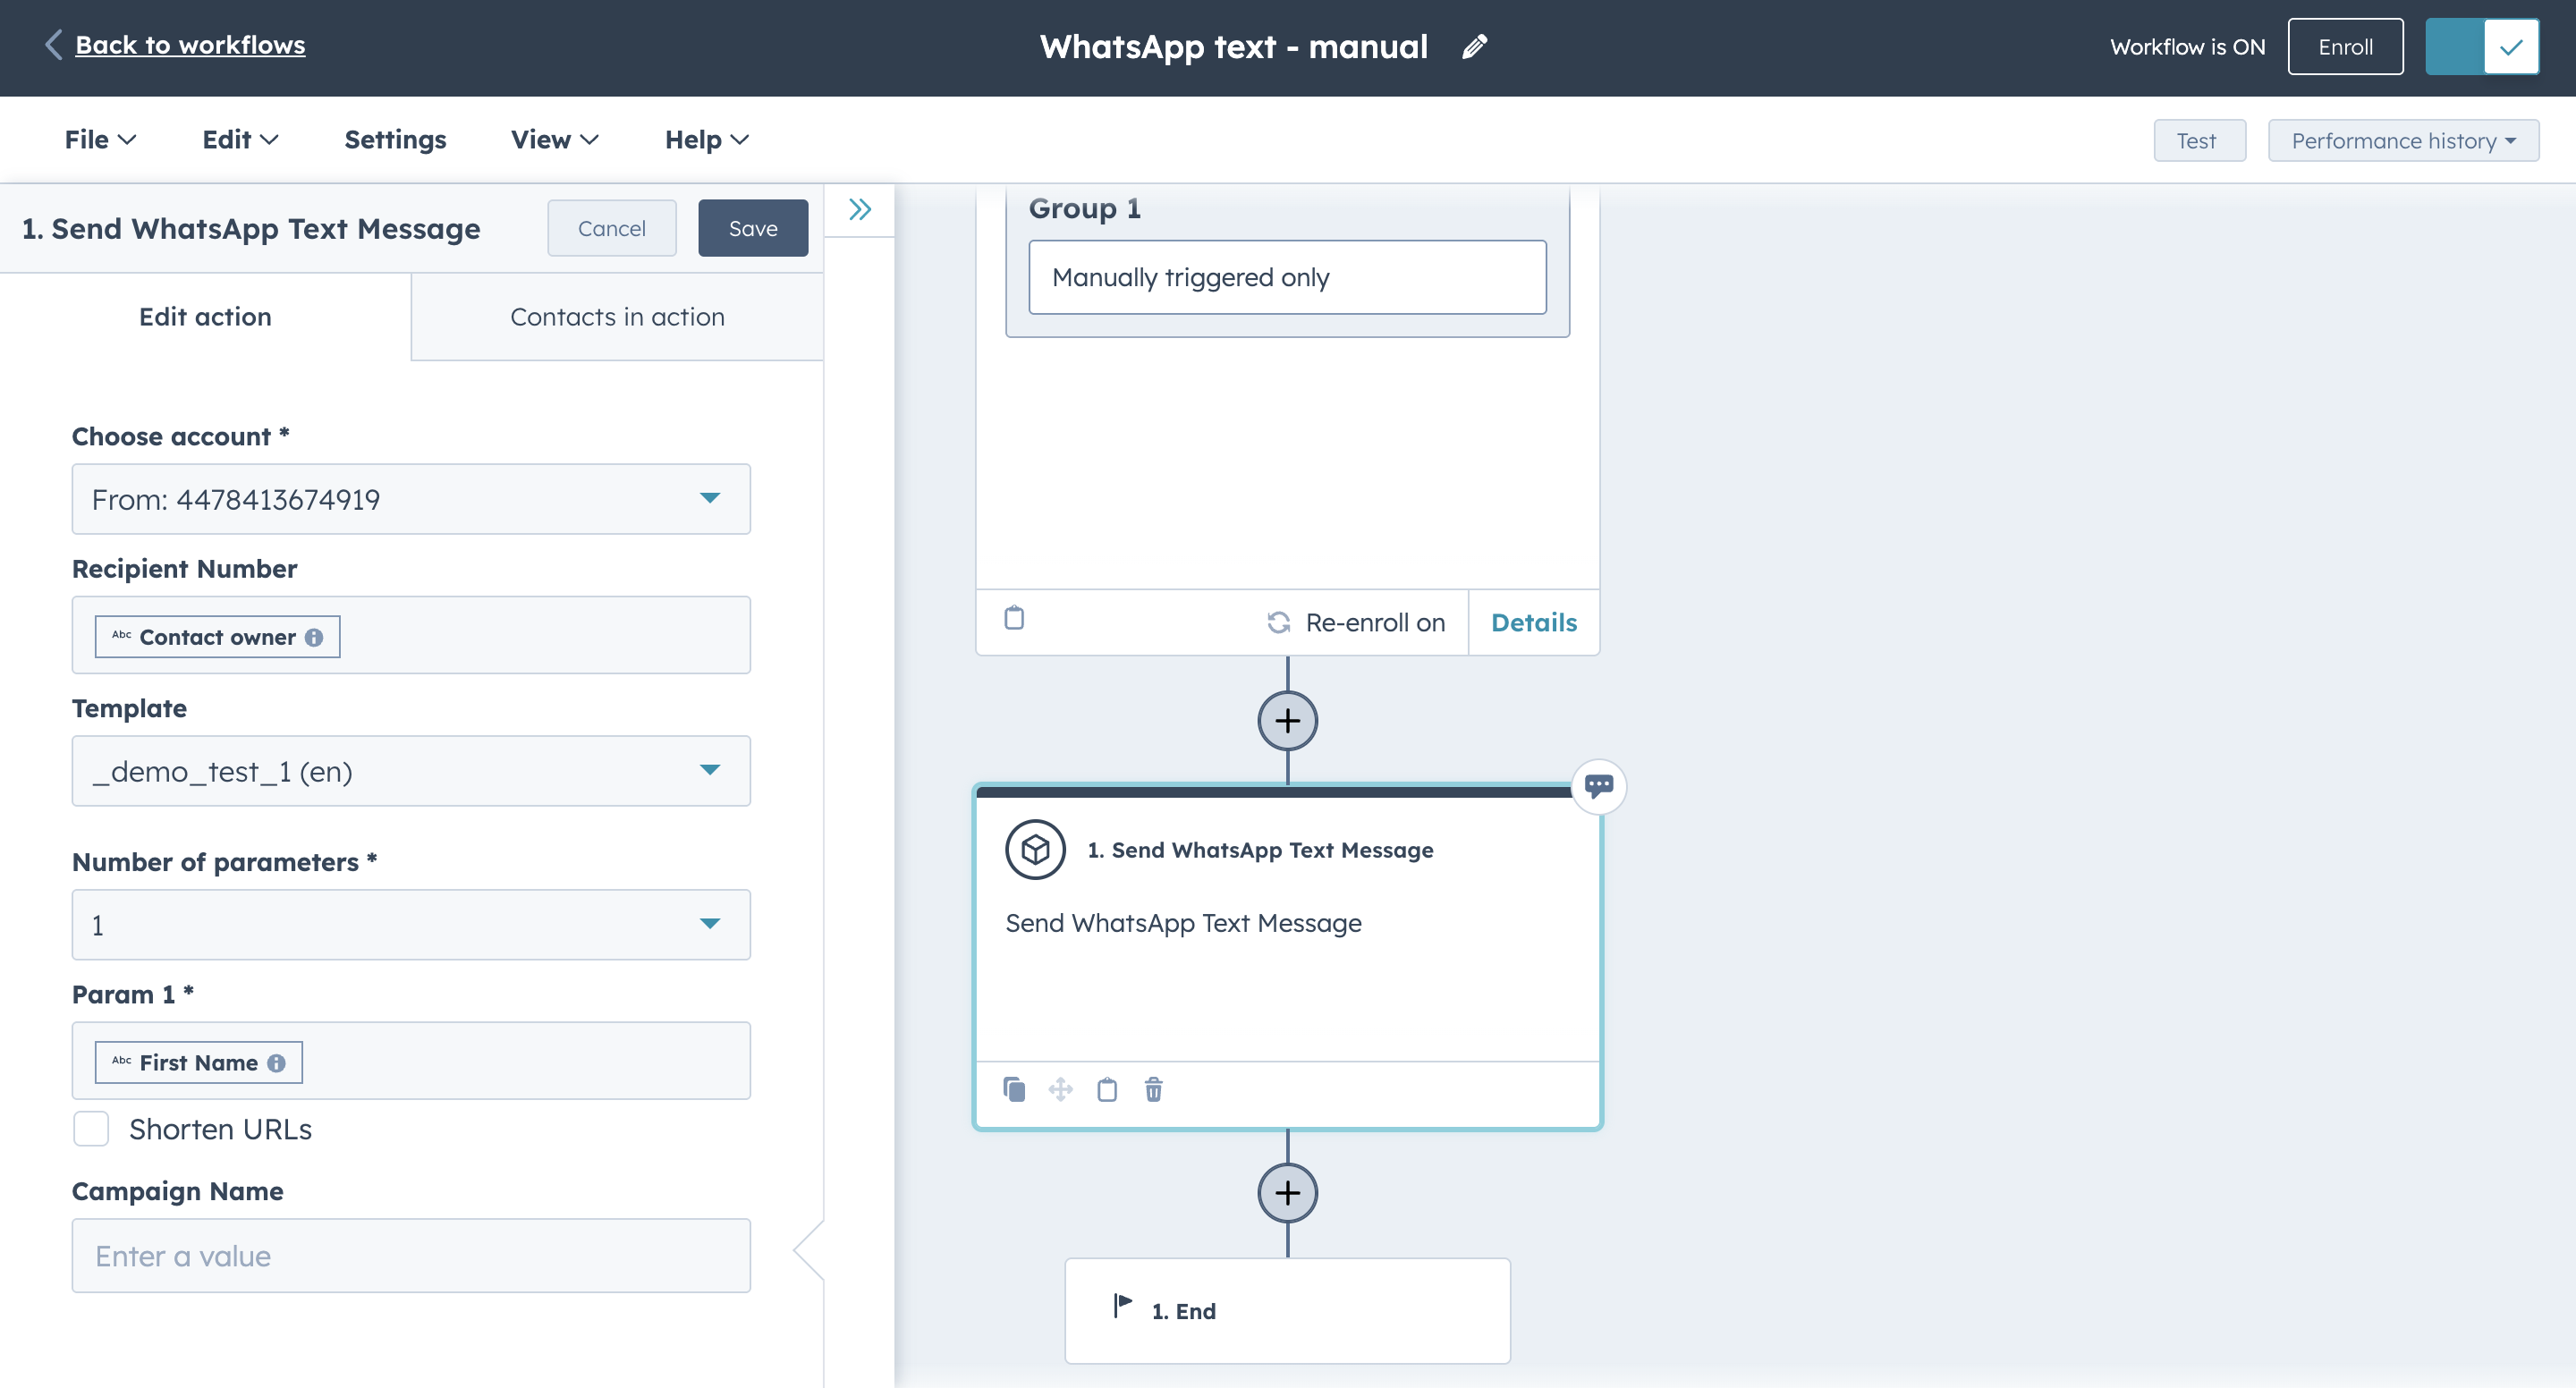
To send WhatsApp Text messages:
- Select Send WhatsApp Text Message.
- Choose the account (the sender) from which you want to send a message and the recipient number.
- Set the remaining fields:
- Select a template
- Define the number of parameters
- Add an optional campaign name
- You can also select the Shorten URLs option.
- Select Save.
Send WhatsApp Media message action
To send WhatsApp Media messages:
- Select Send WhatsApp Media Message.
- Choose the account (the sender) from which you want to send a message and the recipient number.
- Set the remaining fields:
- Select a template
- Define the number of parameters
- Add an optional campaign name
- To enable URL Shortening, select the Shorten URLs option.
- Select Save.
After completing the fields and creating a workflow, select Review and publish in the top right corner. On the panel on the right, you see a workflow step. To go to the next step, select Next. When you get to the last step, select Turn on workflow to publish your workflow.
SMS failover
SMS failover ensures message delivery through an alternative channel when the primary channel is unavailable.
To set up SMS failover:
- In the menu, go to Automation > Workflows.
- Select Create workflow.
- On the next screen, select a record type for your workflow. The default type is contact-based.
- Select Next.
- On the workflow panel, select Edit > Edit enrollment trigger from the navigation bar.
- In the Automatically trigger enrollment section, select When an event occurs.
- Select Add criteria, and select WhatsApp sent in the categories list.
- After selecting the criteria, select Close editor and then save it.
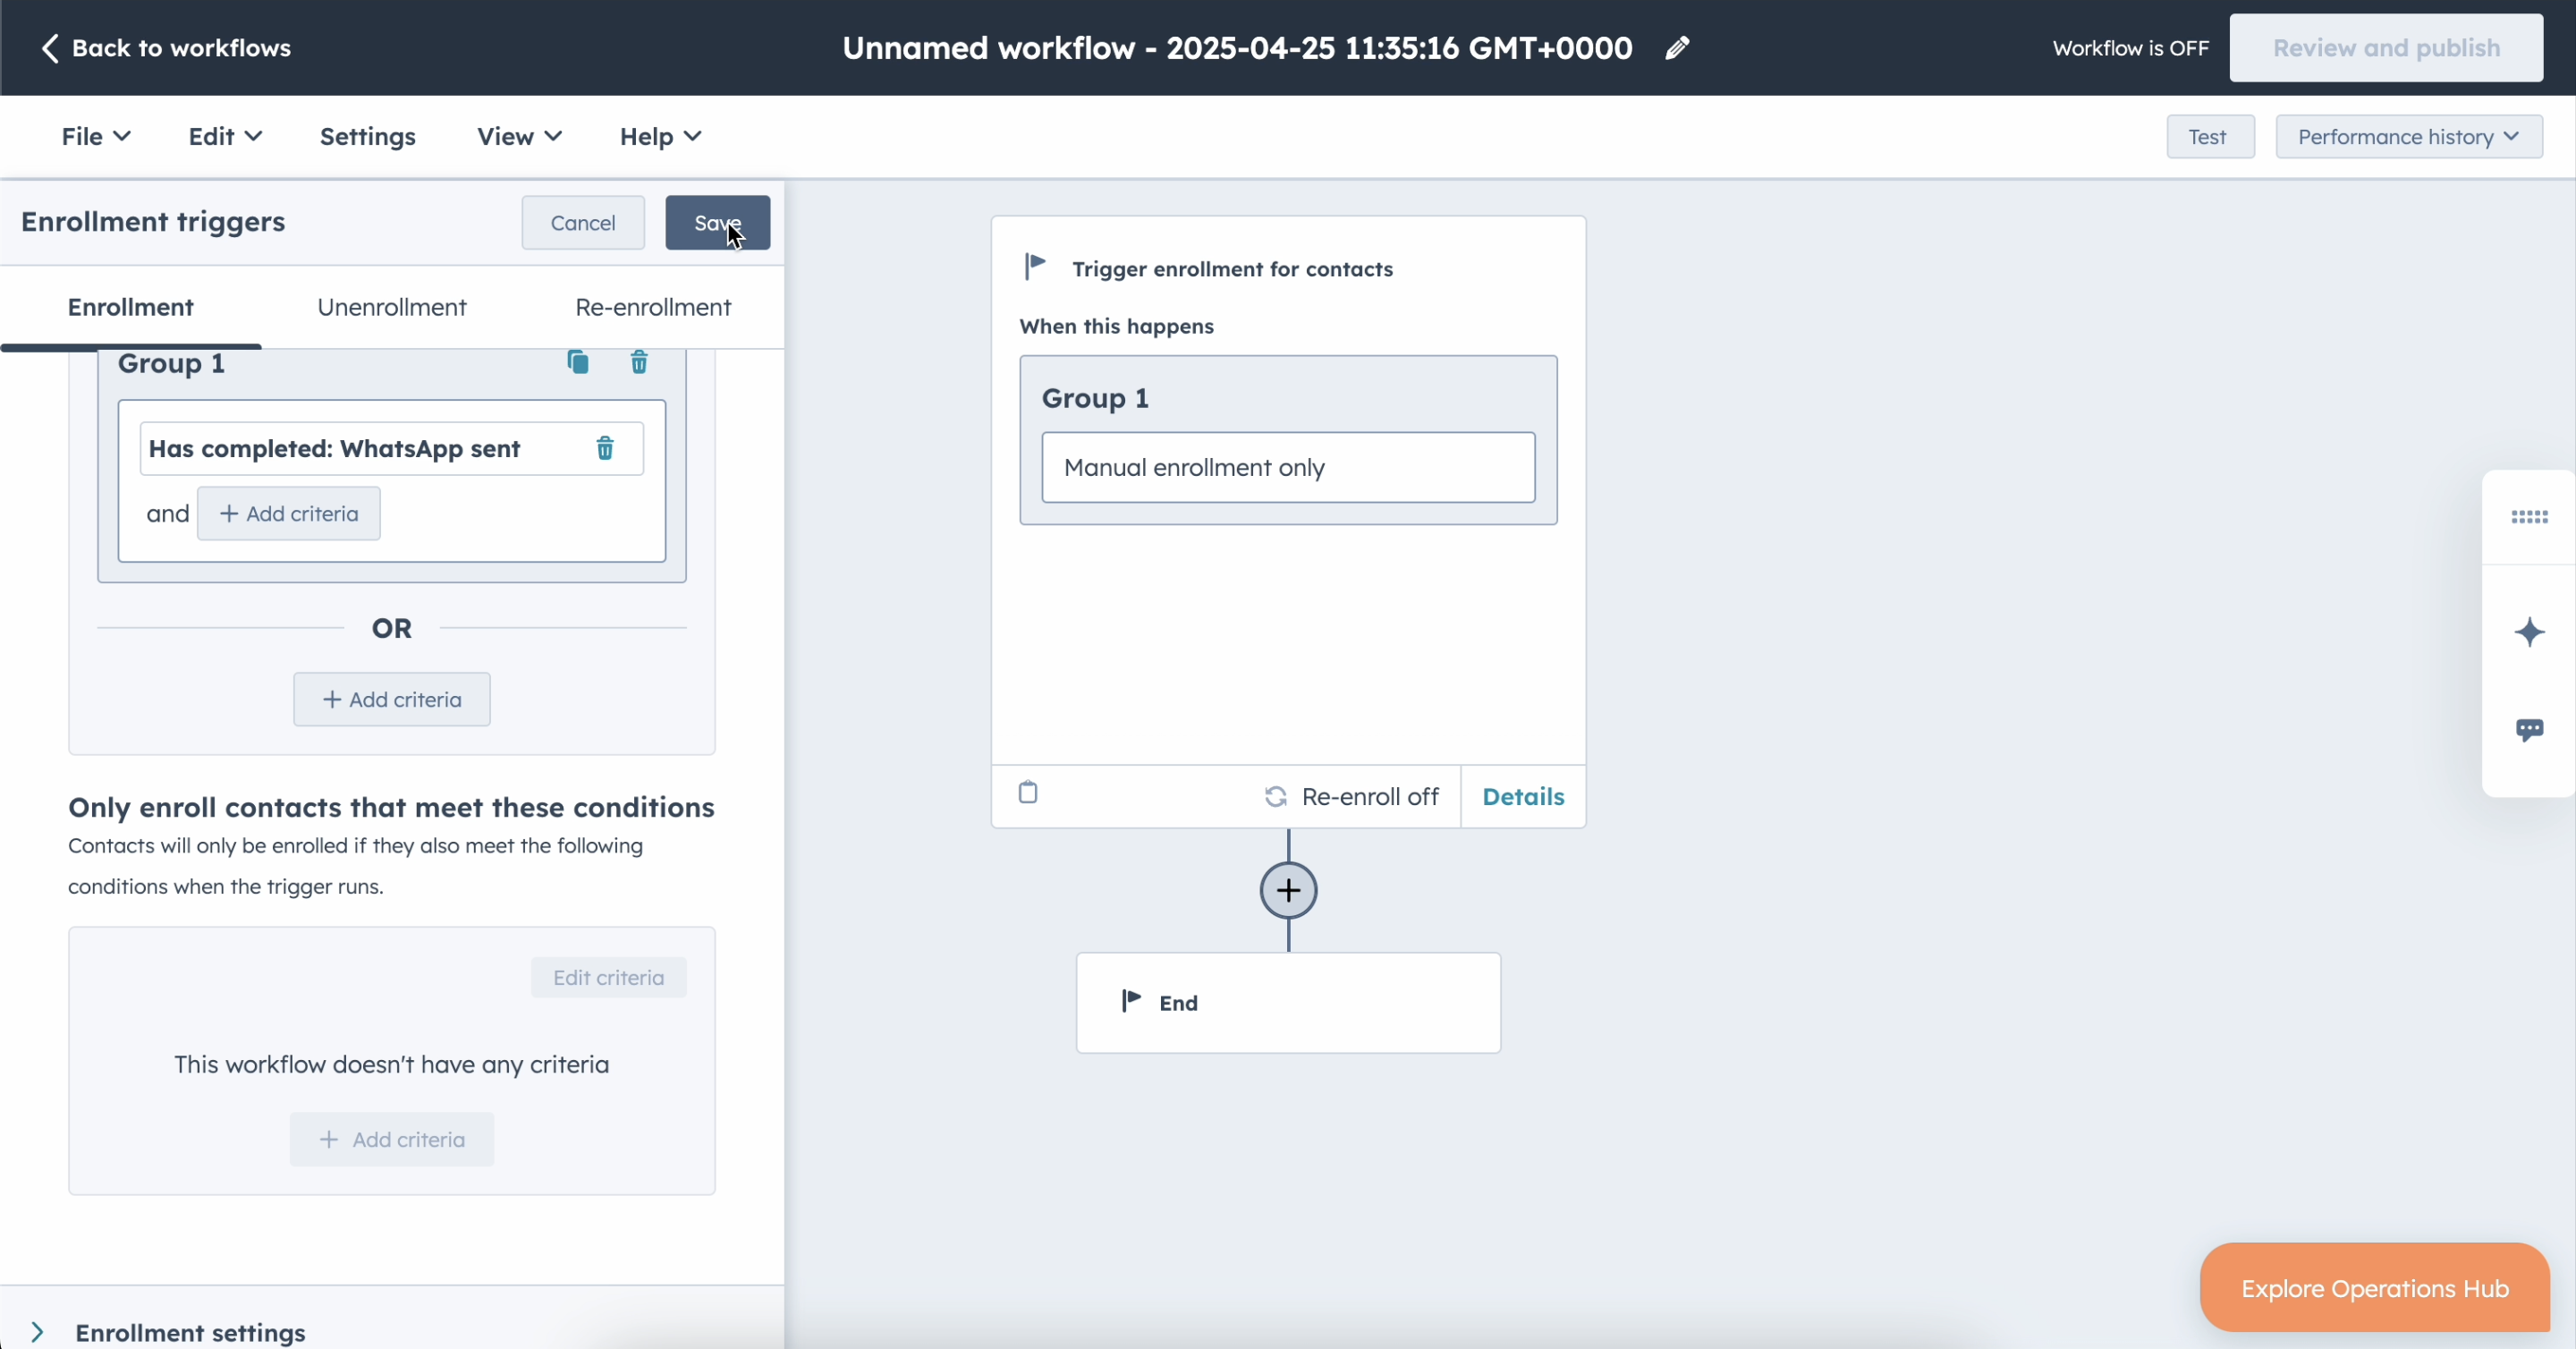
- Select the criteria that will trigger the record, if the criteria are met.
- Select Add criteria and find Infobip Messaging: WhatsApp sent properties > Status group name criteria.
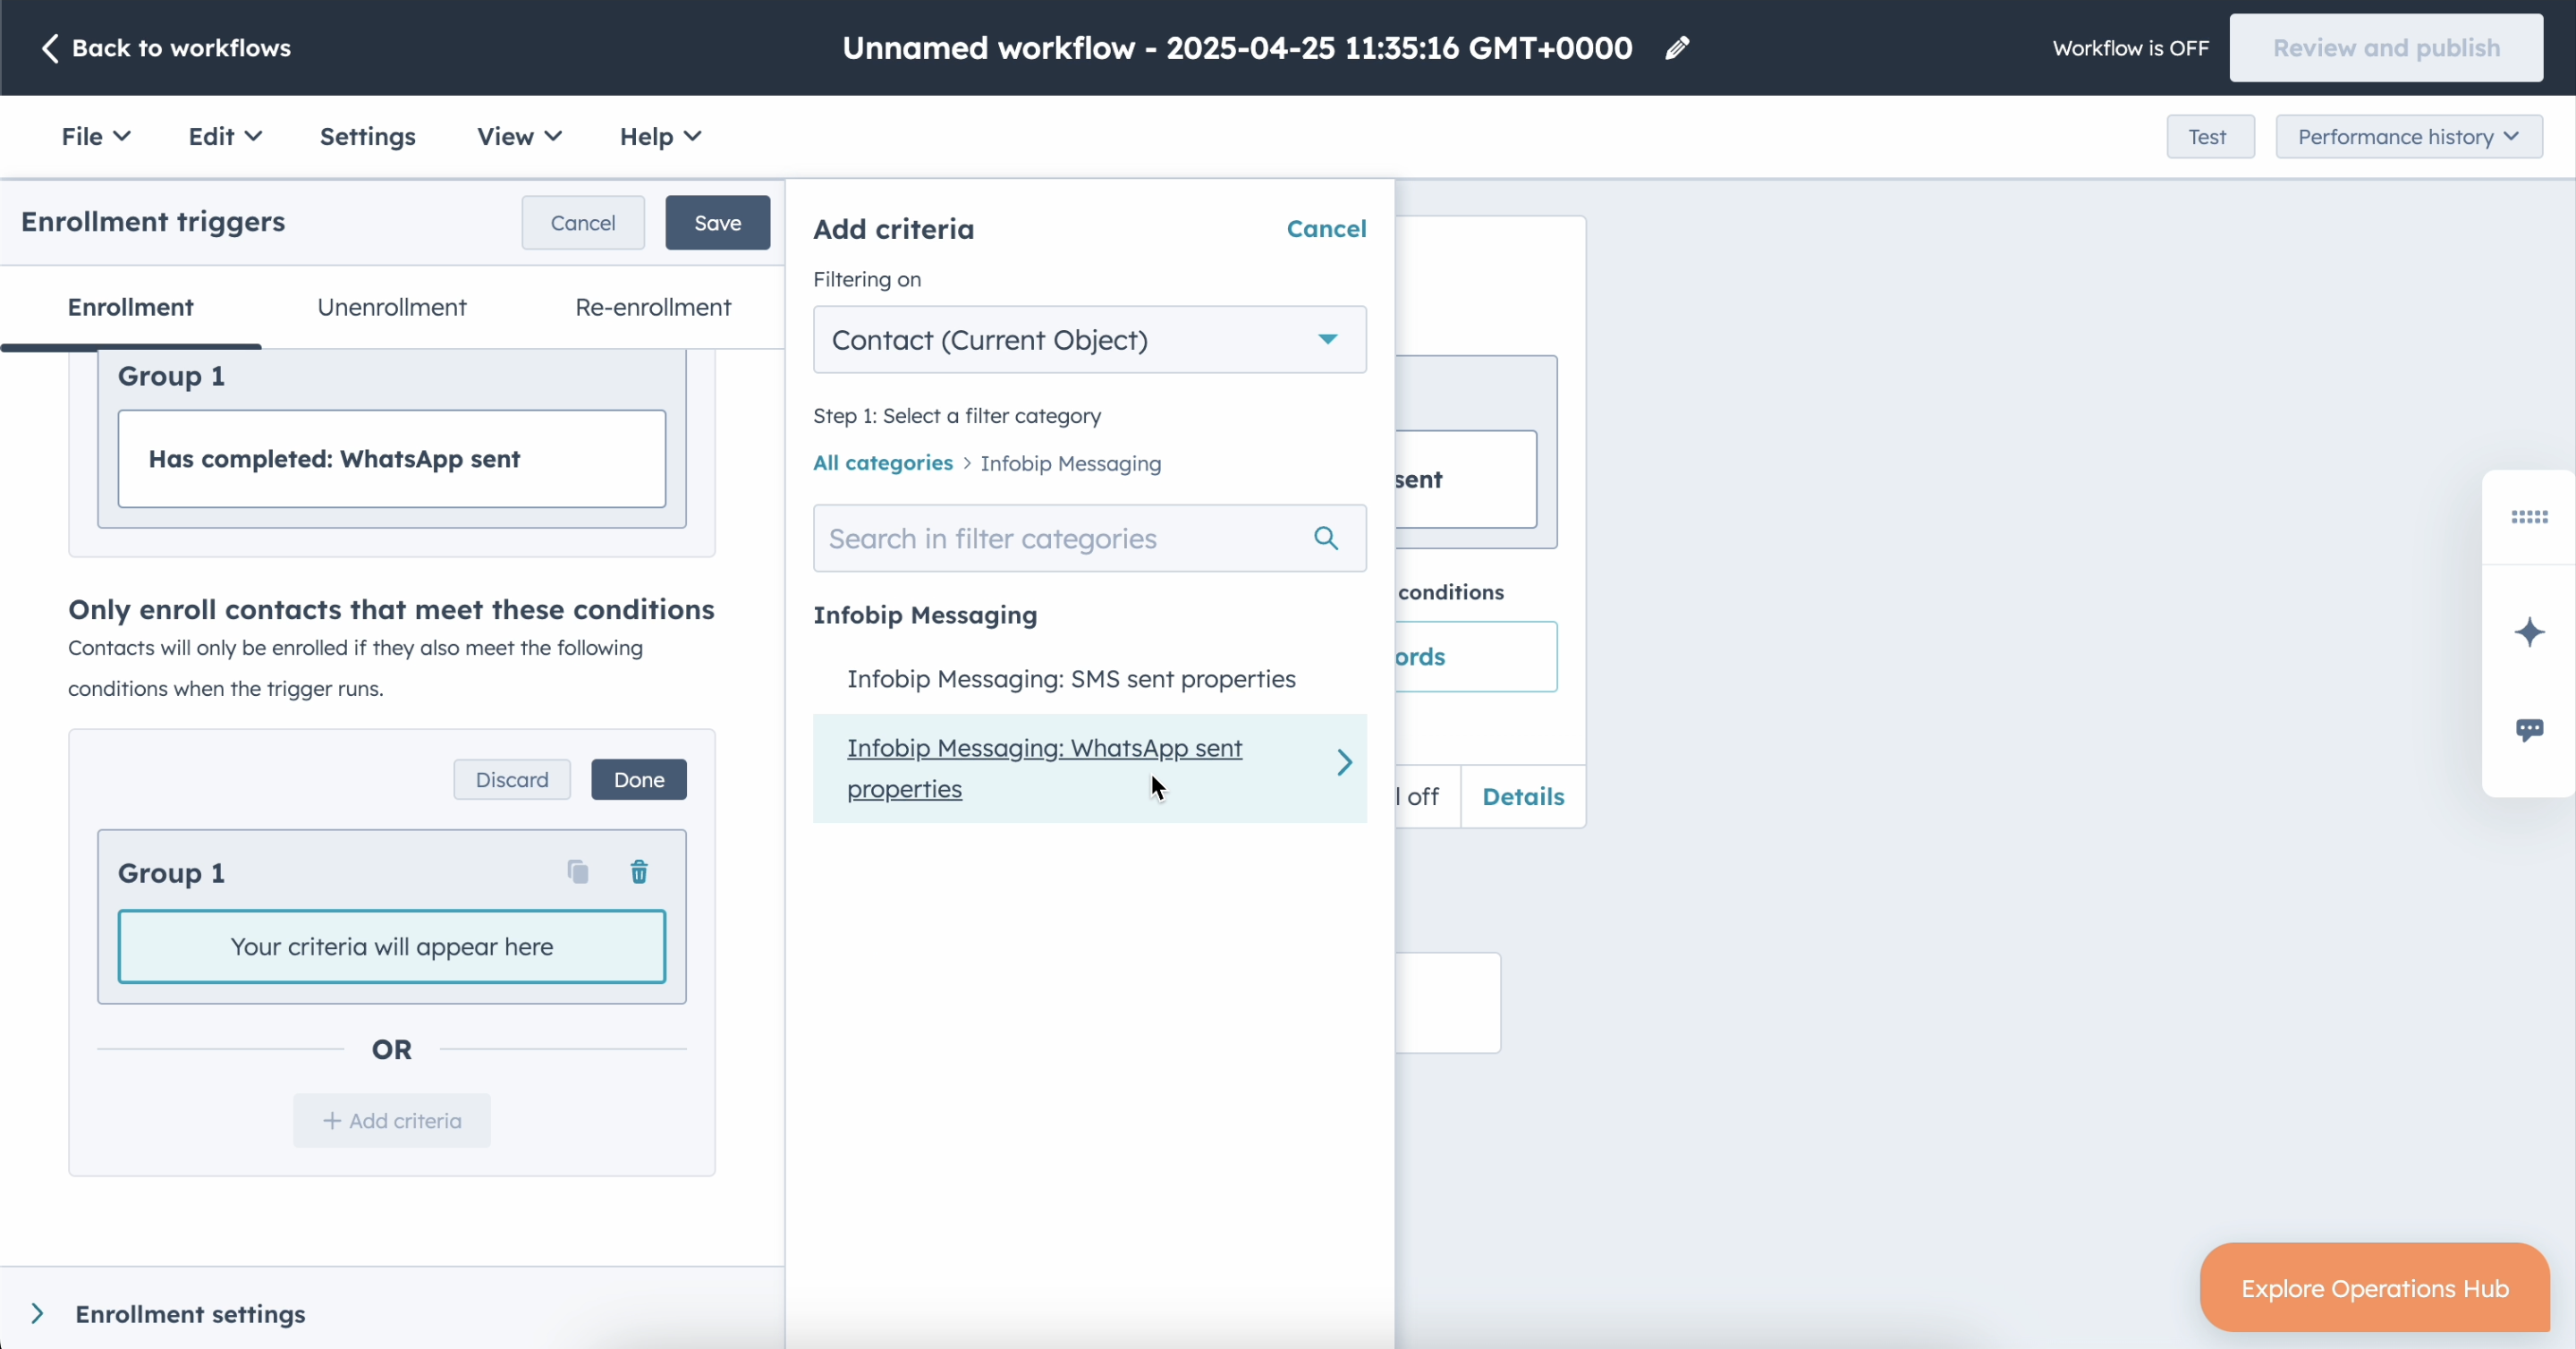
- On the edit criteria panel, choose is not equal to any of and type in the input DELIVERED and PENDING values.
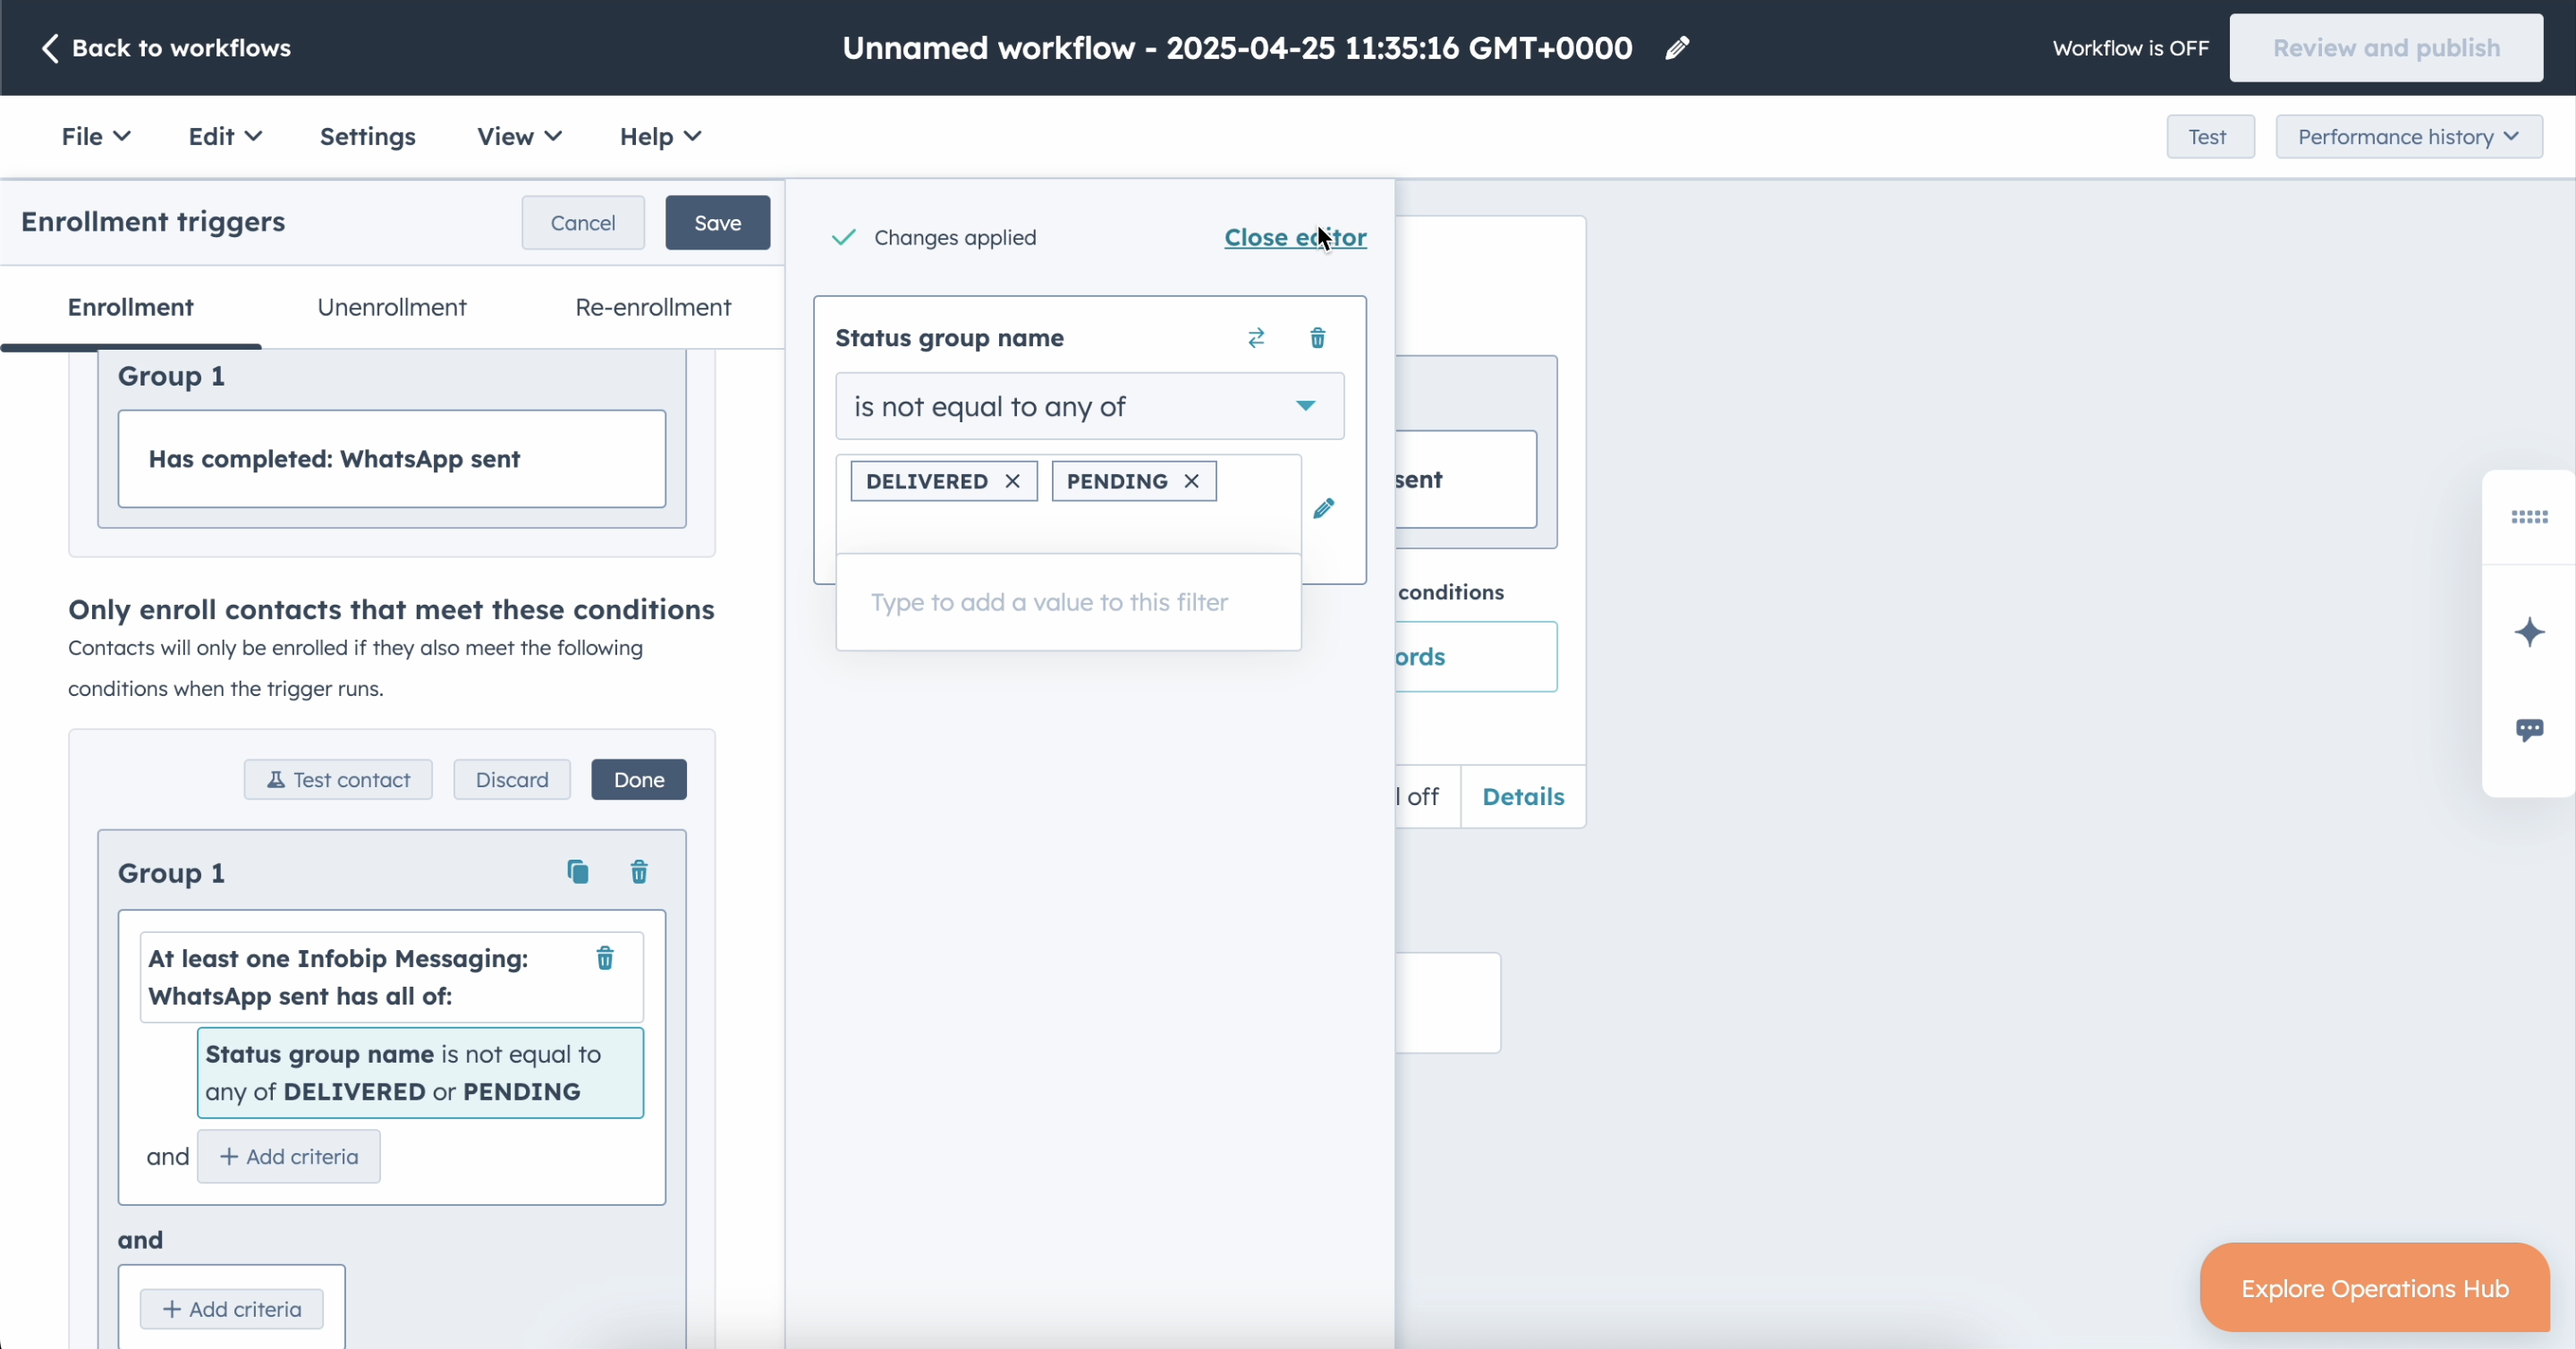
- Close the editor and save it again.
- Now when the trigger enrollment is set up, select the + button and choose Infobip Messaging > Send SMS.
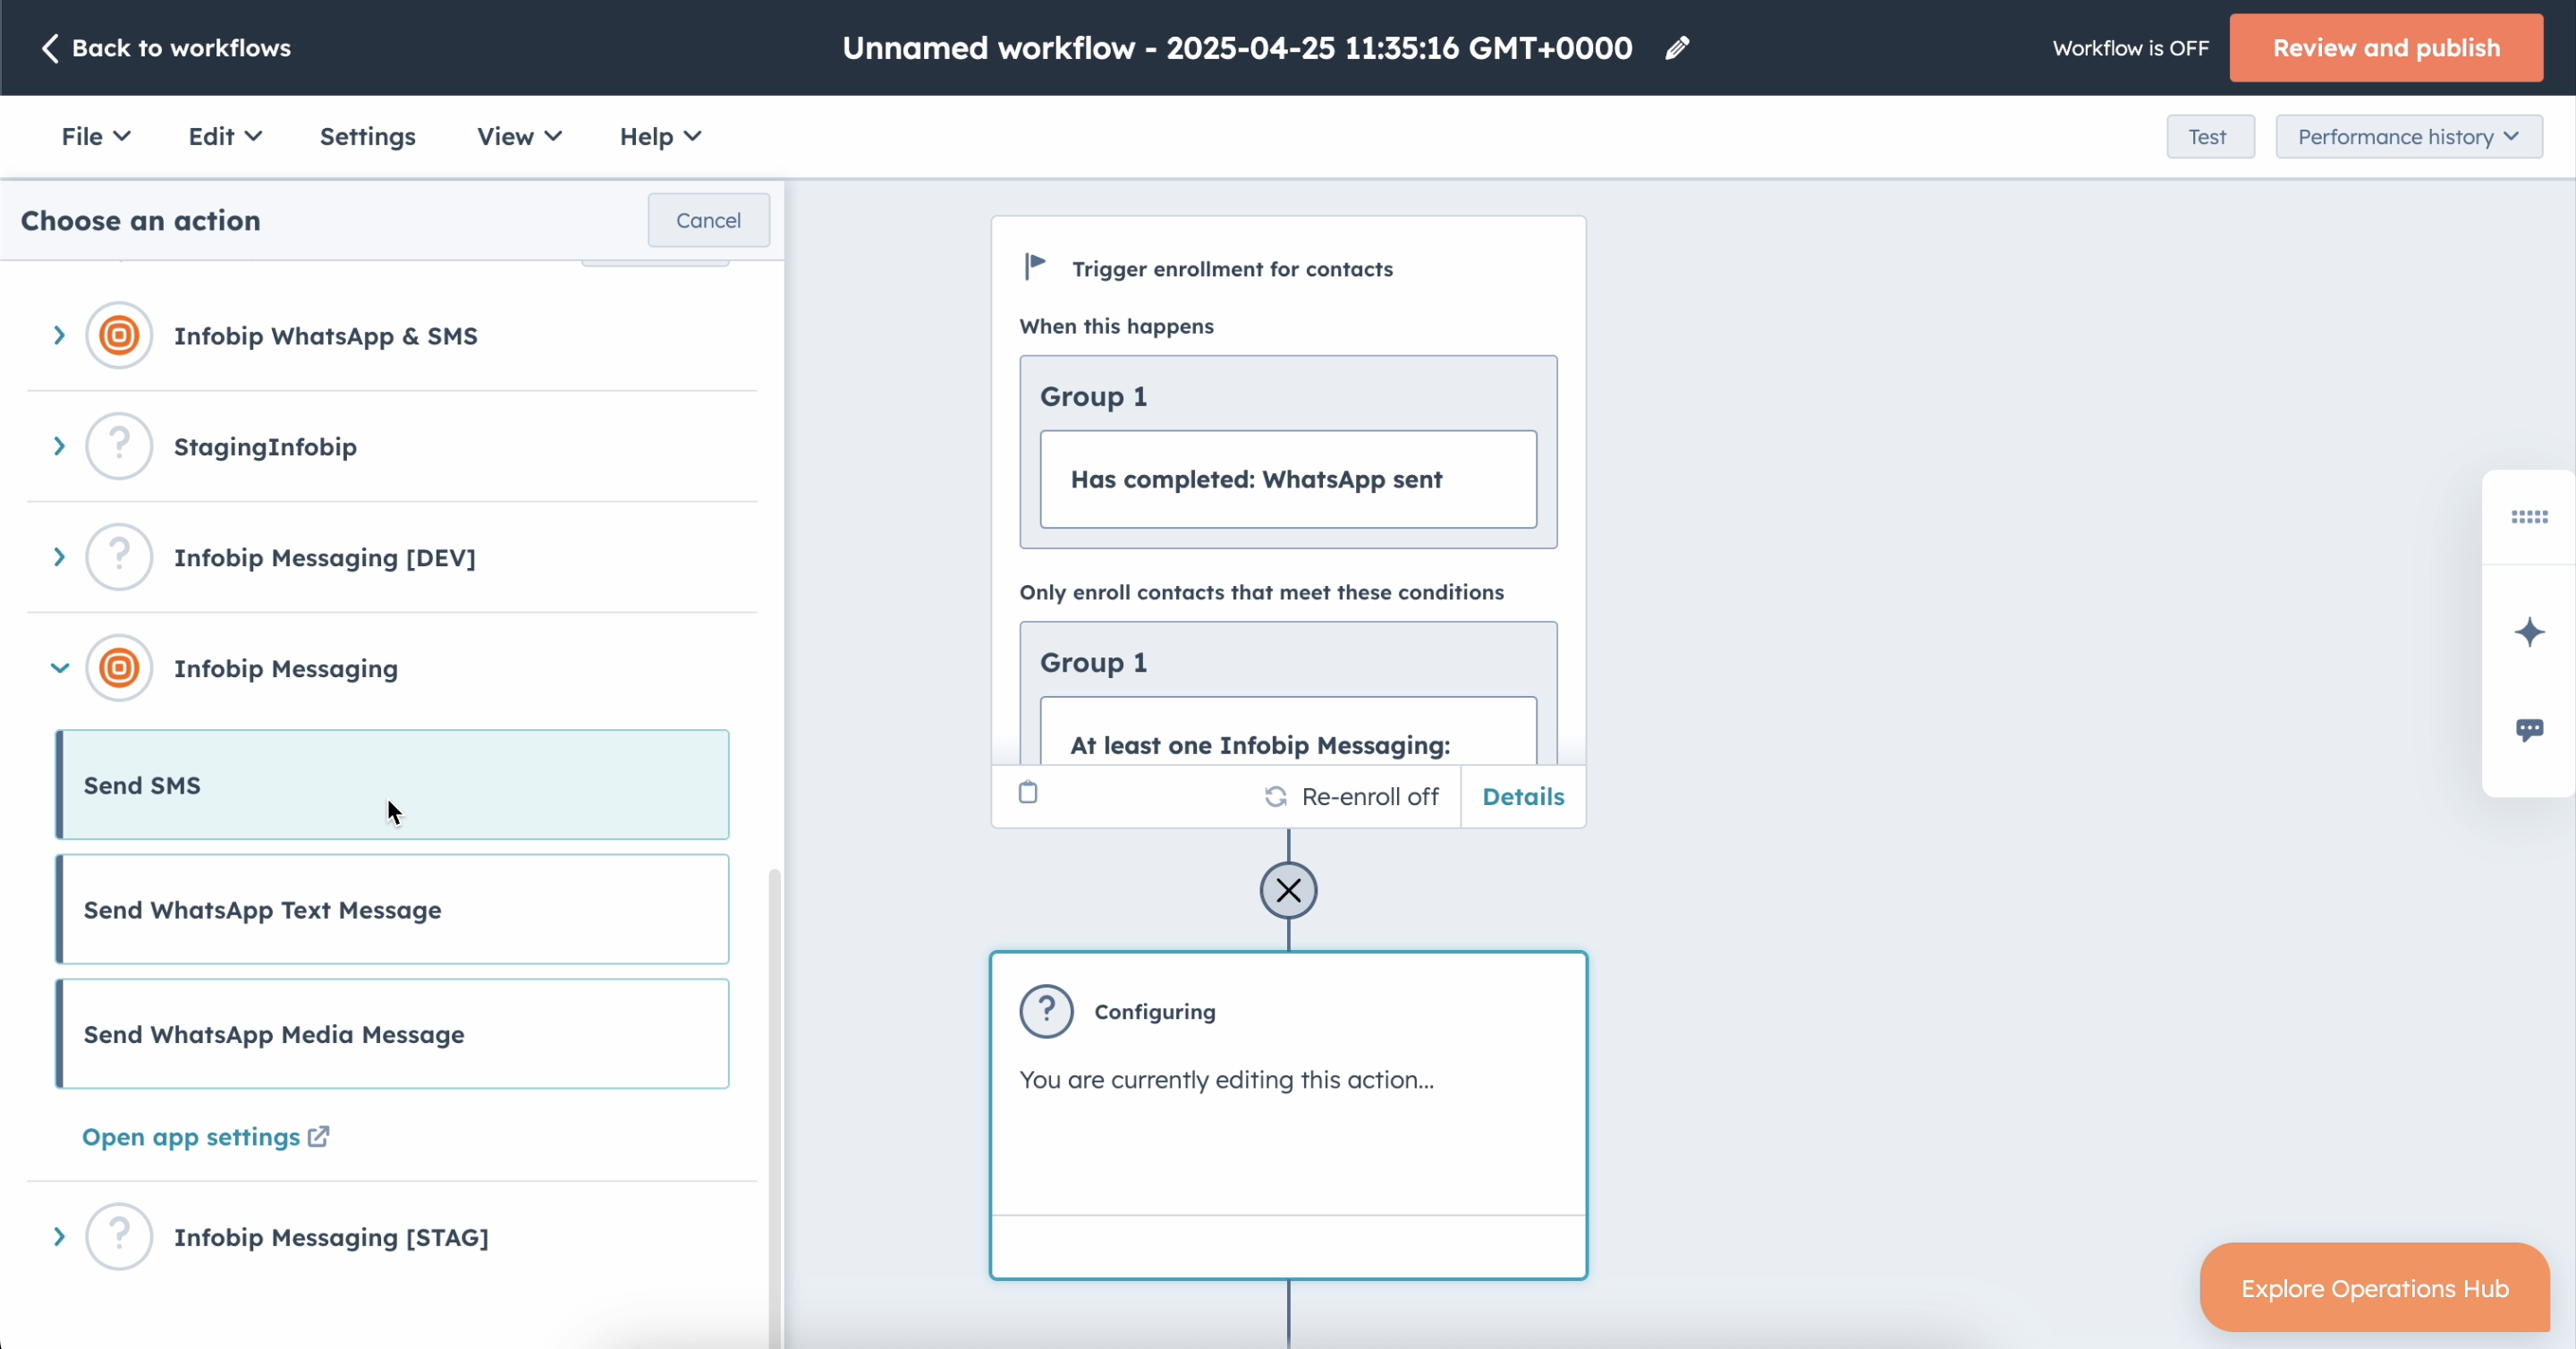
- Fill out the values as you would for the regular SMS sending process and select Save.
- Select Review and publish to activate the workflow.
Send Viber Media message action
For the Send Viber Media message action, firstly, you need to create a Viber template before you add the action in the workflow.
Create a Viber template
Before you add the Viber message action into the workflow, you need to create a Viber template in the Template Builder. For more information about creating the template, see Template Builder.
Add the Viber action in Workflows
In Workflows, add the Send Viber Business Message action:
- Choose the account (sender) you want to send a message from and recipient number.
- In the next fields, configure the template and number of parameters.

- After completing the fields and creating the workflow, select Review and publish in the top right corner. The panel on the right will appear and you see workflow step.
- Select Next, and then on the last step, select Turn on workflow to publish your workflow.
- To enable URL Shortening, select the Shorten URLs option. Additionally, if you want to use a custom domain and you have registered it with Infobip, you can add it to the domain for the URL Shortening field. If it is left empty, one of the default domains will be used.
Send RCS Media message action
For the Send RCS Media message action, firstly, you need to create an RCS template before you add the action in the workflow.
Create RCS template
Before you add the RCS message action into the workflow, you need to create a RCS template in the Template Builder. For more information about creating the template, see Template Builder.
Add the RCS action in Workflows
In Workflows, add the Send RCS Message action:
- Choose the account (sender) you want to send a message from and the recipient number.
- In the next fields, configure the template and the number of parameters.
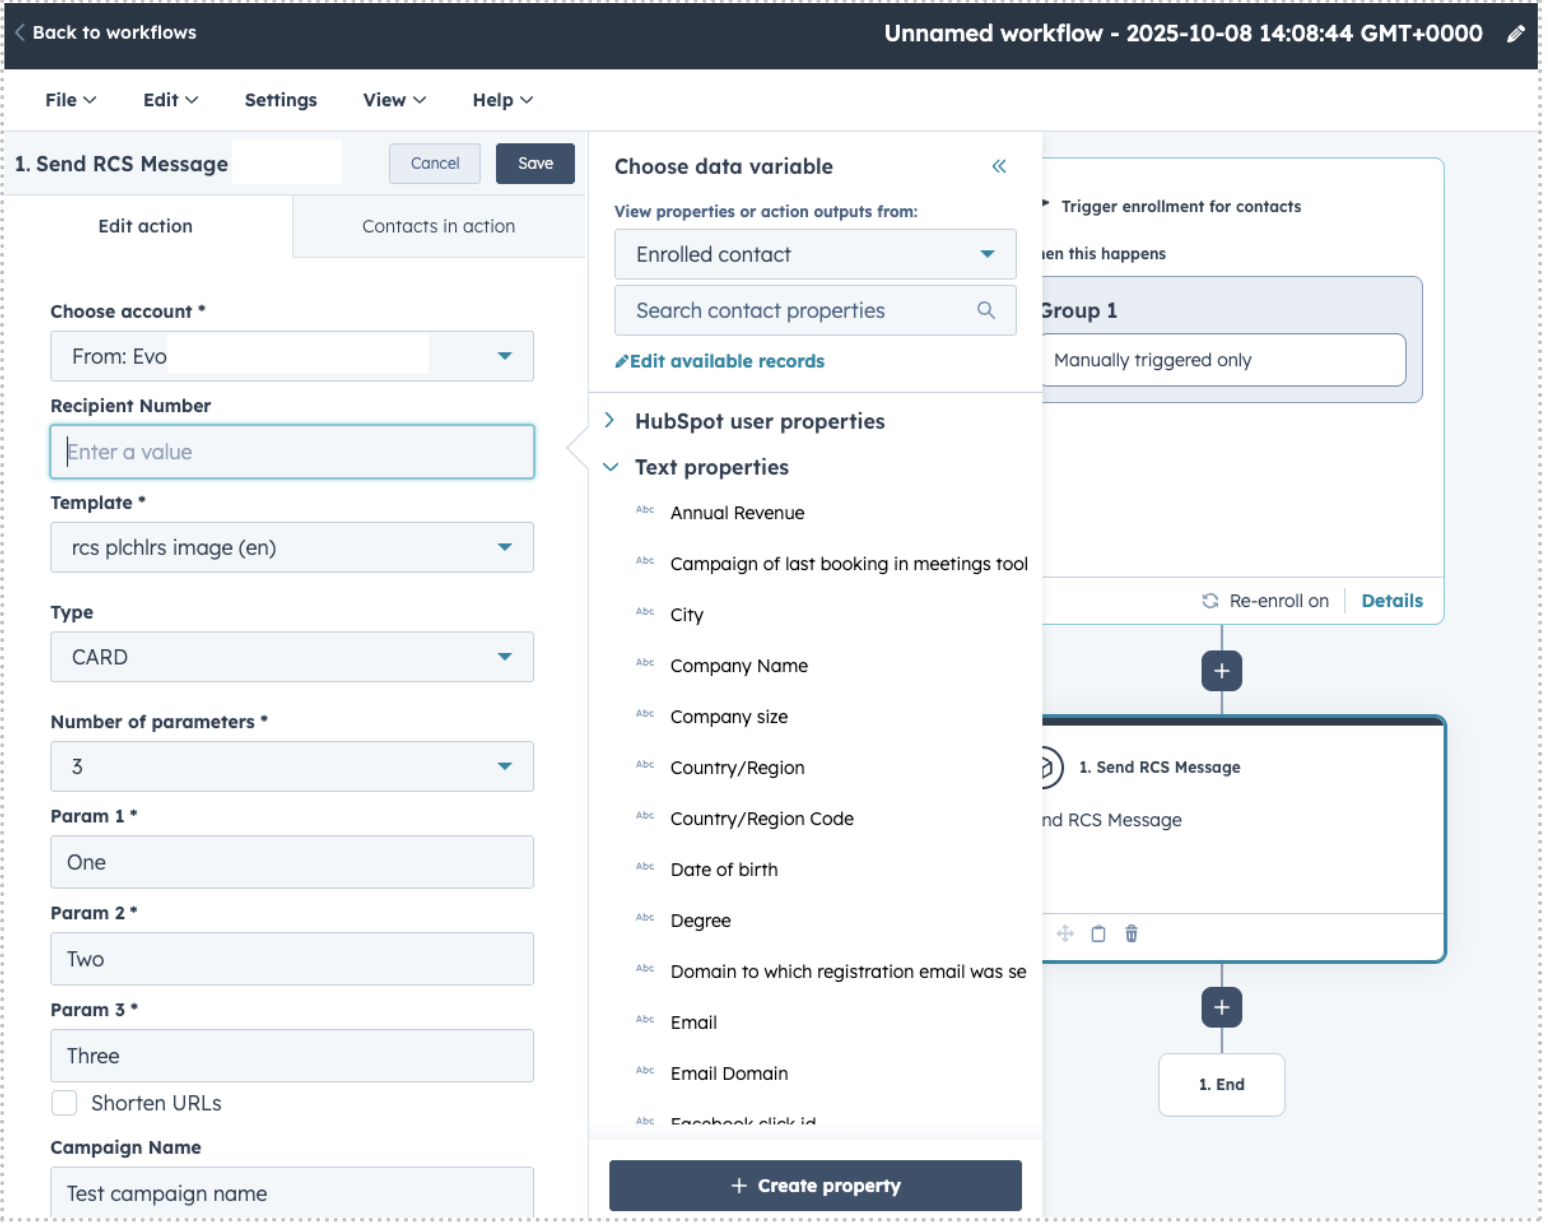
- After completing the fields and creating the workflow, select Review and publish in the top right corner. The panel on the right will appear and you see workflow step.
- Select Next, and then on the last step, select Turn on workflow to publish your workflow.
- To enable URL Shortening, select the Shorten URLs option. Additionally, if you want to use a custom domain and you have registered it with Infobip, you can add it to the domain for the URL Shortening field. If it is left empty, one of the default domains will be used.
Additional action options
The following additional options are available for the actions:
- URL shortening
- Regional options
URL shortening [#url-shortening-additional-action-options]
To enable URL shortening, select the Shorten URLs option. URL shortening is available for all actions.
Additionally, if you want to use a custom domain and you have registered it with Infobip, you can add it to the domain for the URL Shortening field. If it is left empty, one of the default domains will be used.
See the URL shortening documentation for more information.
Regional options [#regional-options-additional-action-options]
When sending SMS messages to certain areas, some parameters are imposed by local law regulation. This is available for India (Distributed Ledger Technology (DLT) specific parameters) and Türkiye (IYS).
To enable the regional settings:
- Select the Regional Options checkbox.
- Add the required information.
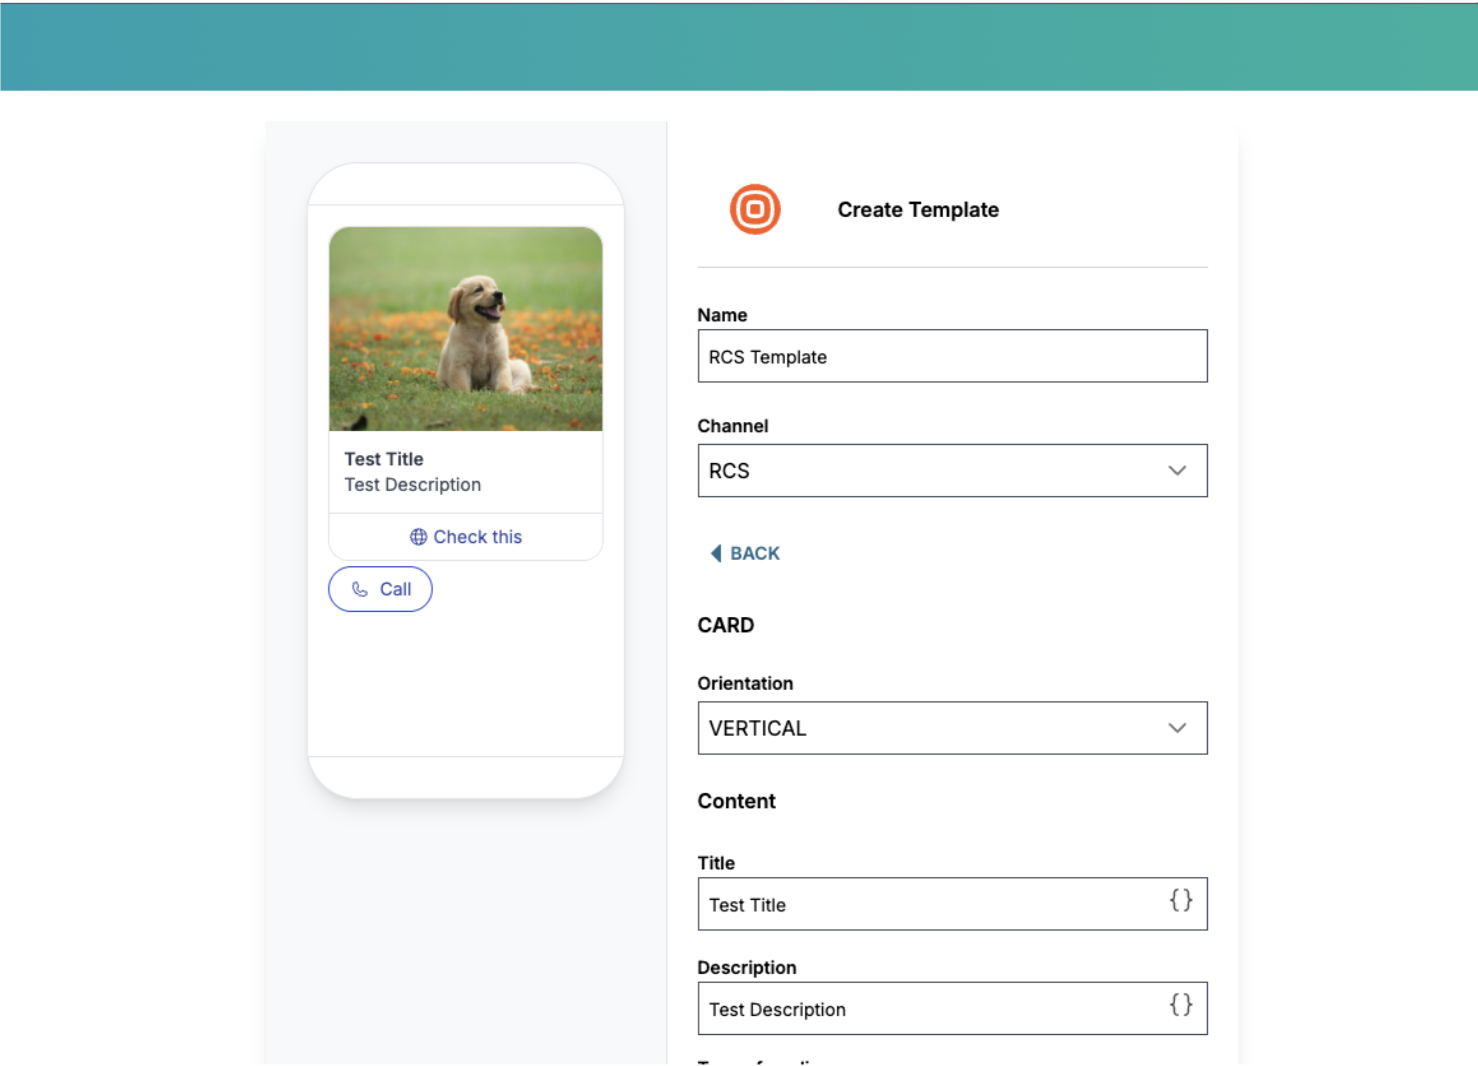
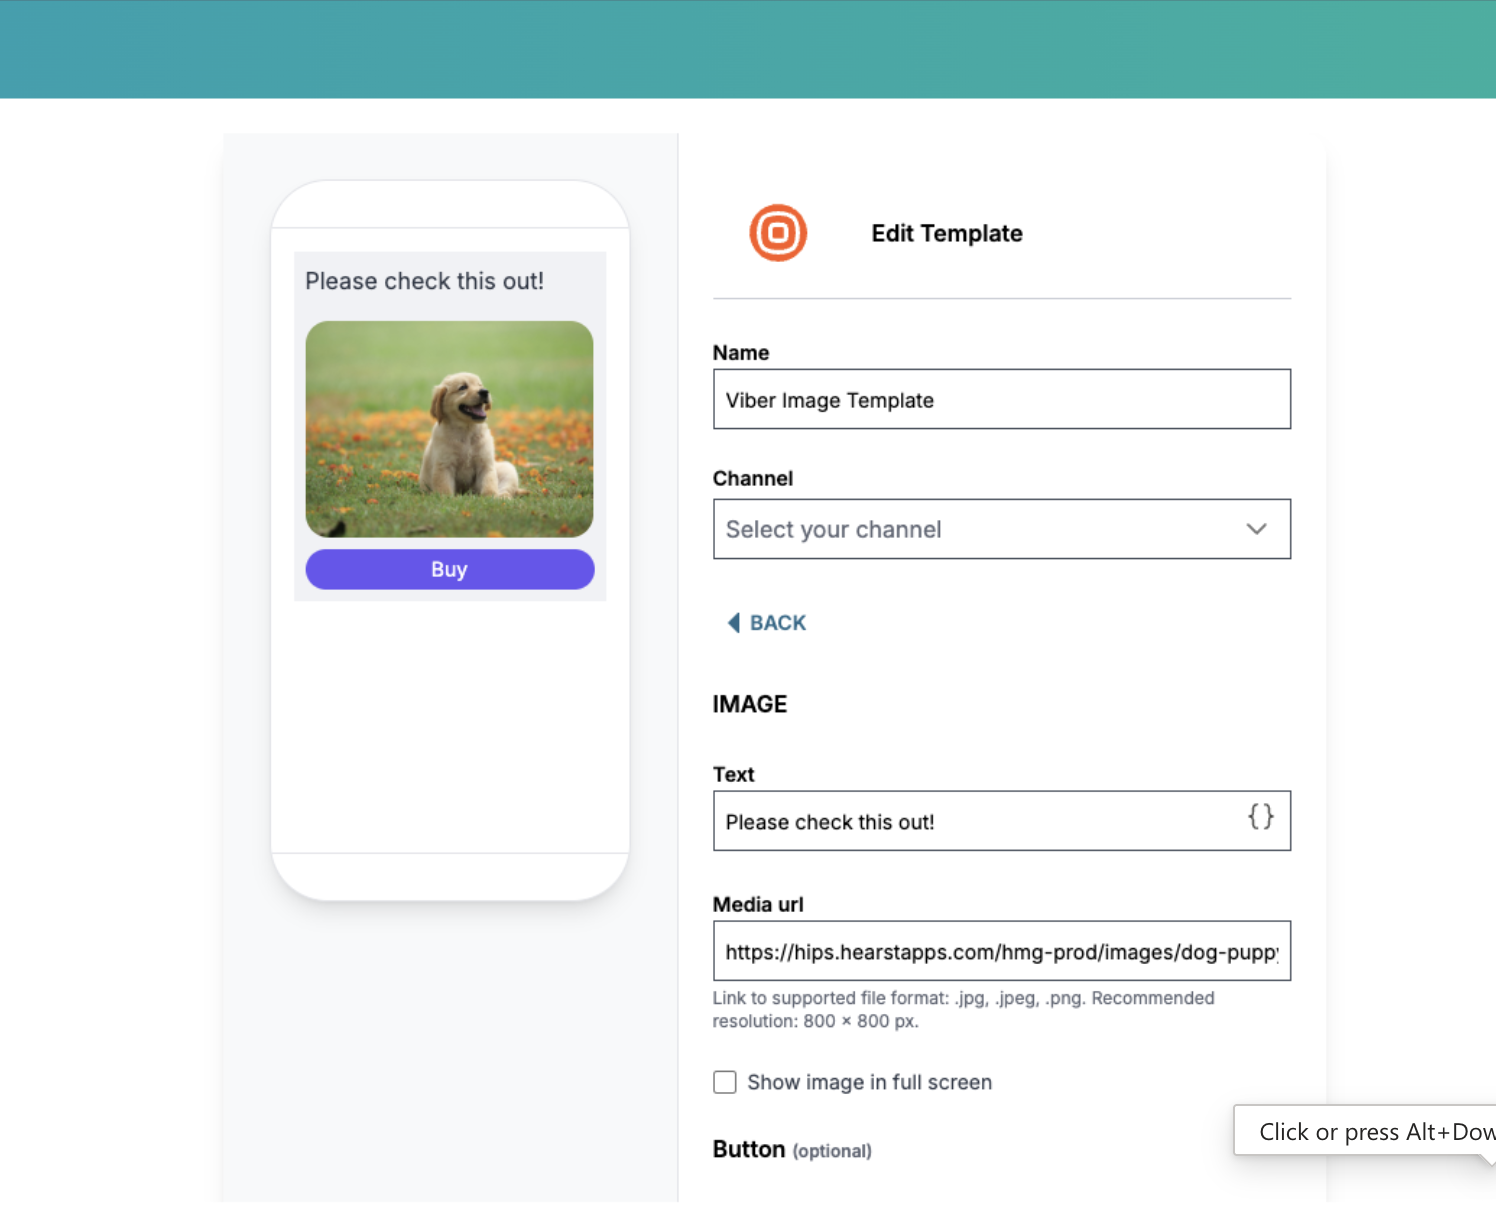
Template Builder
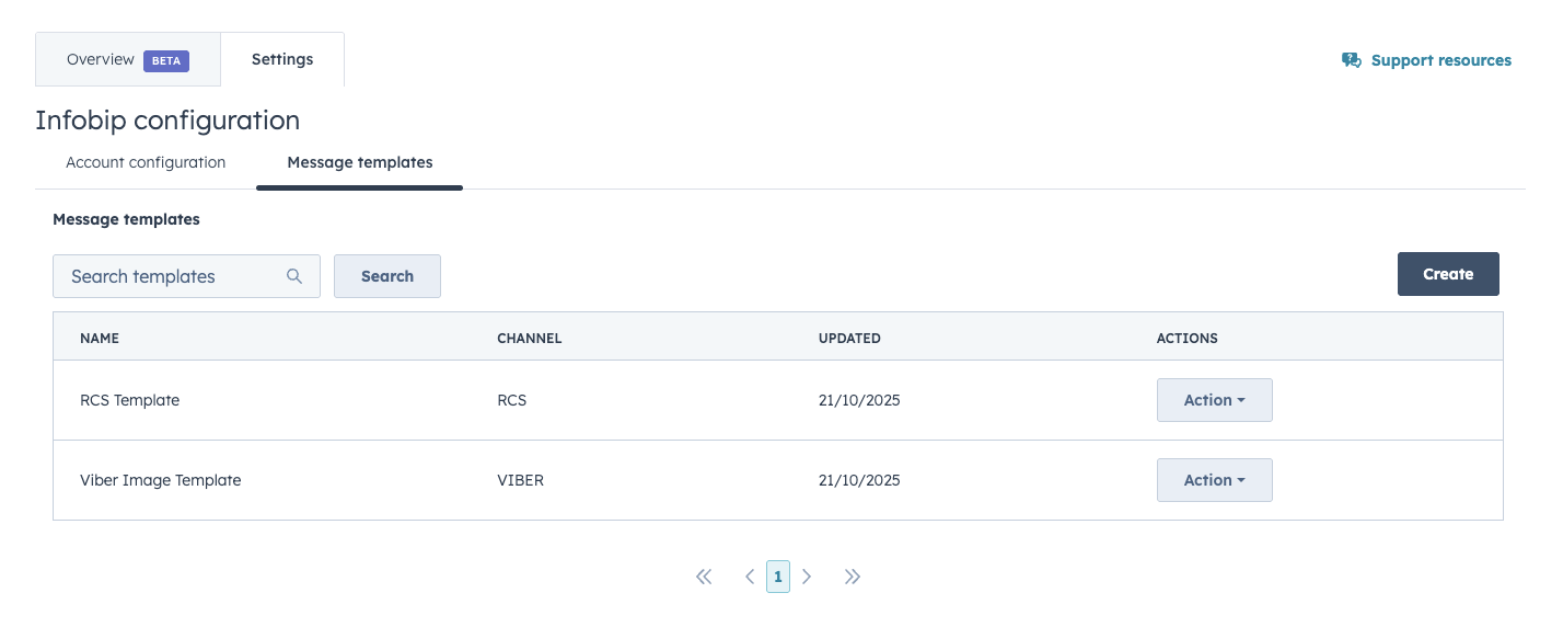
For Viber and RCS workflows, you need to create templates. You can use the Template Builder to assist you with the templates.
On the Infobip Configuration page, the Message templates tab shows the list of existing templates, with options to create a new template, and an Action button, where you can edit and delete templates.
Create a new template
To create a new template:
- From the Message templates tab, select Create.
- Add a name for the template.
- Choose a channel (Viber or RCS).
- Select the corresponding template type.
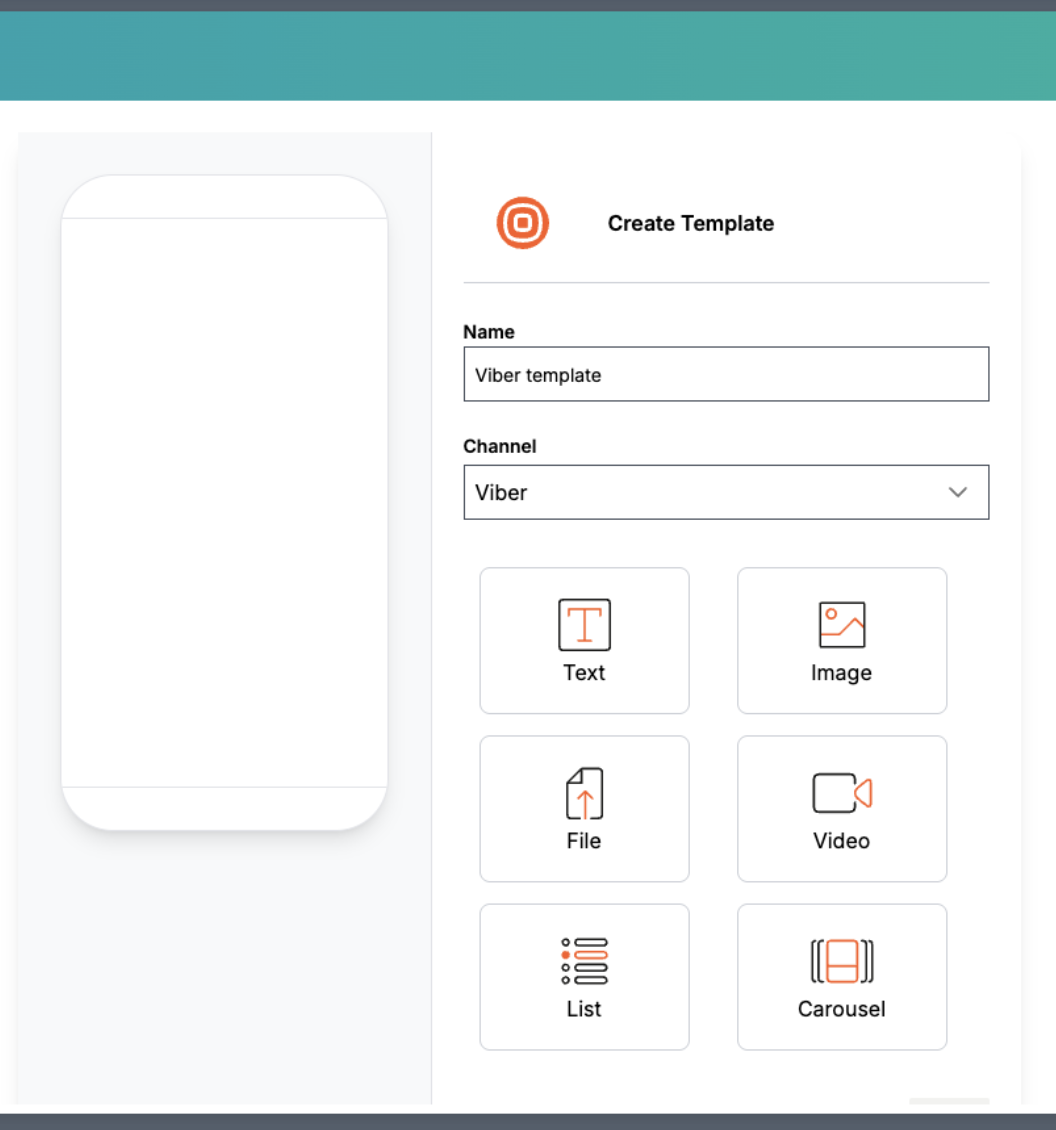
- A preview on the left displays how your template appears.
Edit a template
To edit an existing template:
- On the Message templates tab, locate the template from the list of existing templates.
- Select Edit from the Action drop-down list.
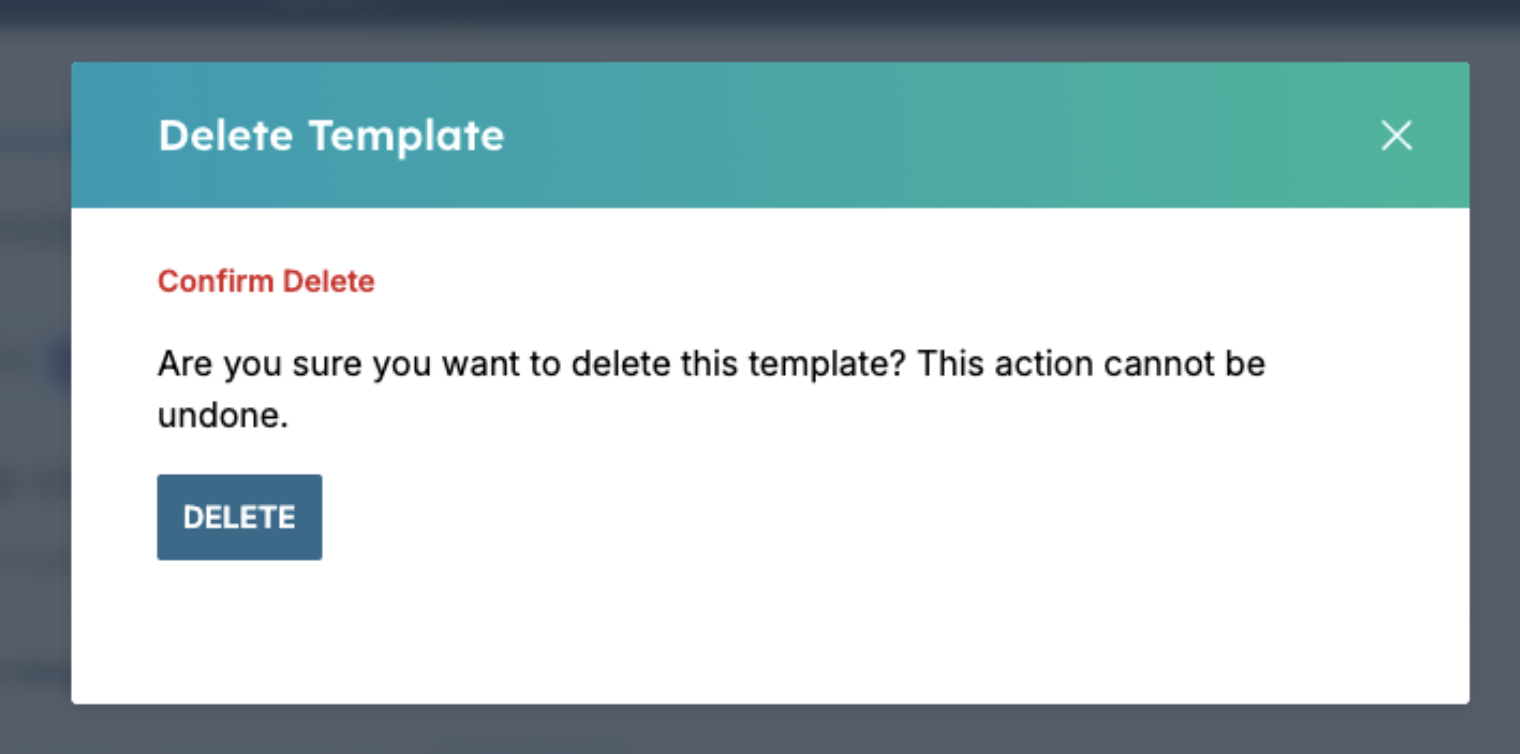
Delete a template
To delete an existing template:
- On the Message templates tab, locate the template from the list of existing templates.
- Select Delete from the Action drop-down list.
- Select Delete to confirm and delete the template.
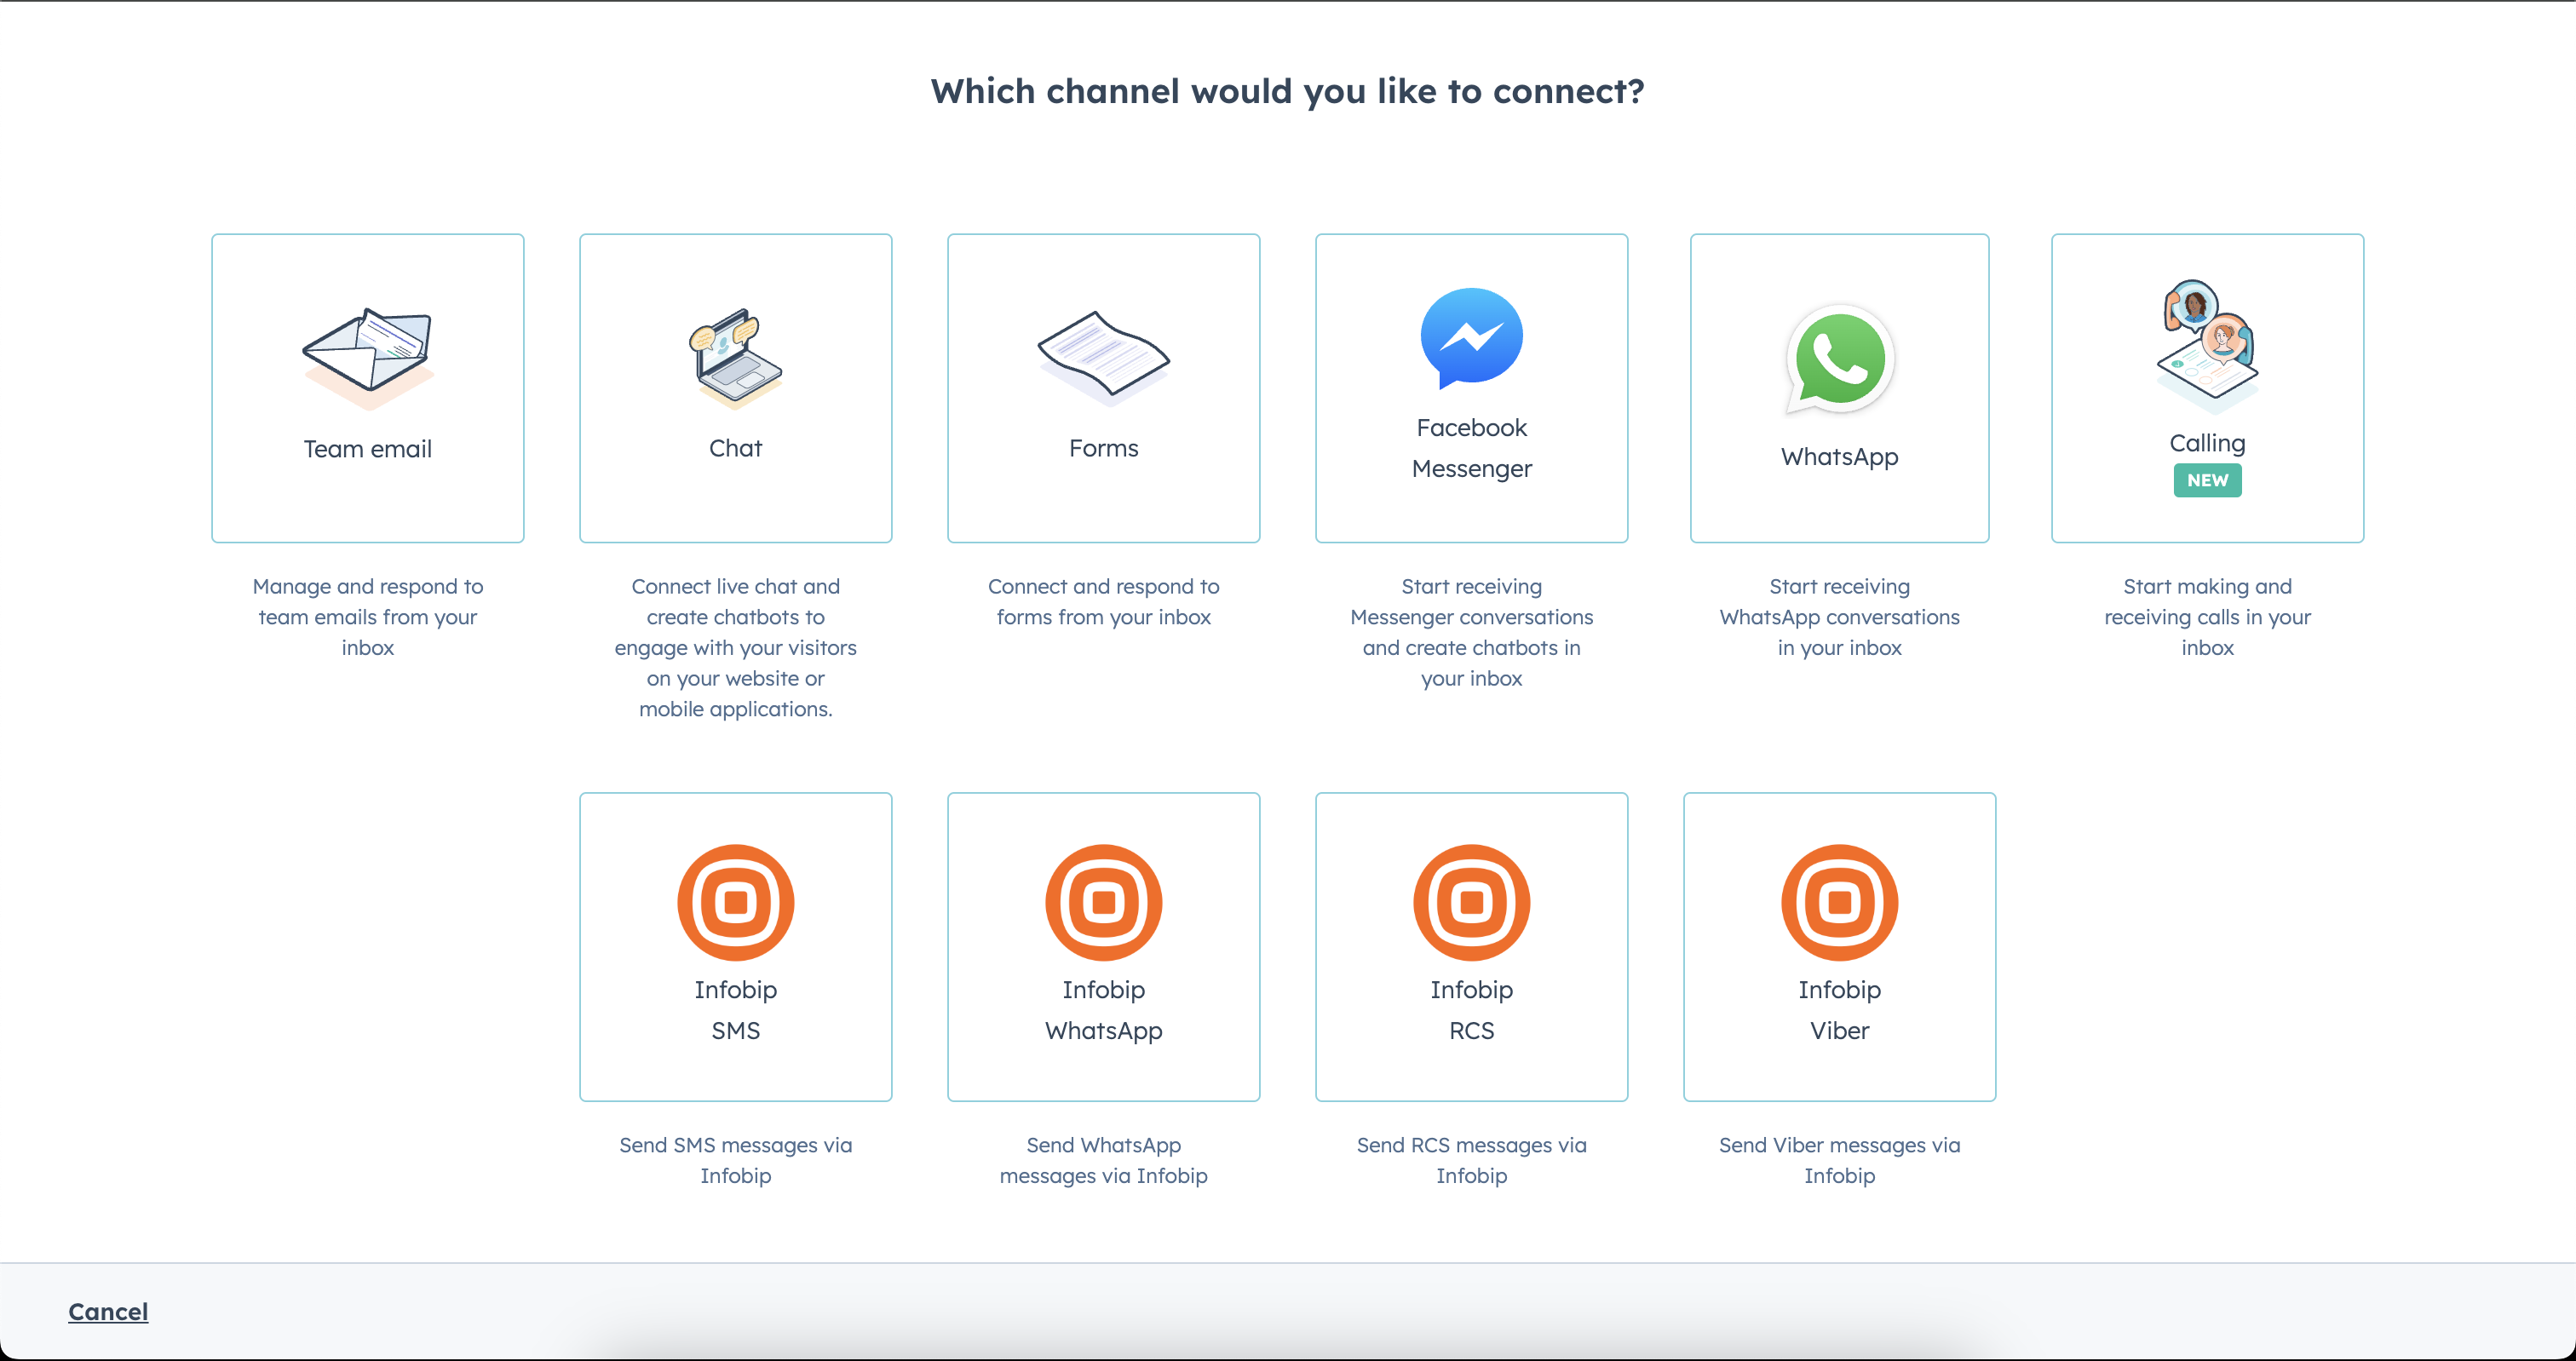
Inbox
You can create custom channels to build a bridge between an external message service and the HubSpot inbox or help desk features. You can then publish your custom channel app in the HubSpot App Marketplace for other HubSpot admins to install and use in their own accounts.
This also connects custom communication channels and HubSpot contacts. In previous versions of the application, CRM cards with custom dashboards were used for two-way messaging. Updates to messages were received as timeline events, which made them harder for agents to track.
Once a channel is registered inside a marketplace application, customers can install and enable it from a list.
Configure your inbox
You can configure your inbox when you want to connect to a custom channel, such as SMS, WhatsApp, RCS, and Viber.
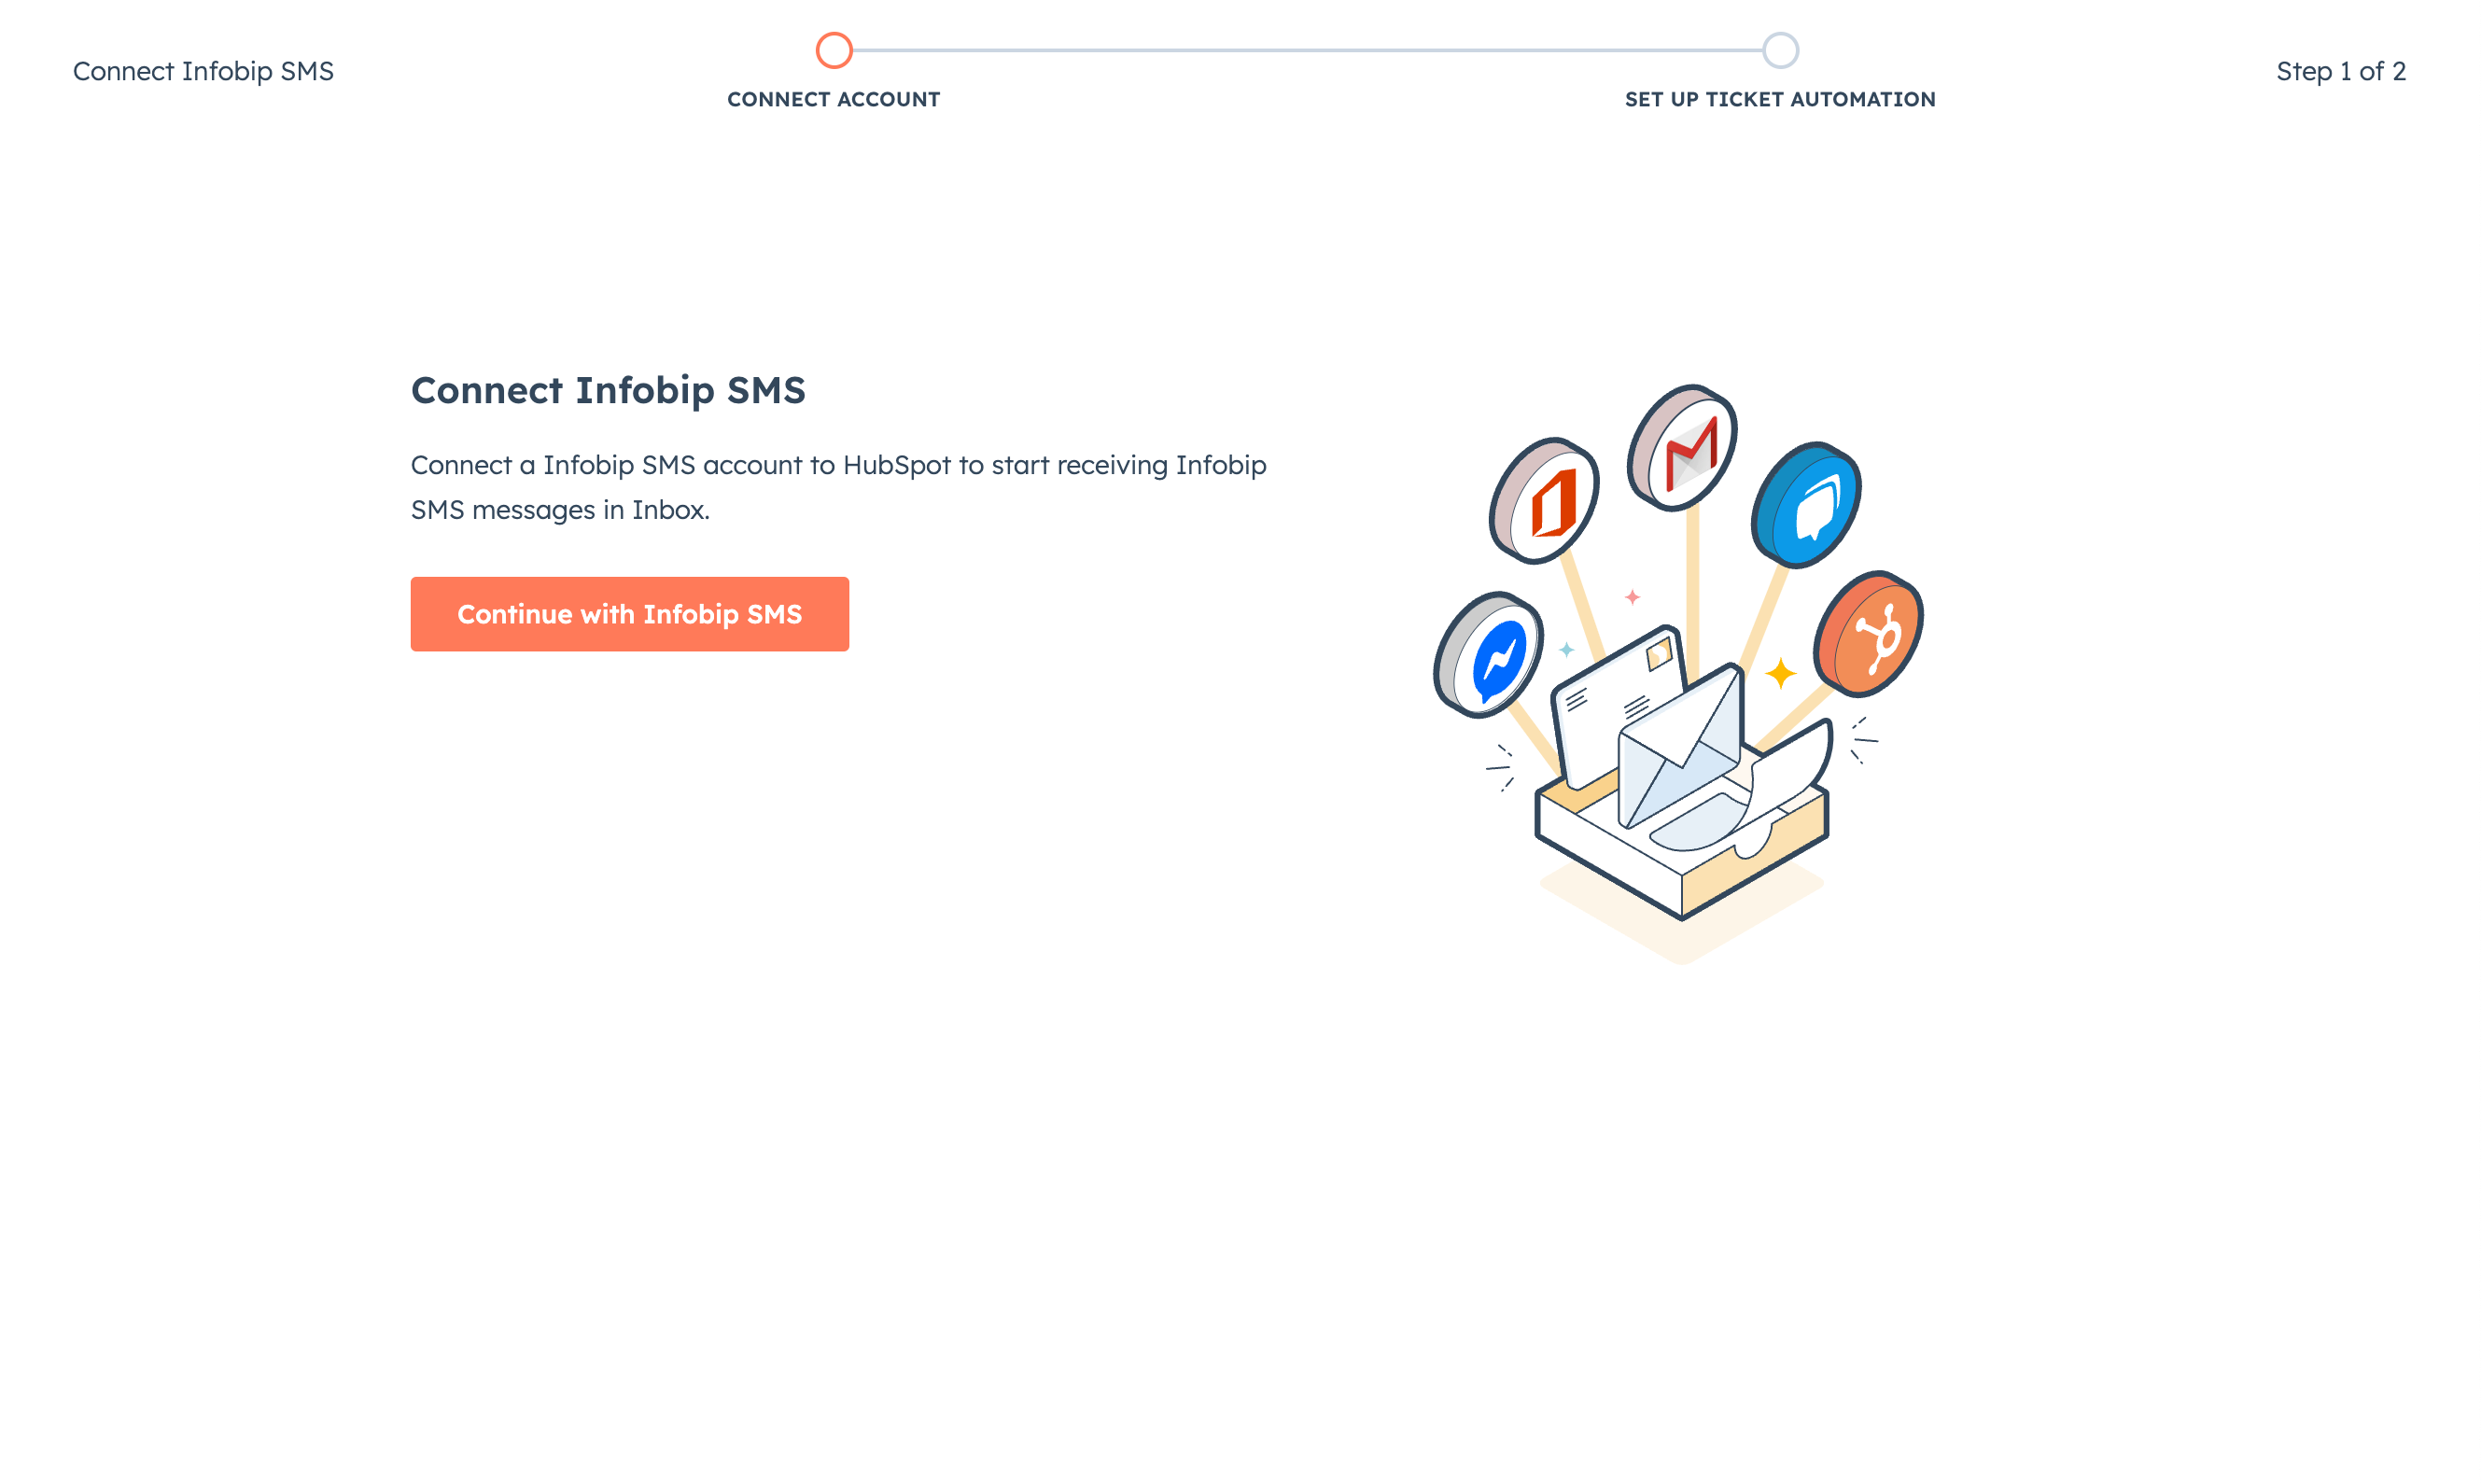
Select Connect Infobip [selected channel] to open the configuration and start the first step.
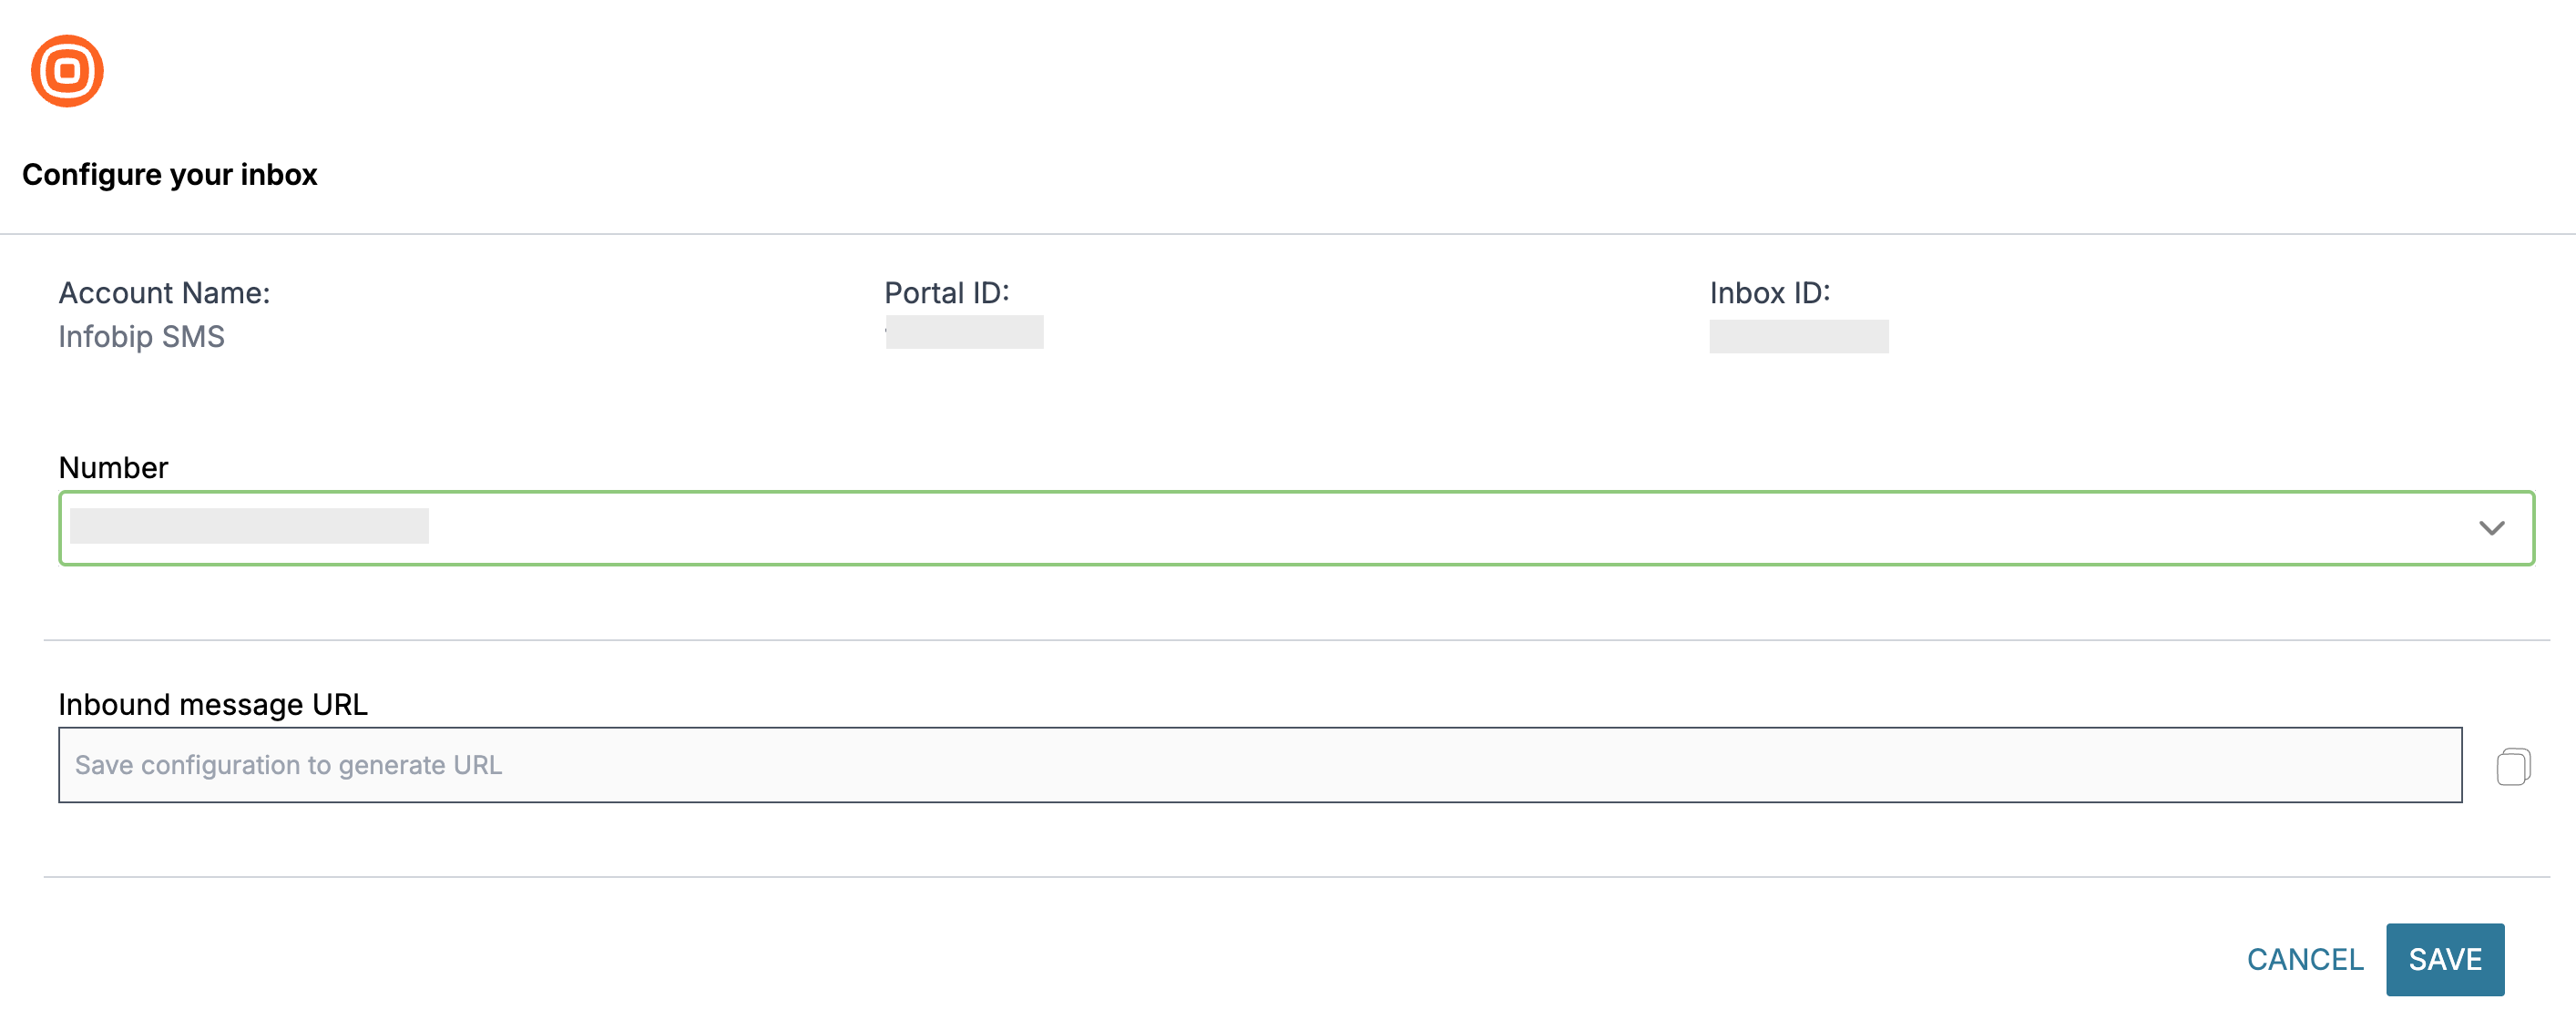
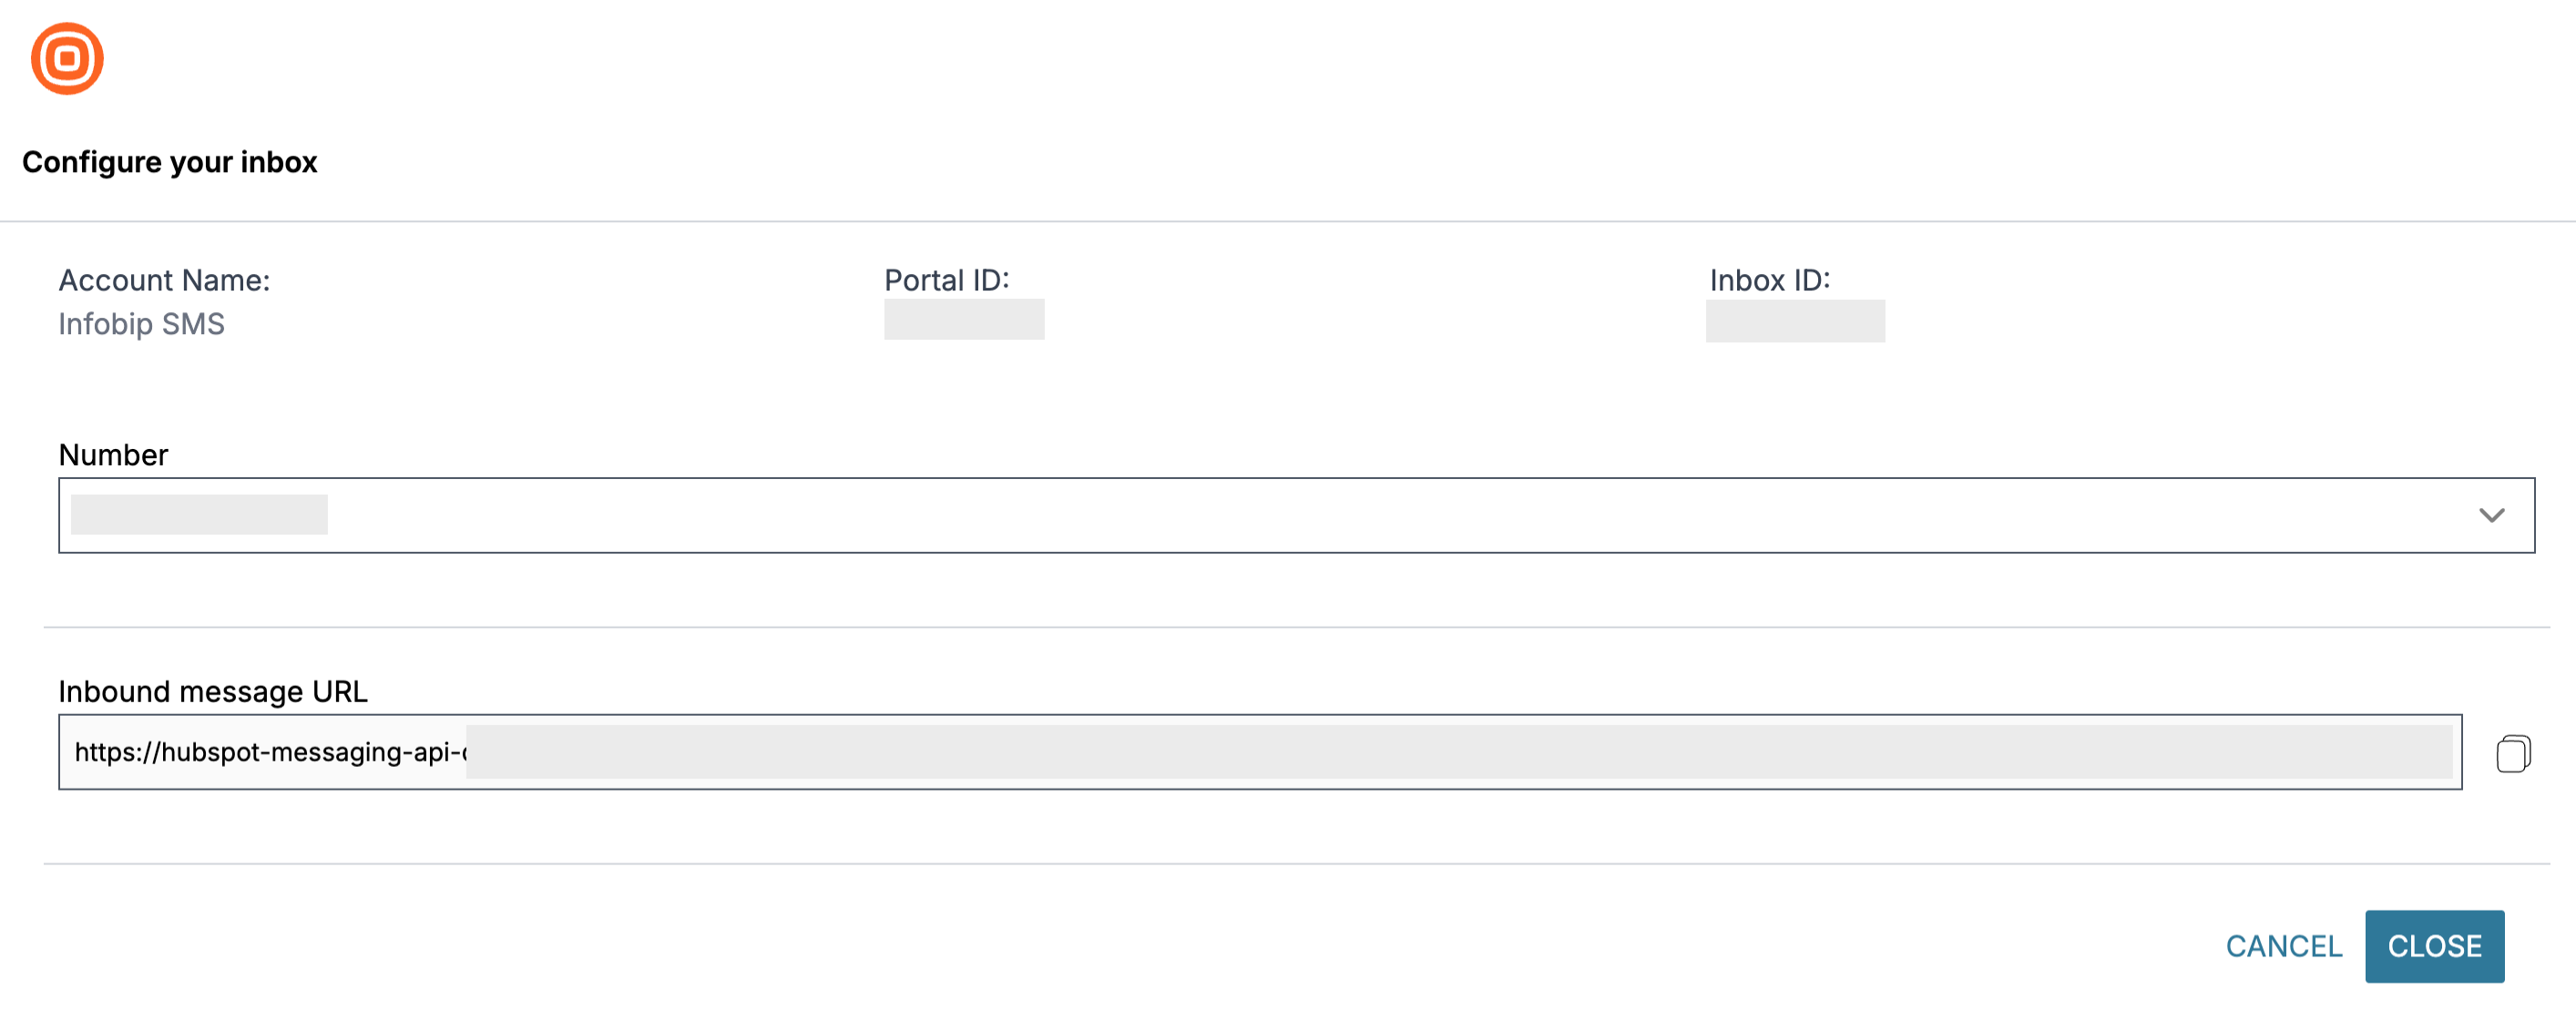
The Configure your inbox page displays the following information:
- Account Name
- Portal ID
- Inbox ID
Choose the channel you want to configure and select a number or sender accordingly.
- Dedicated numbers - If you choose a dedicated number, select Save to generate the URL. When the URL appears, select Close and go to the next step.
- Shared numbers - If you choose a shared number, select Save to generate the URL. Then copy the generated URL and go to your Infobip account.
On the Infobip web interface:
- Go to Channels and Numbers > Numbers.
- Select the same number that you chose in the configuration.
- Choose the channel on which you want to use your number.
- For keyword configuration, select the keyword you want to configure and select the three dots on the right to Edit.
- Paste the generated URL from the configuration setup and make sure that Renderer is the same as the following image:
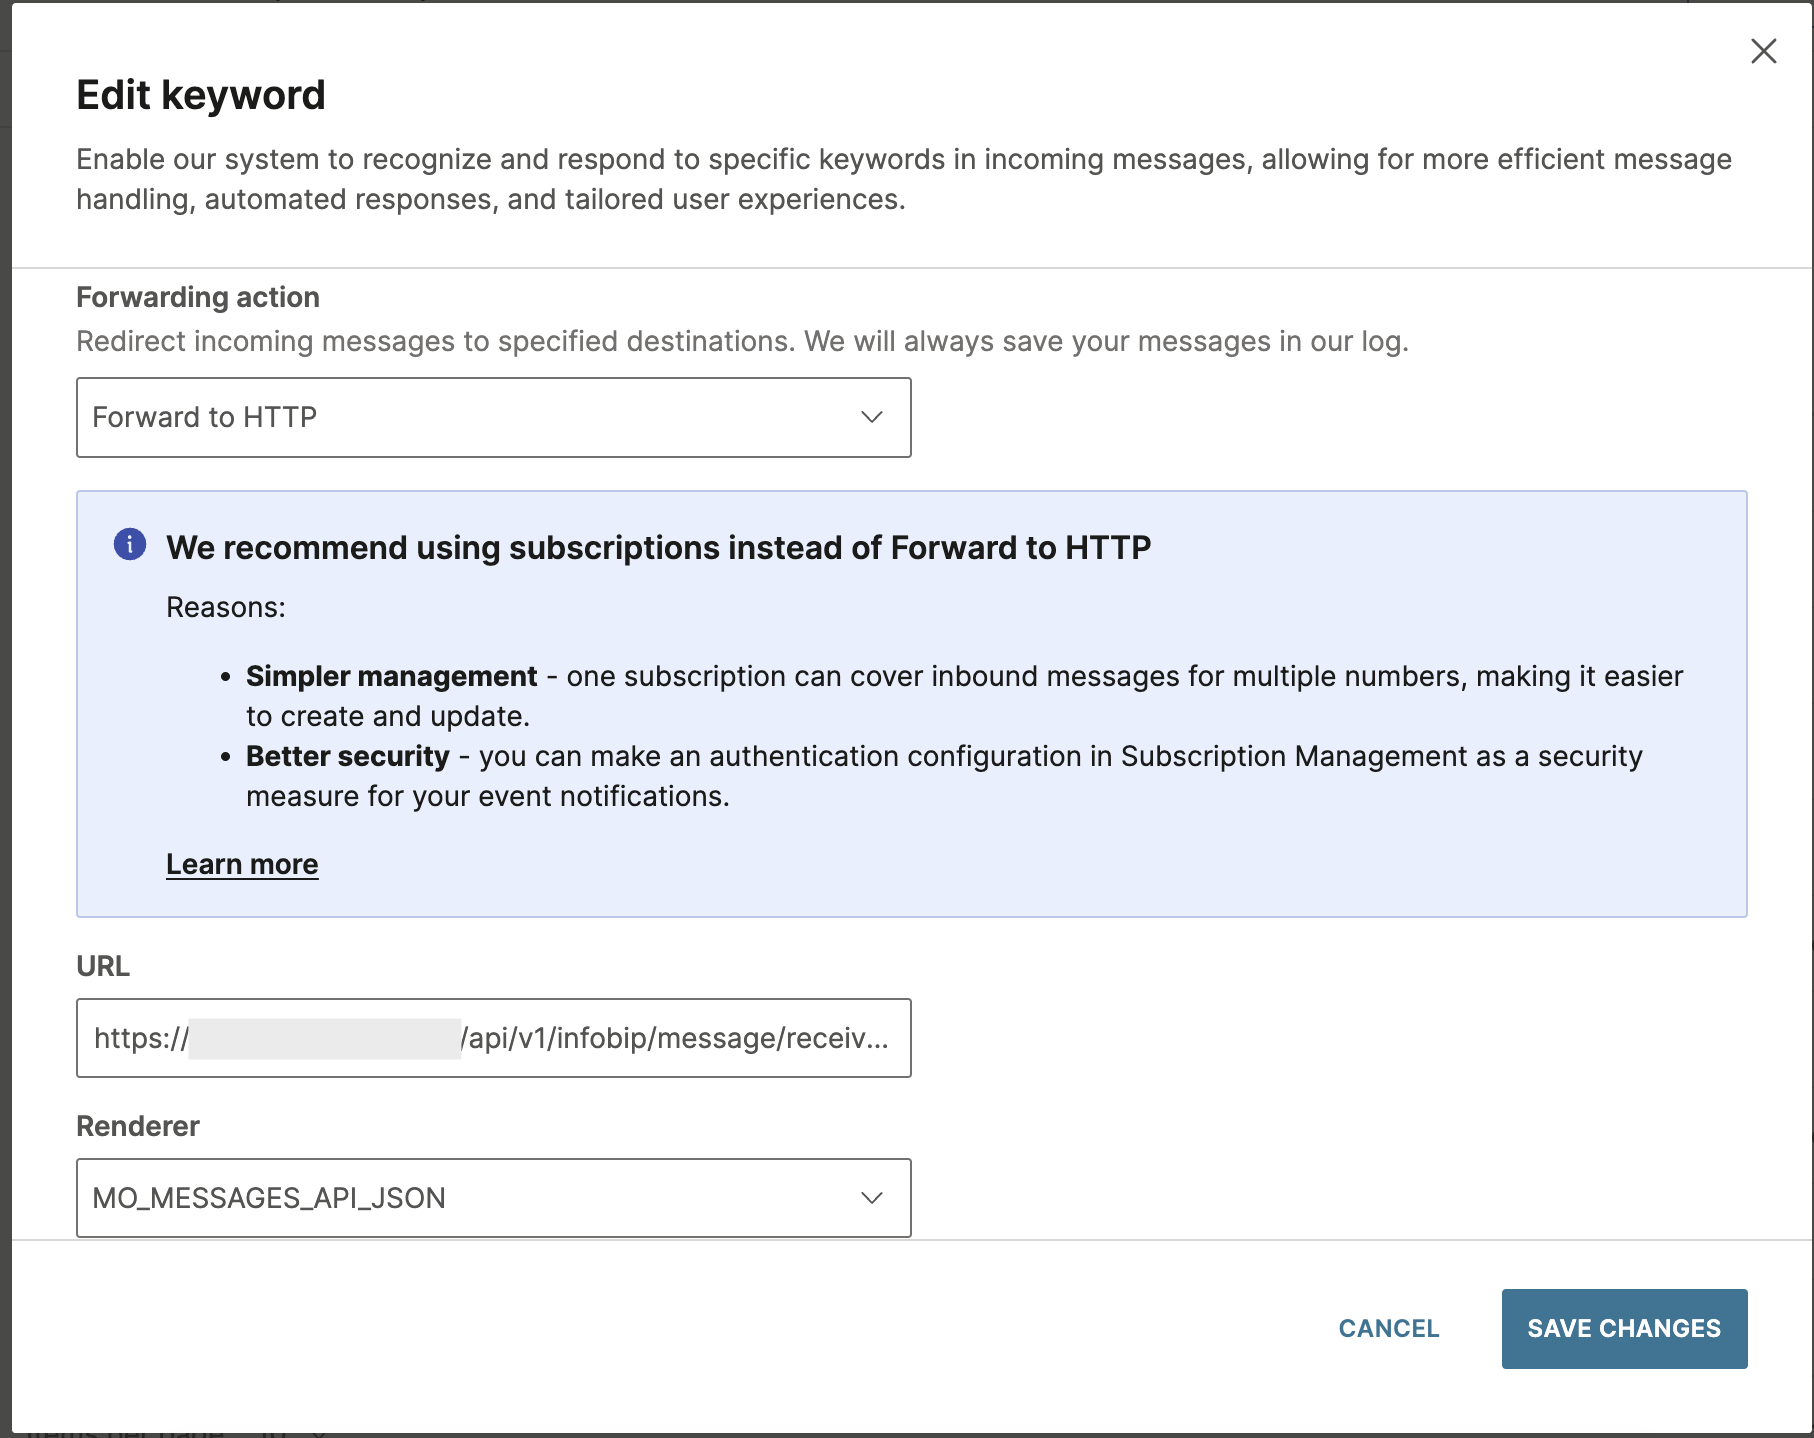
- Select Save Changes and go back to the Inbox Configuration tab.
- Select Close.
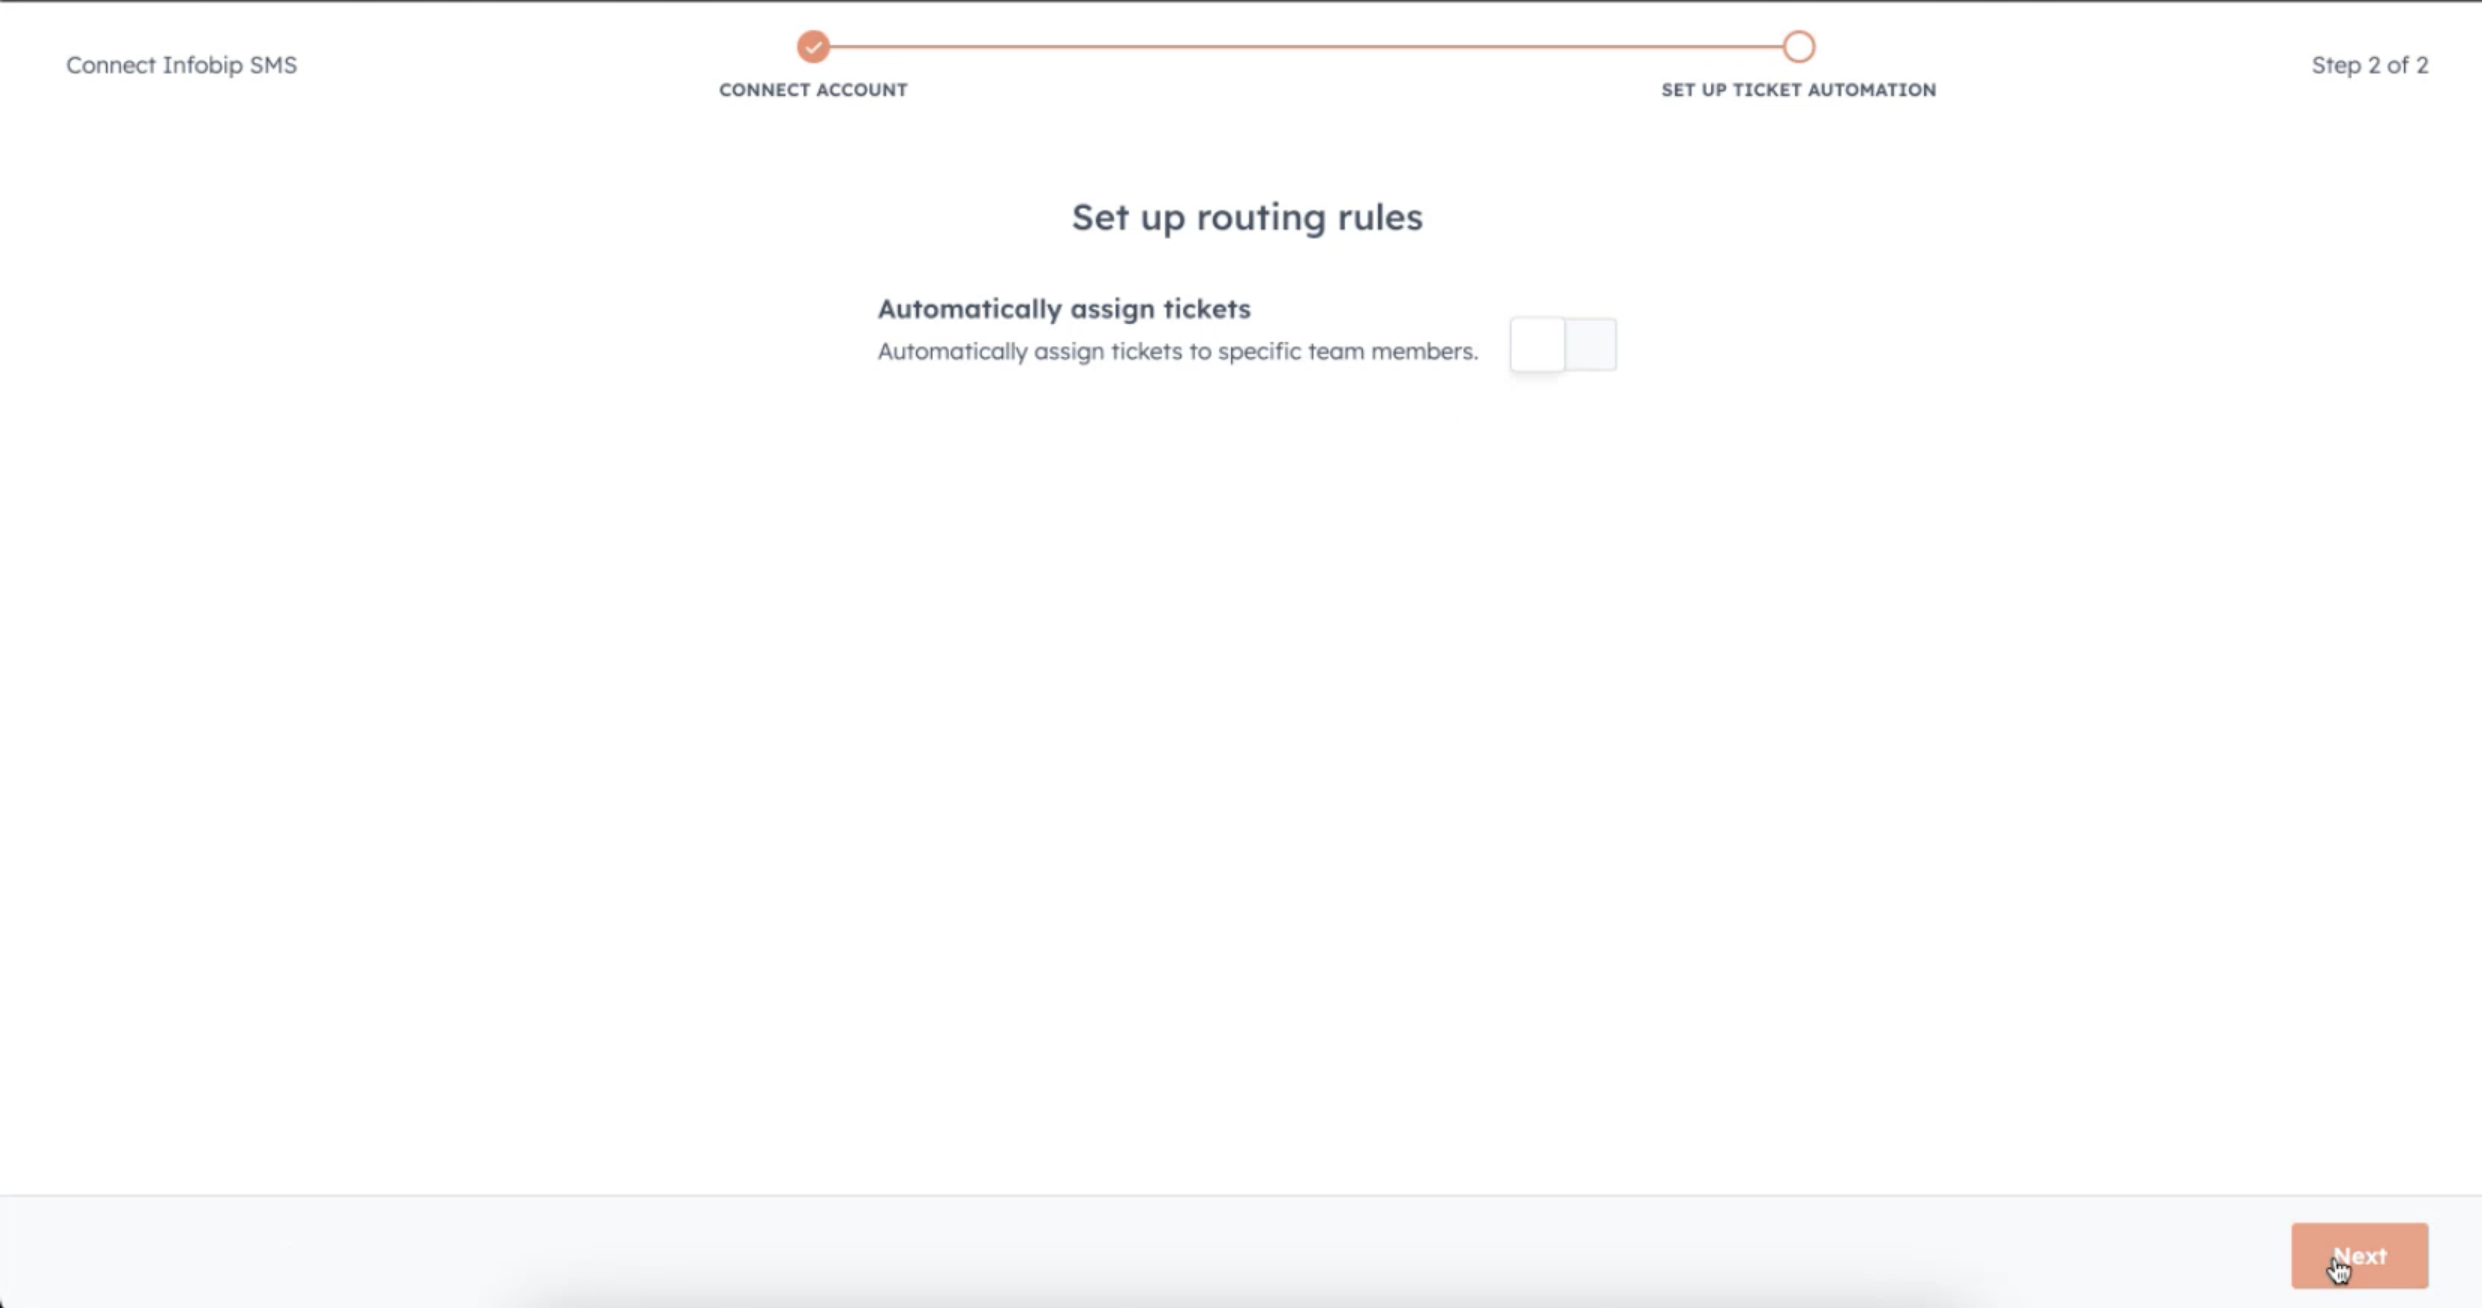
Set up ticket automation
The second step lets you automate ticket assigning. When you have set up ticket automation to specific team members, select Next.
You have now finished the configuration and your inbox is ready to use.
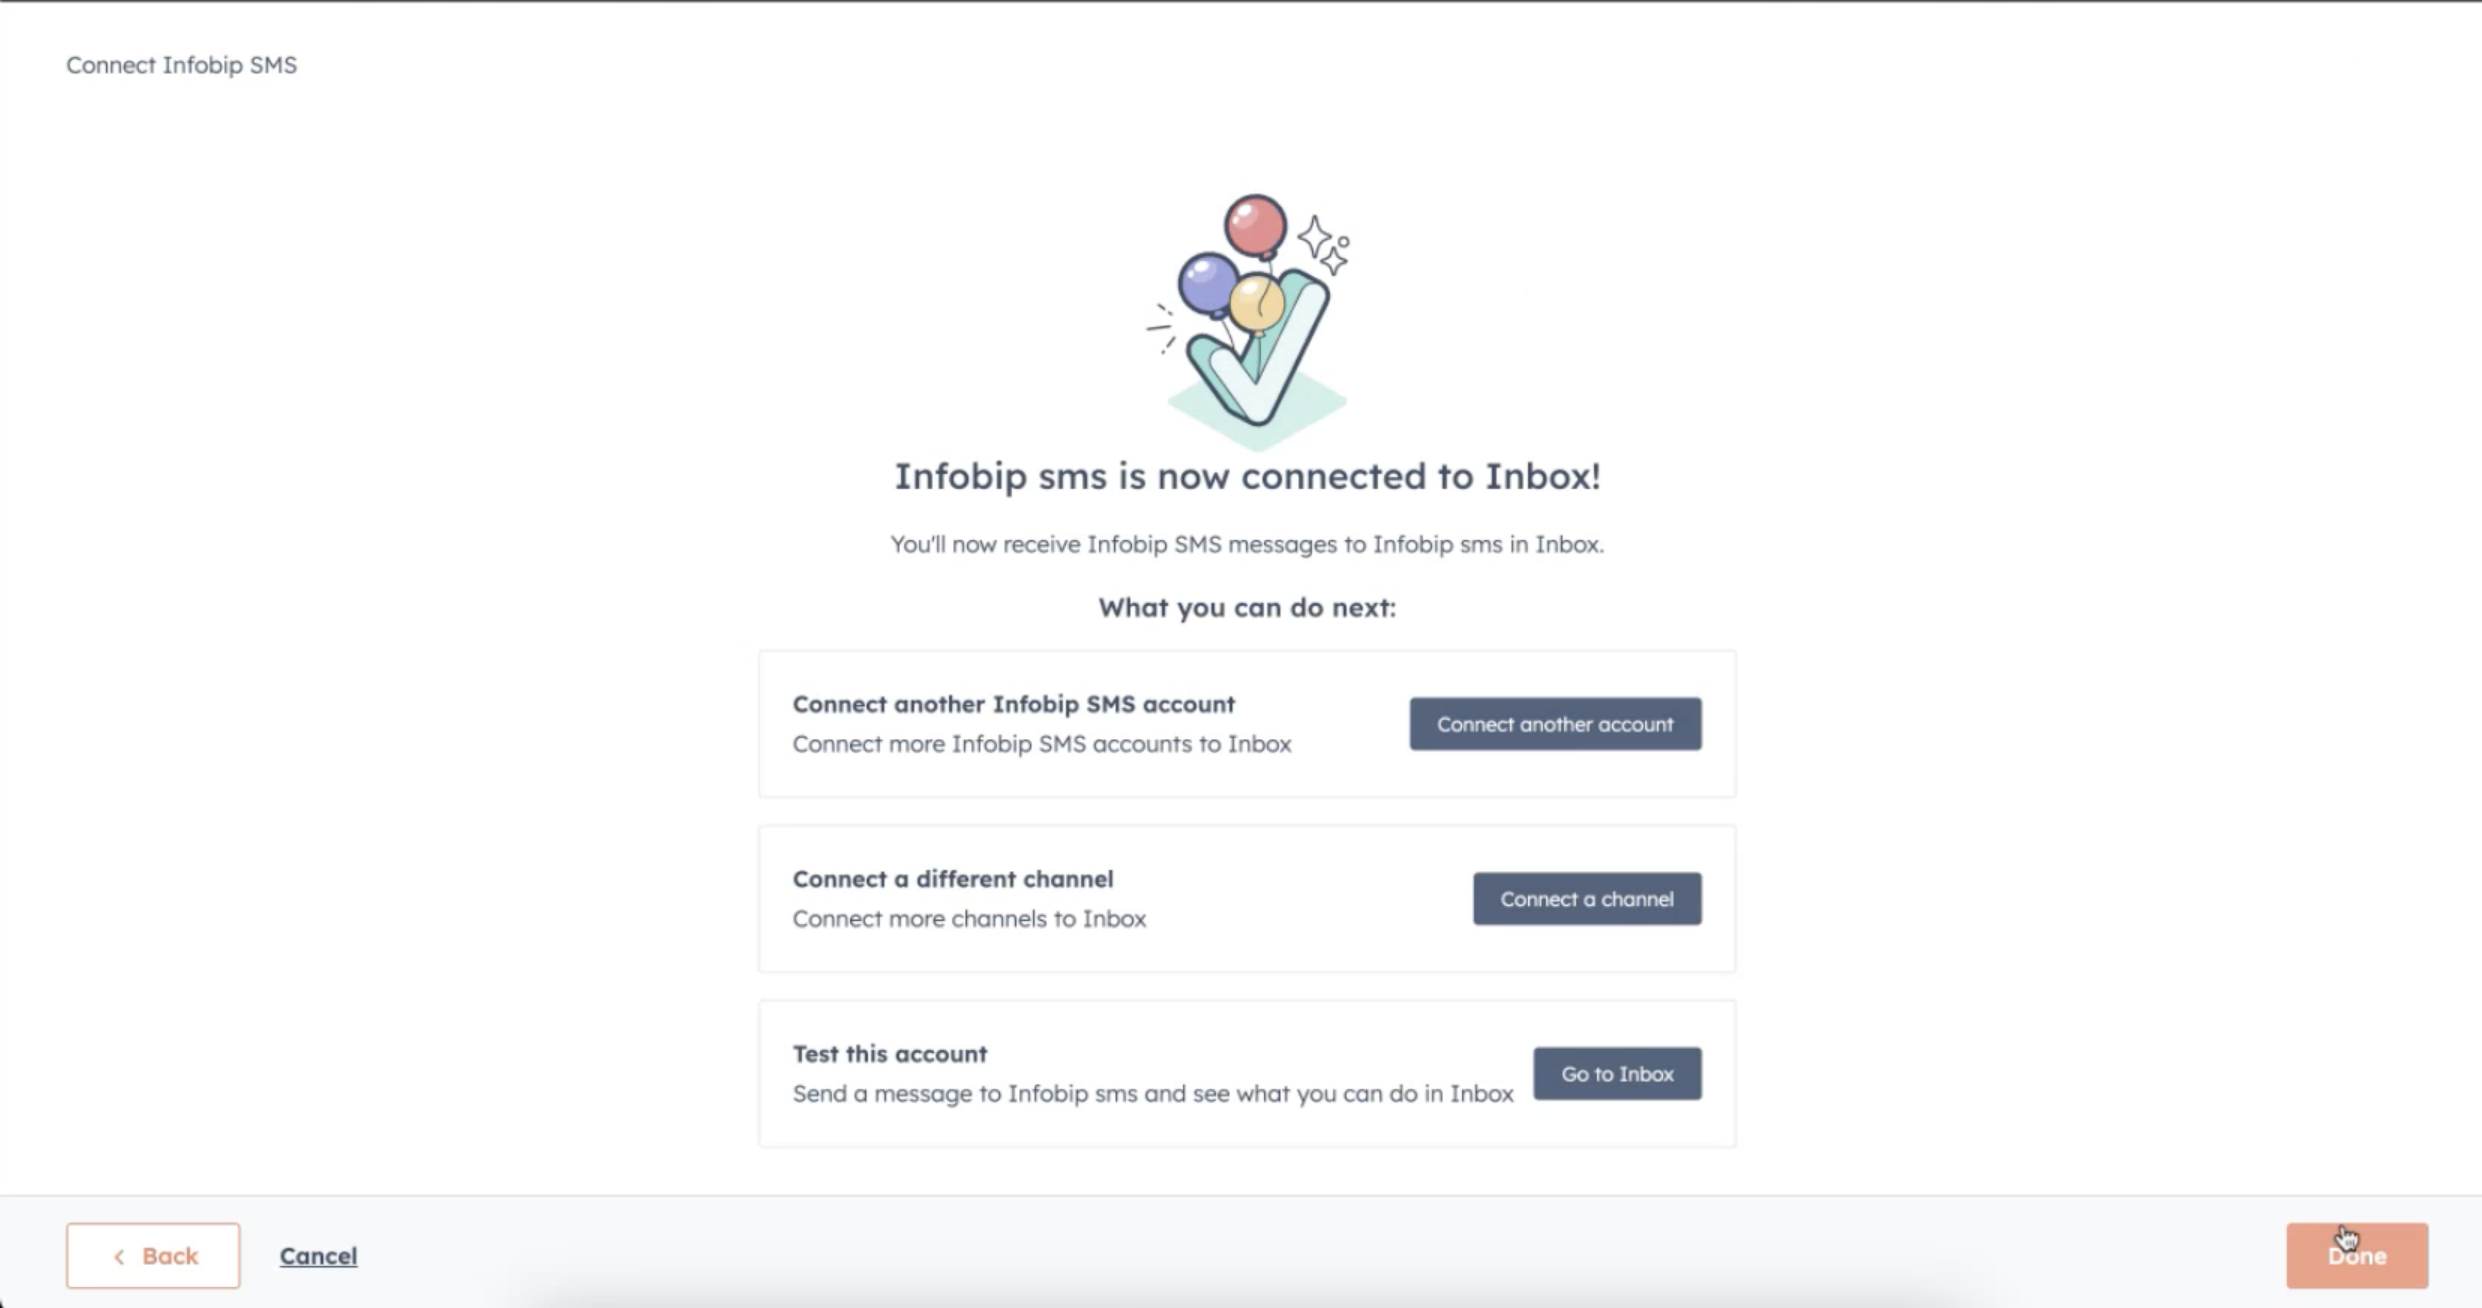
Now, select Go to Inbox and you can start your conversations.
Send a message from the entity
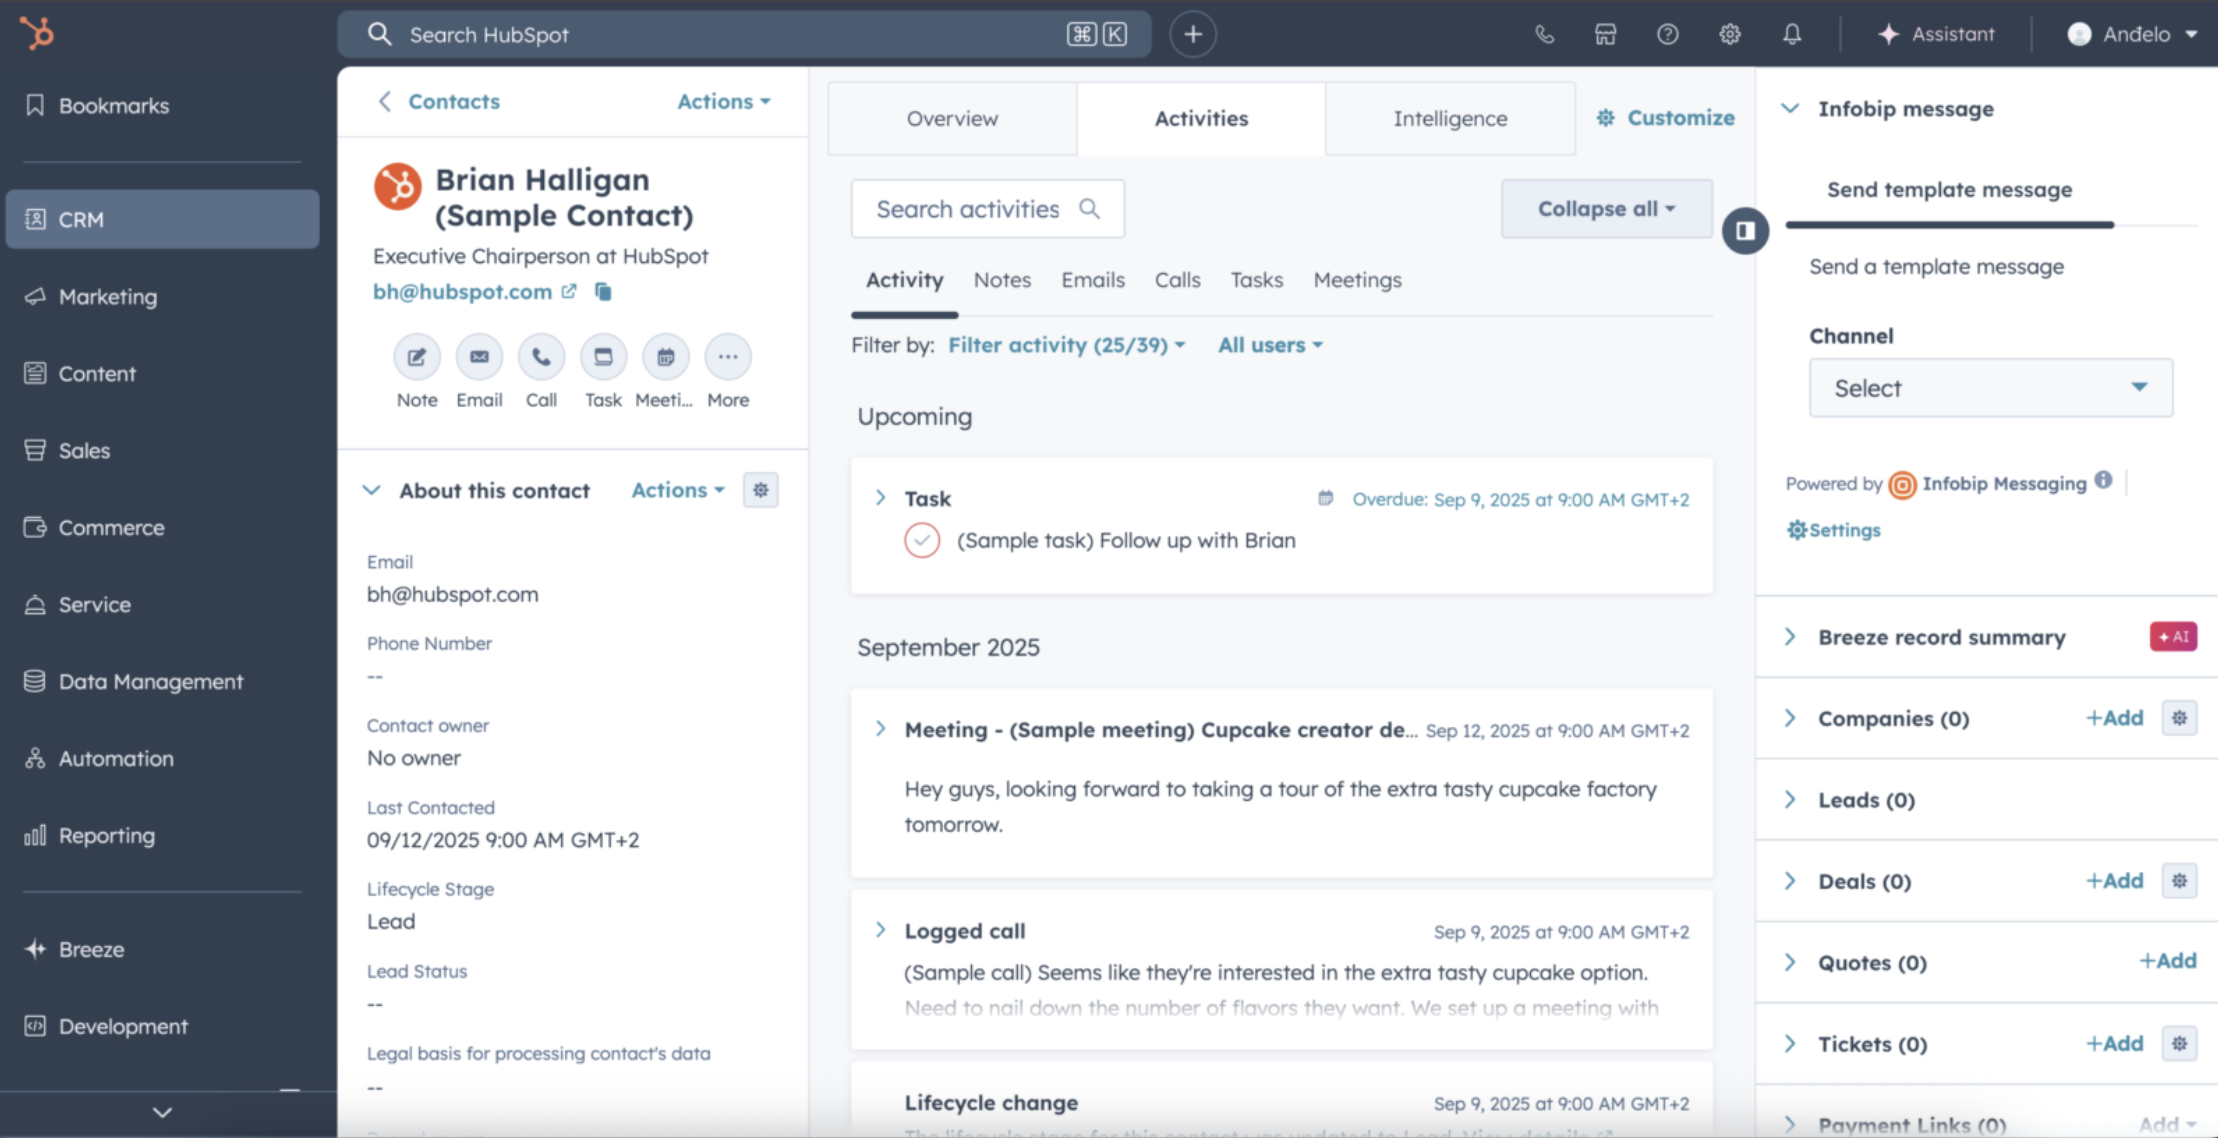
Use the Infobip messaging card in HubSpot to send a single message to a contact directly from a CRM contact record.
You access the Send Single Message feature using a custom UI Extension card in the HubSpot contact record sidebar.
WhatsApp is the only supported channel.
To ensure that the messaging card appears on the CRM Contact Record page, configure the following steps in HubSpot settings:
- Go to Settings > Integrations > Connected Apps.
- Locate and select the Infobip Messaging application.
- Go to the App cards configuration tab.
- Under the App cards section, ensure the card is enabled for the desired locations, typically Helpdesk and CRM Record Page.

- On the CRM Record Page (Infobip message), select Manage locations.
- In the panel that opens, locate and tick the checkbox for the Infobip message card.
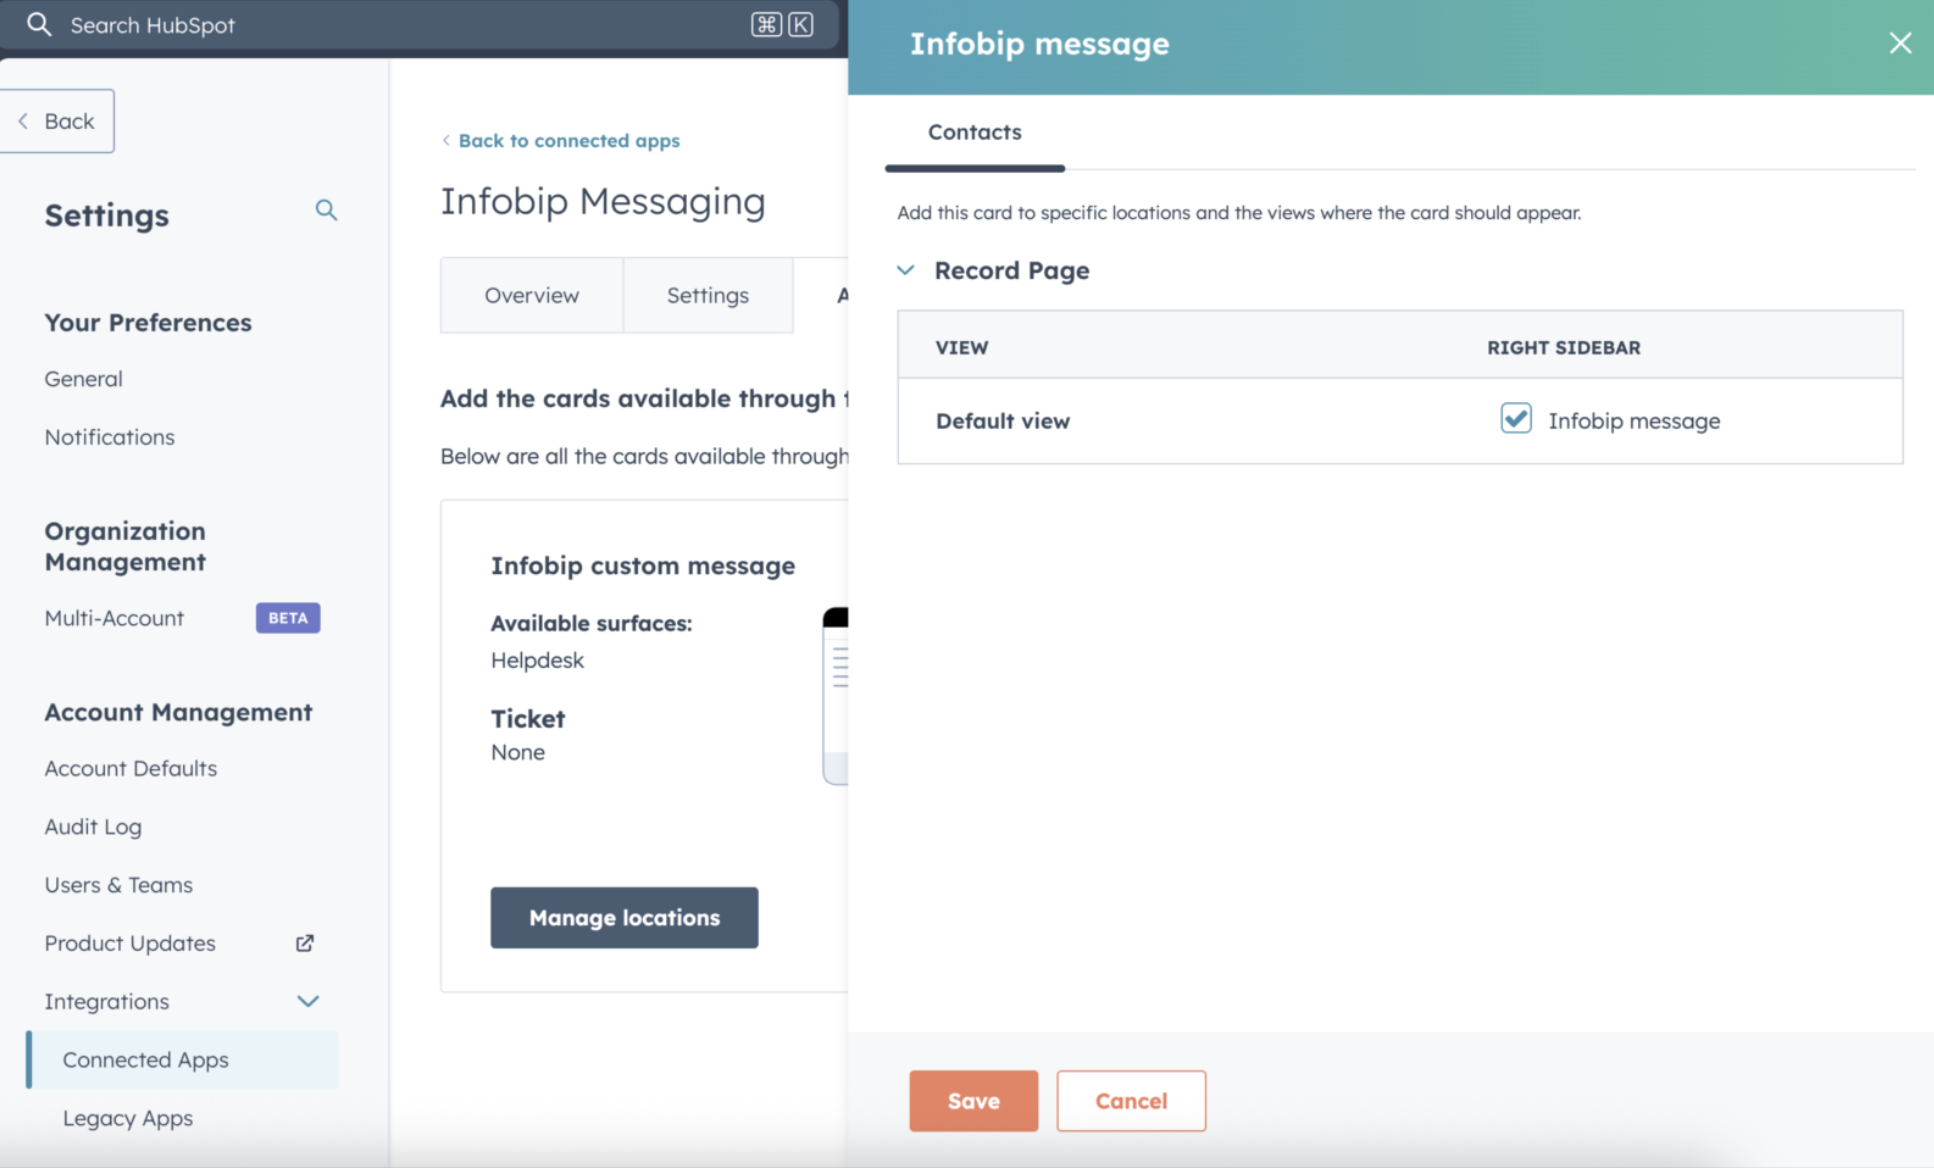
- Select Save.
When you select Save, the Infobip message card is added to the CRM Record sidebar on all contact records.
To compose and send a message, use the following steps within the Contact Record:
- Select channel: Choose a communication channel (for example, WhatsApp) from the drop-down menu.
- Select sender: Select a sender from the list of available senders that are specific to the channel.
- Select template: Select a template from the list of available message templates.
- Review and fill placeholders:
- A preview of the selected template is displayed.
- If the template contains any placeholders (variables), corresponding input fields will render, allowing you to enter the necessary dynamic content (for example, image url).
- Review the message preview, and then select Send Message.
The message is then immediately sent to the contact associated with the record. 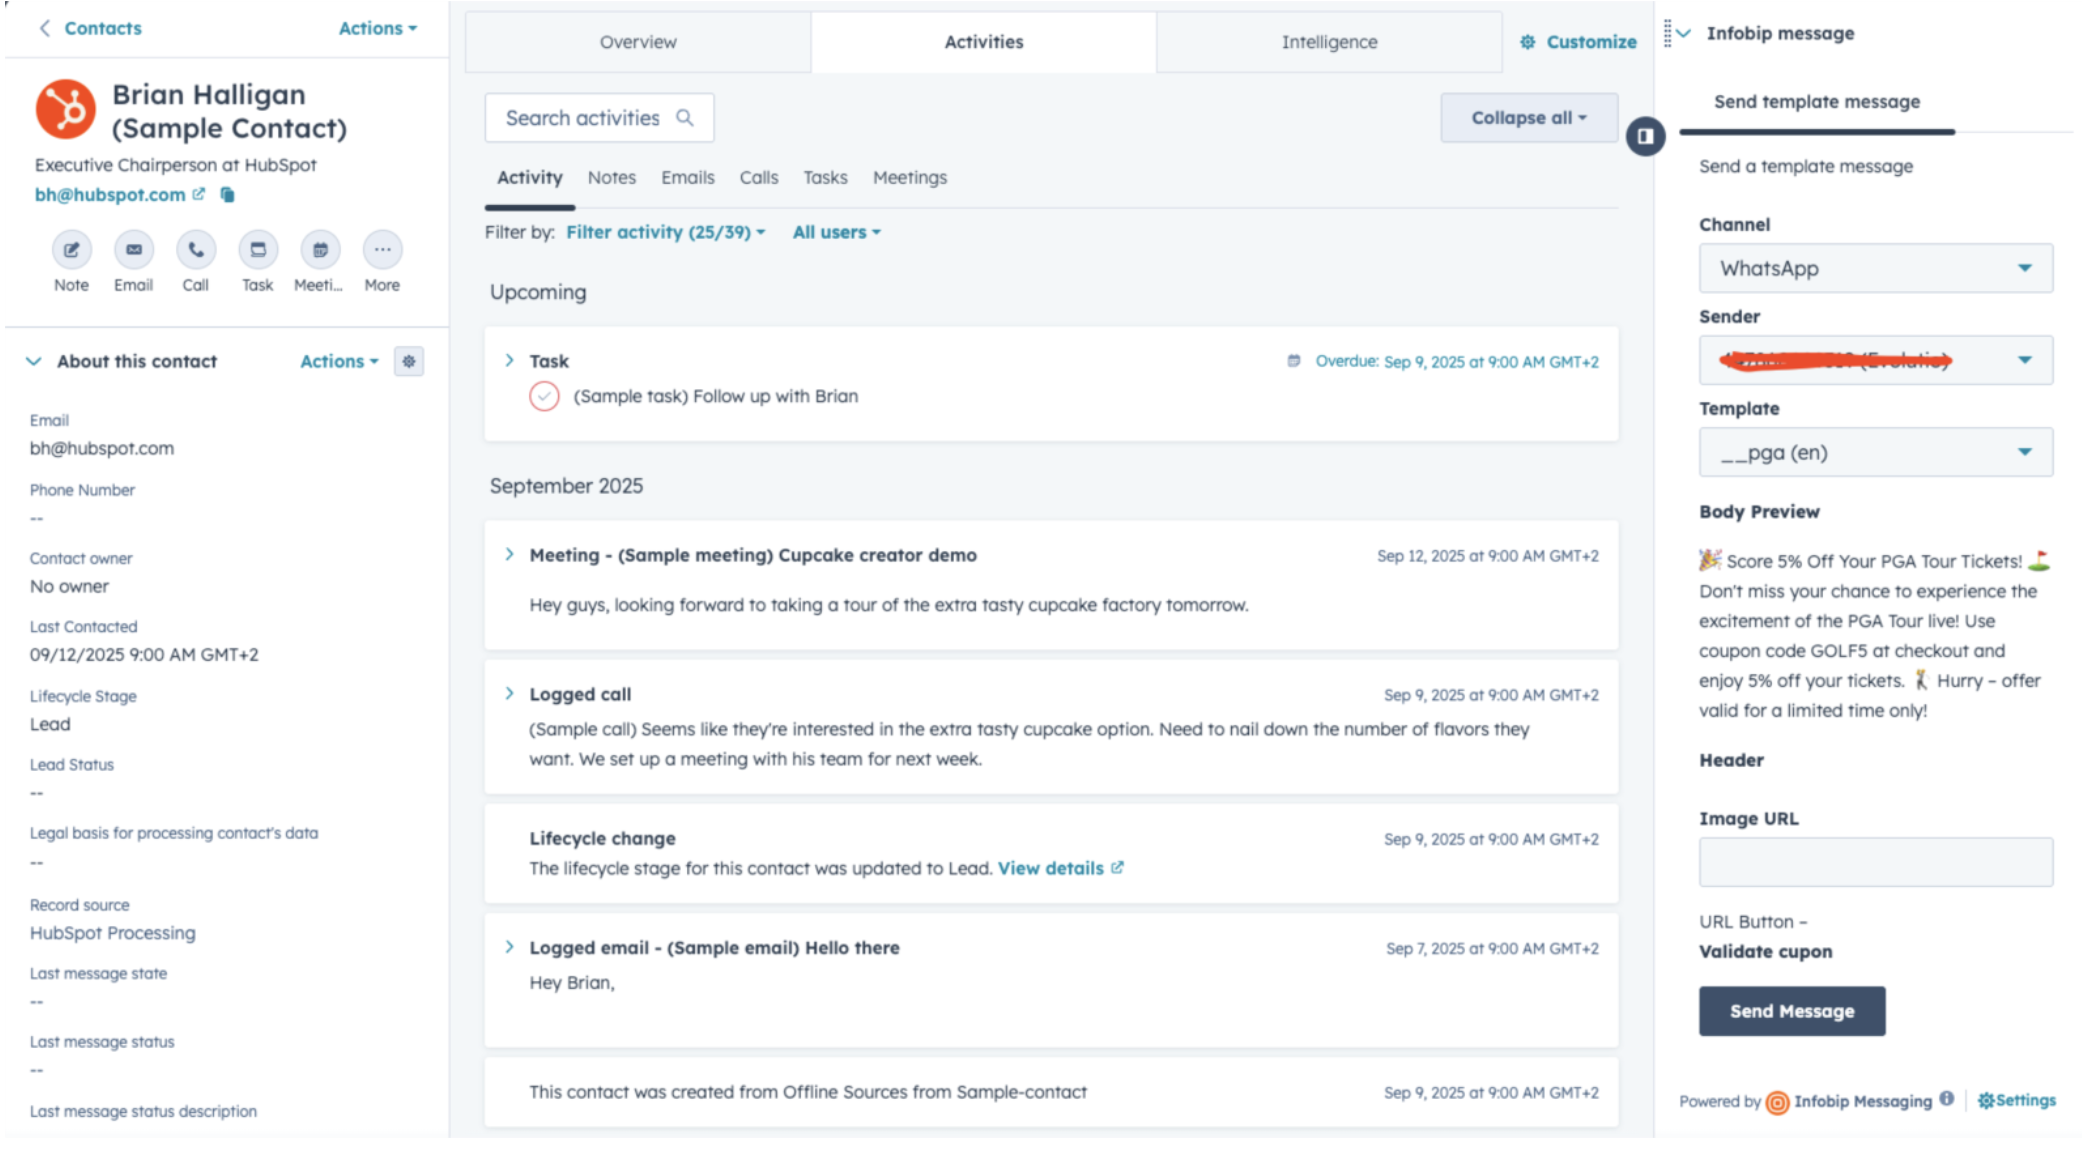
If there is no contact saved and the customer replies on a workflow campaign, the number is saved to the contact list with “--” naming.
When you have more information on the customer, you can edit the contact and fill in the fields.
User properties
The application automatically creates a set of properties that relate to the most recently sent message for a contact. These properties are grouped inside a property group called Infobip Last Message Information and can be shown or hidden in the contact view.
These properties are updated when a message is sent to the contact and whenever a delivery report is received, so that they reflect the latest status.
Use contact properties in workflows to react automatically to message status updates.

You can configure the workflow and arrange branching based on any property available from DLR (for example, Status Group name, Detailed Message Status, Inbound Reply Text).
Set up workflow branching
This example shows how to set up branching based on the Last Message Status group:
- On the create workflow screen, select Edit > Enrollment trigger to set up the triggers.
- Add the channel and the message you want to send.
- Select Edit > Add action and add a Delay action. Set the delay to 5 minutes.
- Add a Branch action by selecting Edit > Add action > Branch. Choose One property or action output, and then search for and select Last message status.
- After selecting the Last message status property, select Next. On this step, create and name separate branches for each message status you want to track.
- Optionally, add an action to trigger a message notification when a specific condition is met.
When all actions and branches are configured, the completed workflow will match the following example screenshot.

Disconnecting inbox
If you no longer want to receive messages in a connected inbox, you can disconnect the channel from HubSpot.
- On the Home page, find CRM in the left sidebar menu and choose Inbox.
- When the Inbox page opens, find Inbox Settings at the bottom.
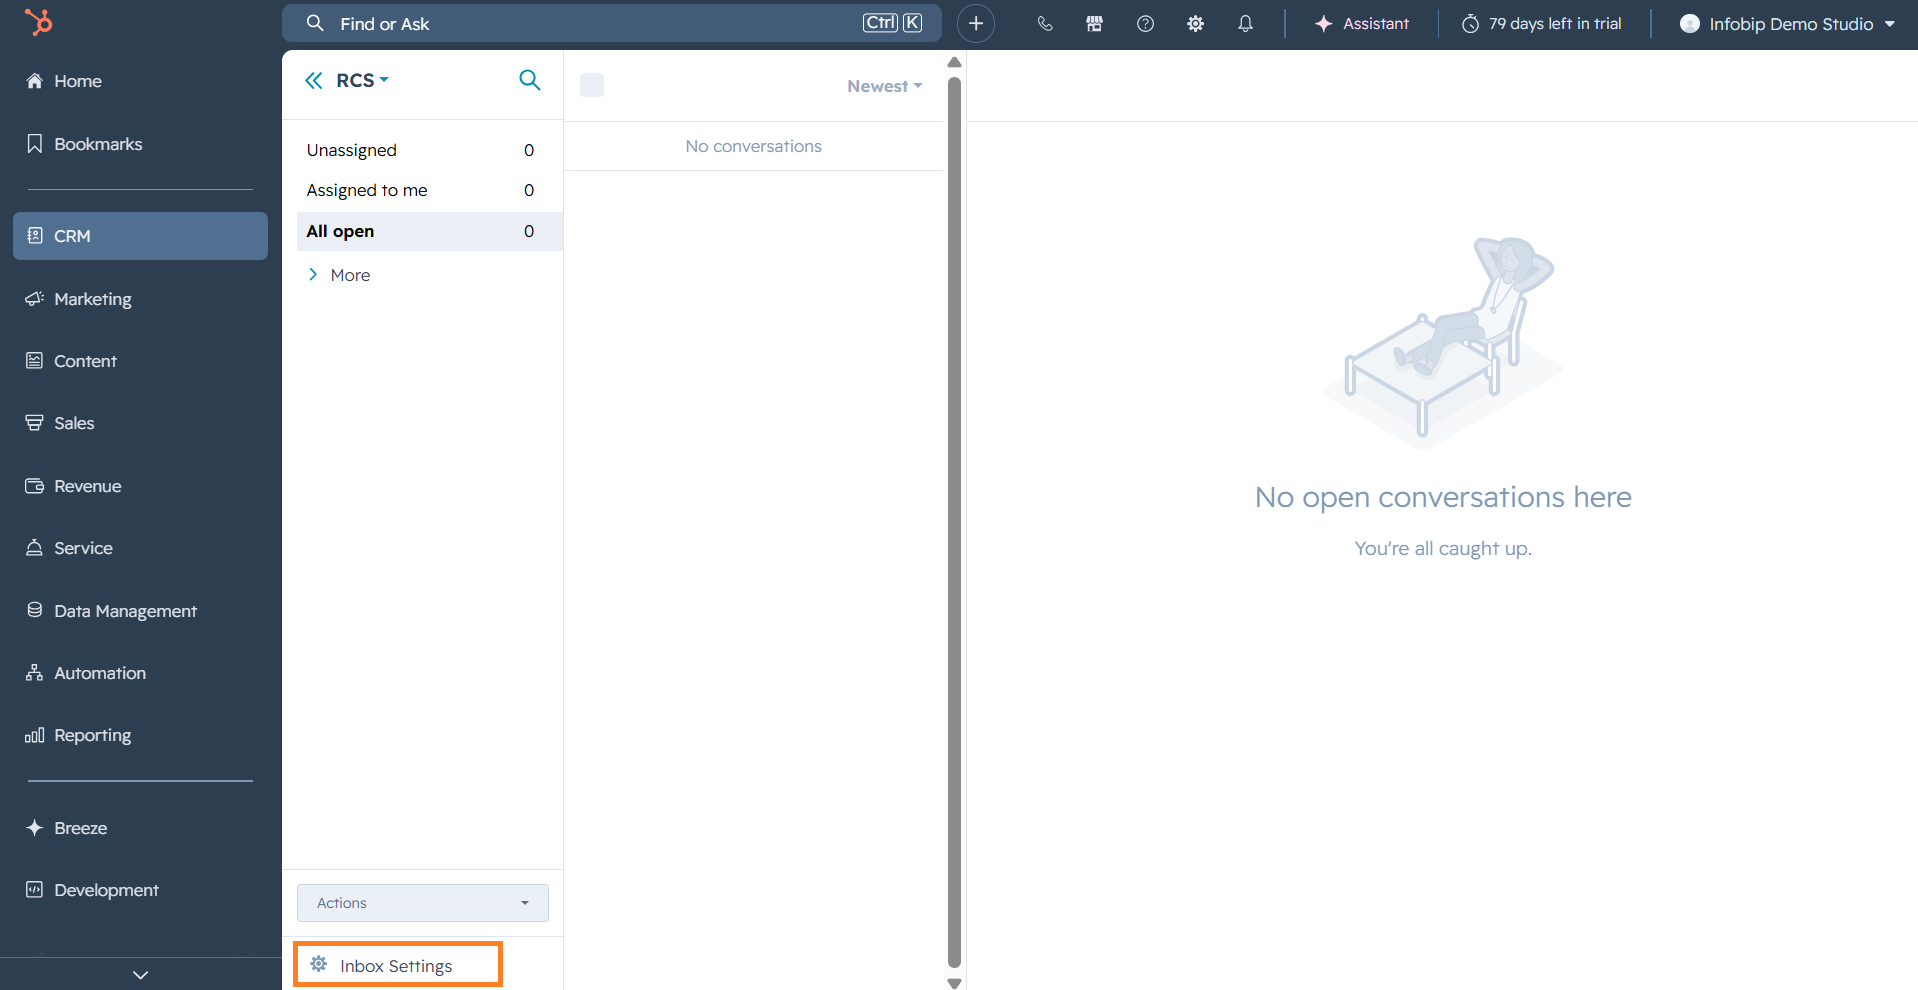
- Choose the channel that you want to disconnect the inbox from.
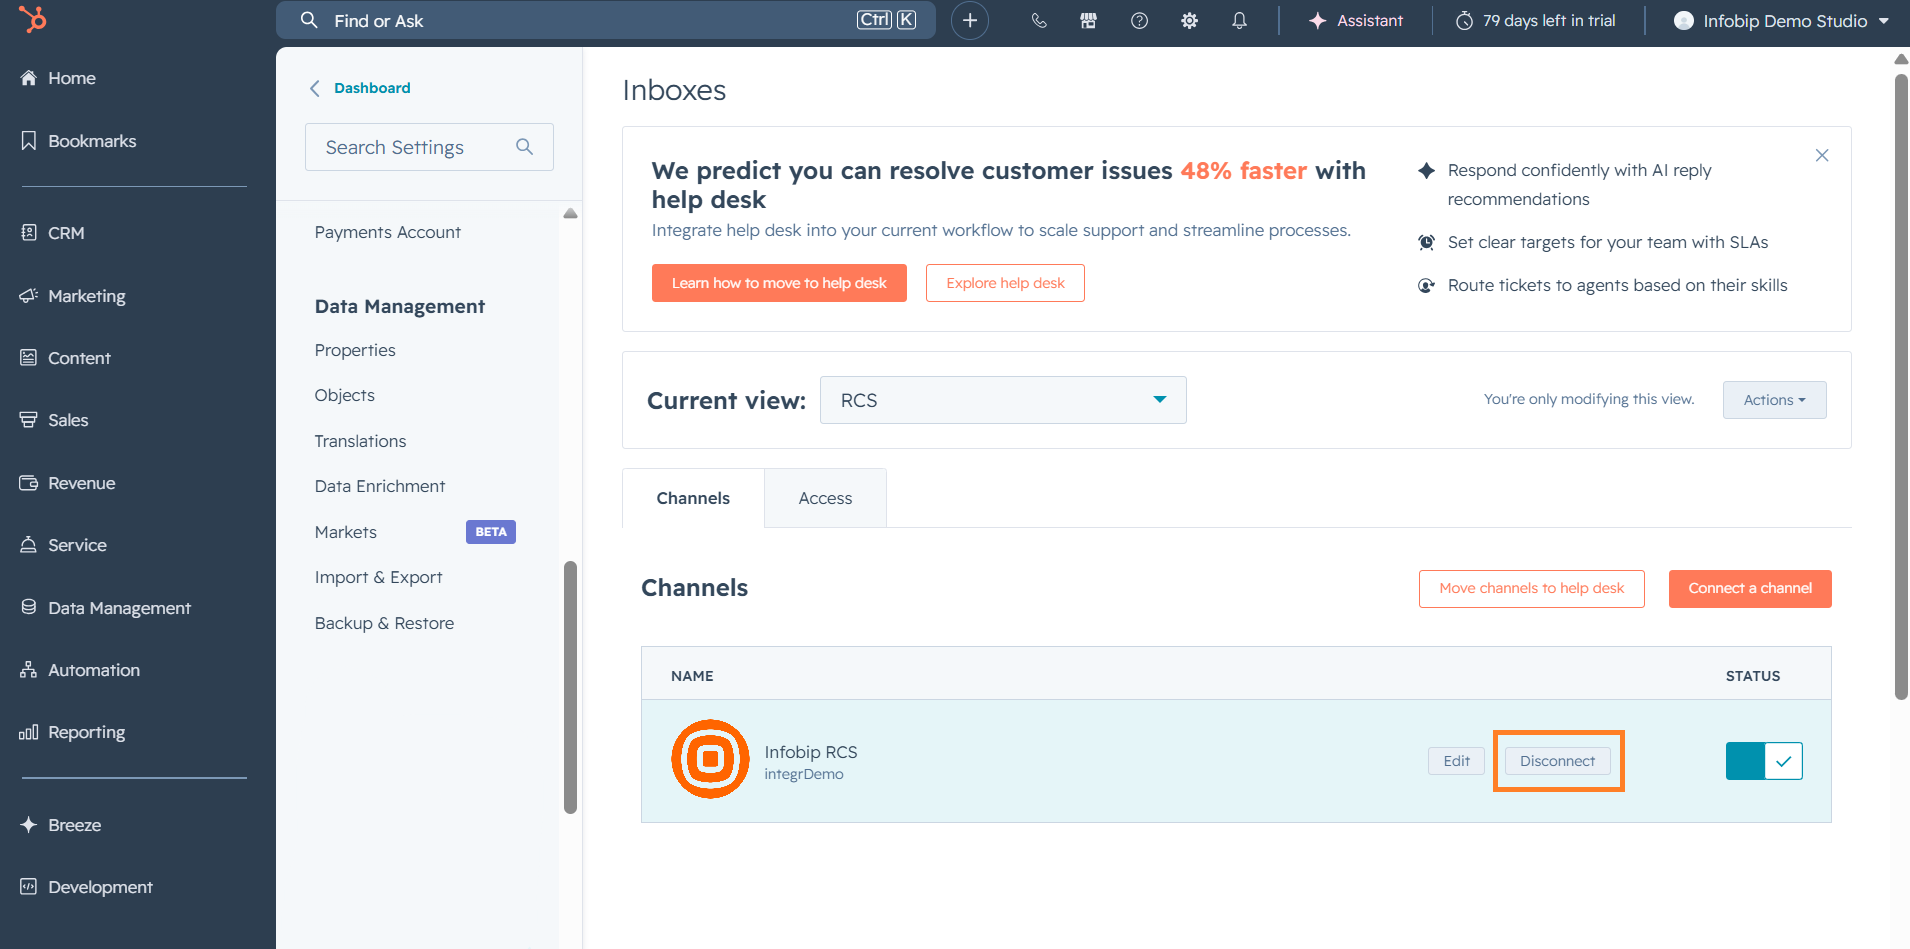
- Confirm that you want to disconnect the specific inbox.
You will no longer receive messages to this inbox. Existing conversations remain visible, but you will no longer be able to respond to them. If you want to use the channel again, select Connect a channel.
Your inbox is successfully disconnected.
How to uninstall the app
Remove the HubSpot app connection from Infobip when you no longer need the integration.
- In HubSpot, select the settings icon in the top navigation bar.
- Under General, search for Integrations in the left sidebar menu, and then select Connected Apps.
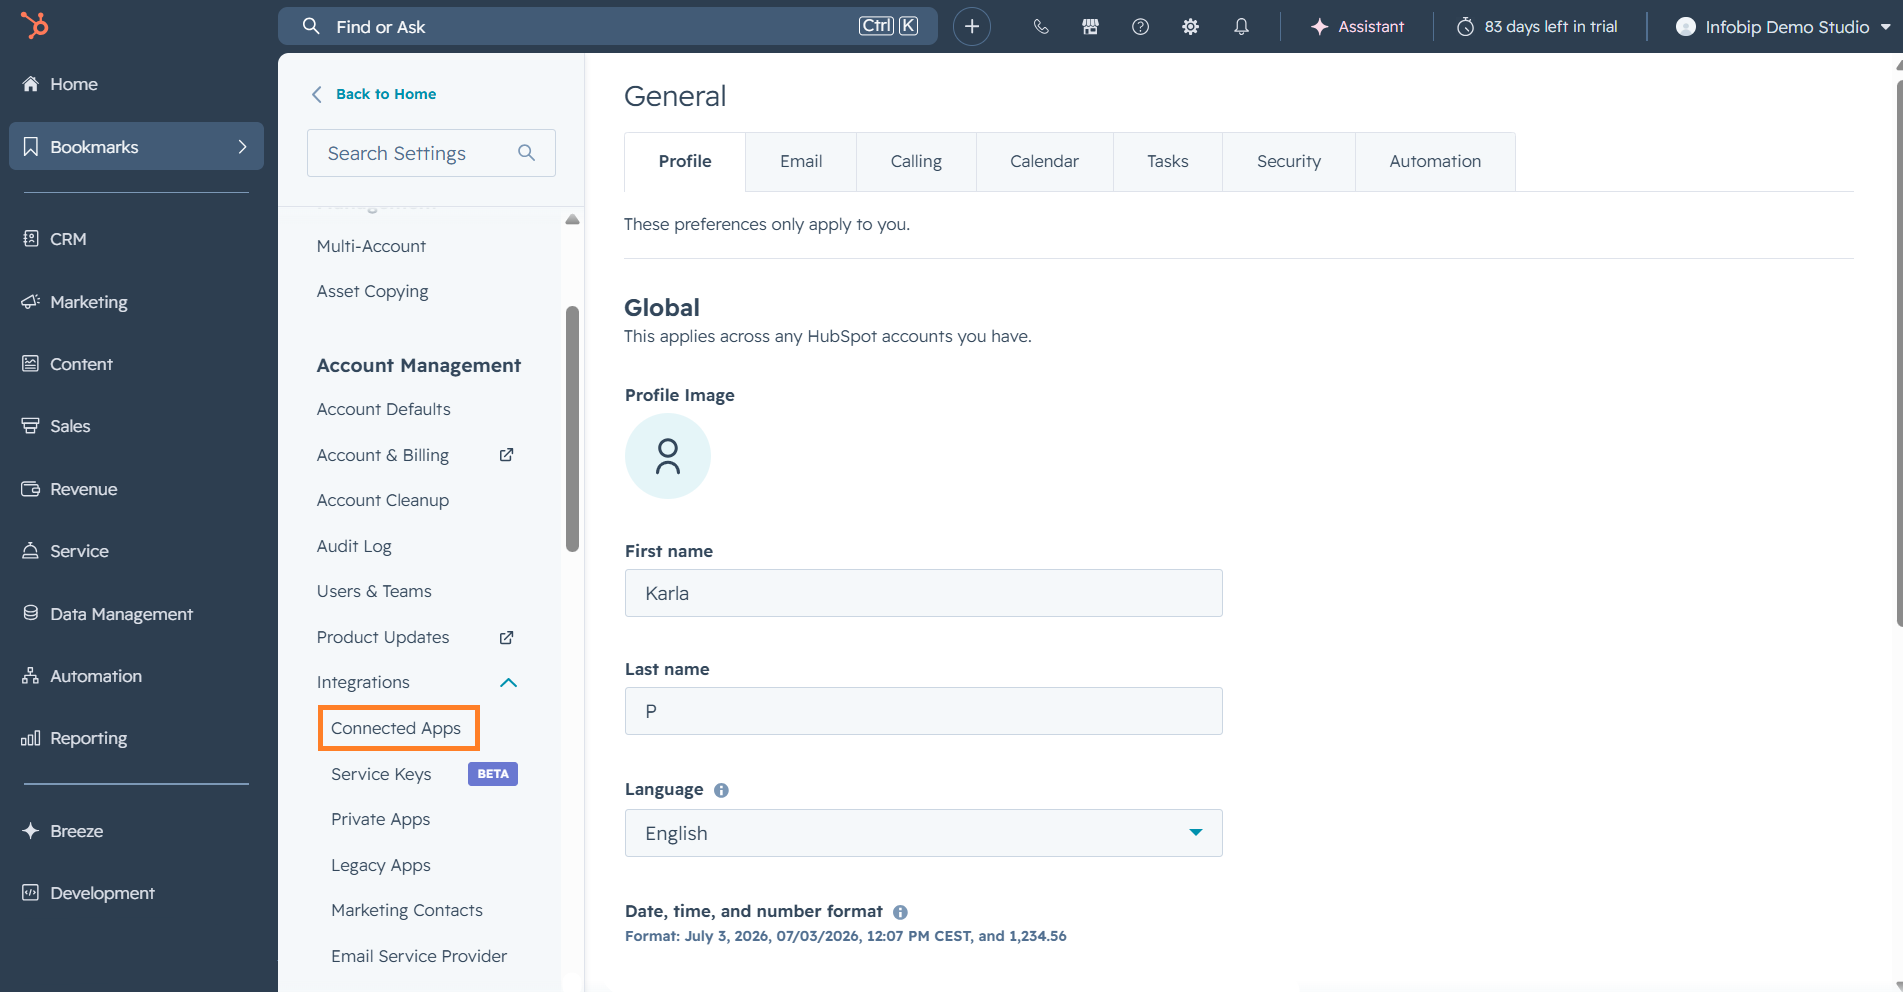
- On the Infobip Messaging app, select Actions.
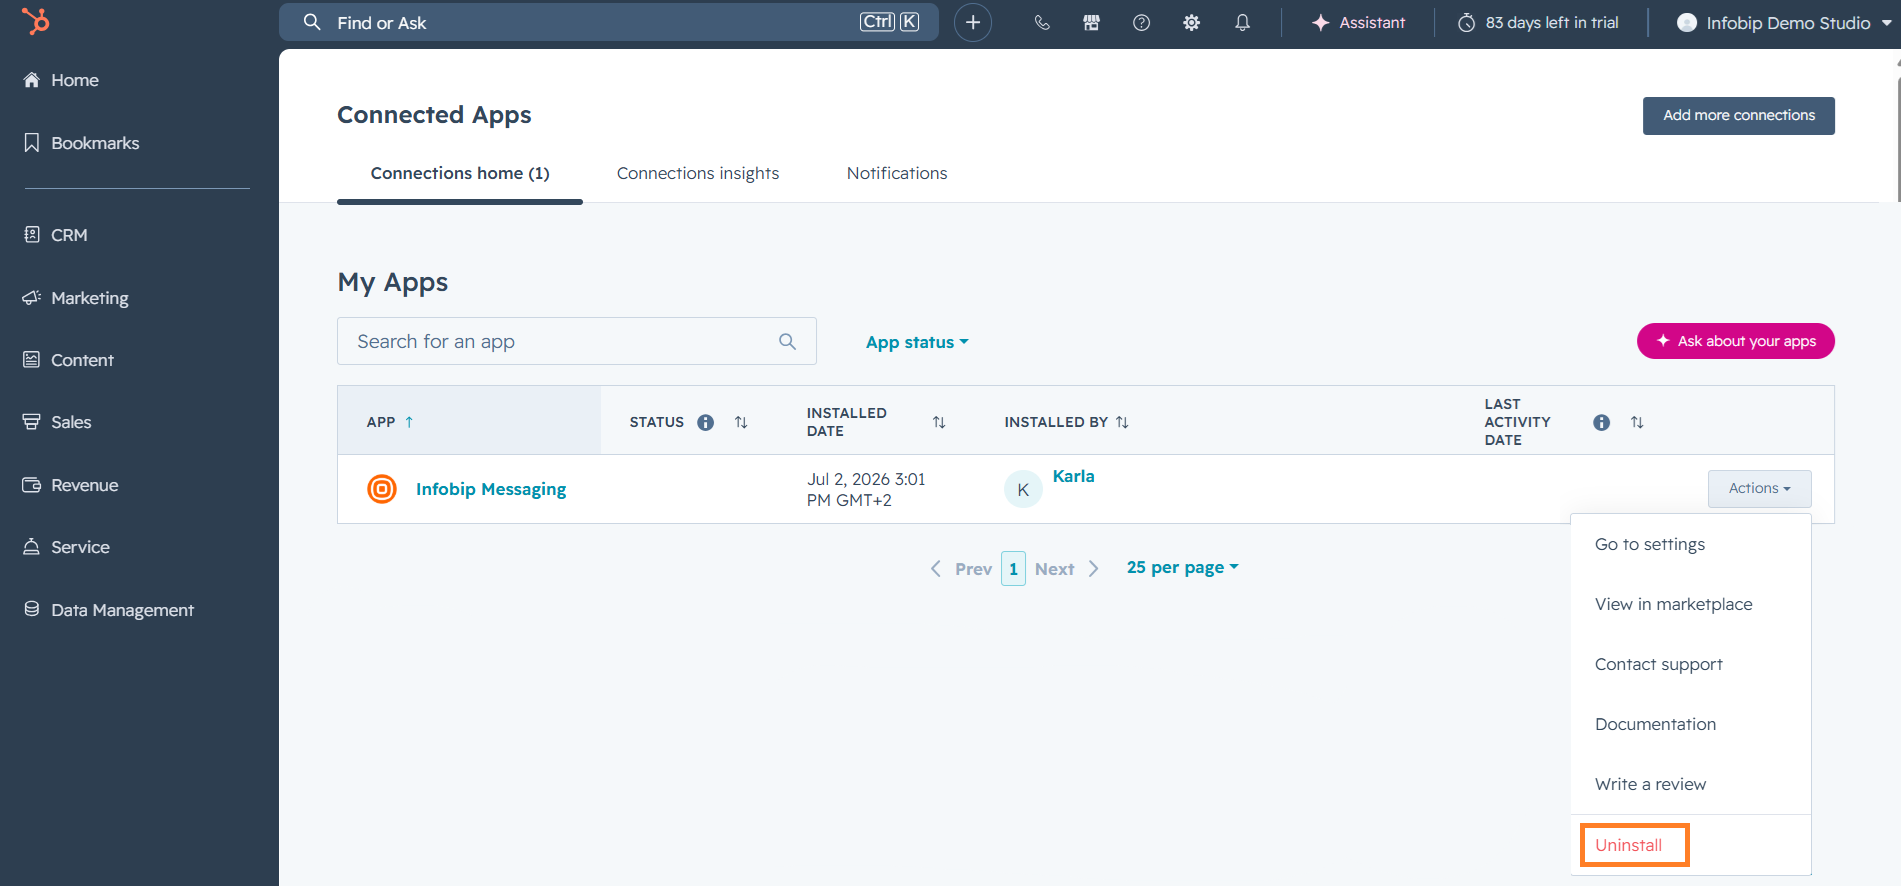
- Select Uninstall.
- When prompted, type
uninstallto confirm that you want to proceed.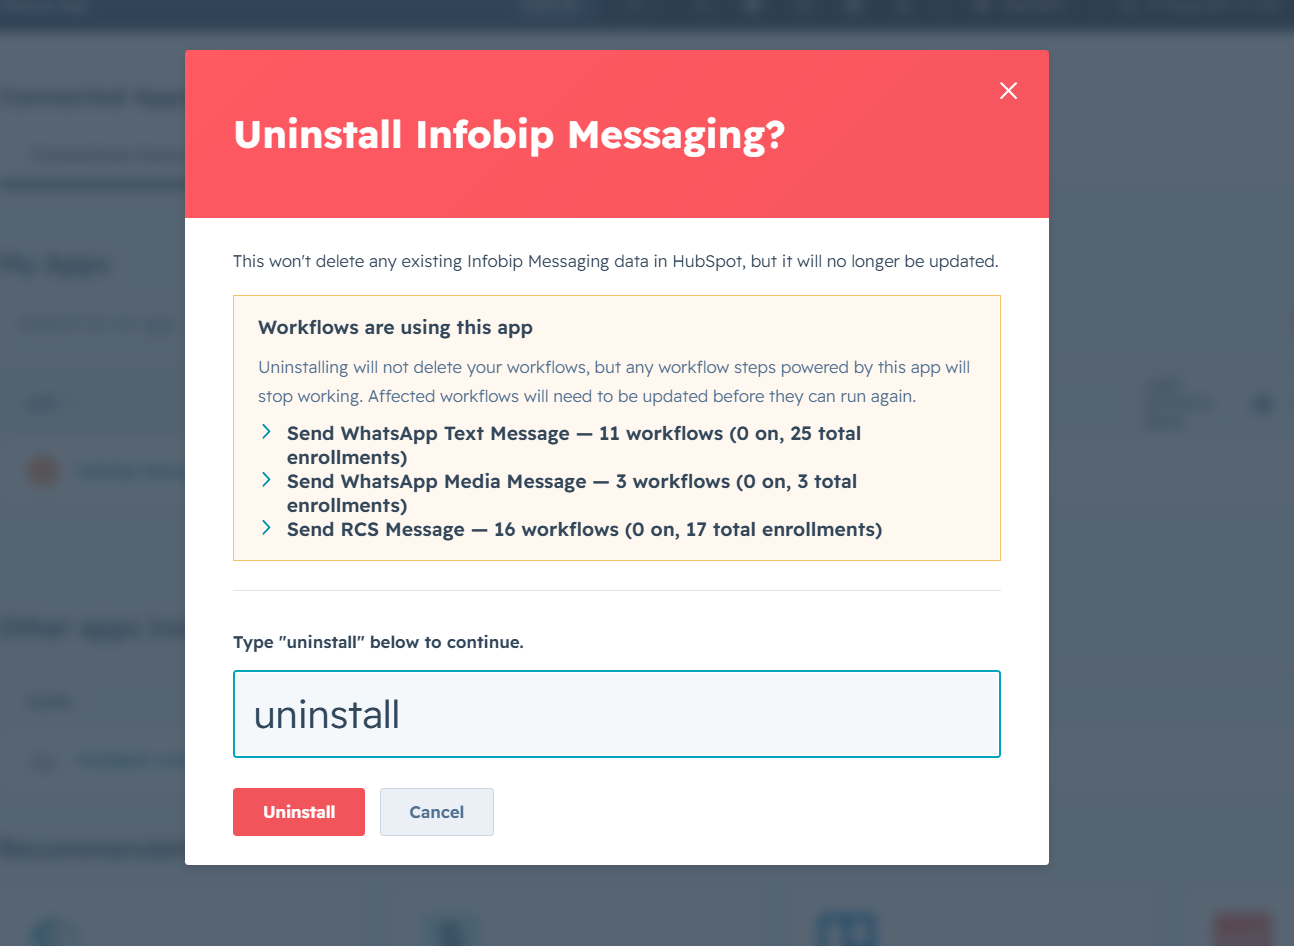
- Enter the reason for uninstalling the app. After you submit the form, the Infobip Messaging app is removed from your HubSpot instance.
All data related to your Infobip Messaging integration is deleted. For more information, see the HubSpot knowledge base.